
A wise man once said this:

This is true for the digital marketing world. If you don’t track where your marketing spend is going to and how effective they are, your company is likely wasting the majority of the advertising budget, not just half.
Thankfully, it’s not difficult to implement some basic tracking provided free, by Google. In this 4000 words mega-post I’m going to give you a step-by-step guide on how to implement Google Analytics using Google Tag Manager or GTM as it would be referred to for the rest of the article.
*Preface: This is a guide meant for business owners and marketers who struggle with wrapping their head around GTM, like myself! True story.
Table of Contents
Introduction to Tracking, Google Analytics and Google Tag Manager
At Adscelerate Marketing, whether our clients are doing Search Engine Optimization or Adwords Pay-Per-Click (PPC) campaigns with us, we always audit and implement tracking before anything else.
Few things you need before we begin:
Google Analytics ID
Google Tag Manager Account
Verified Google Search Console
Google Analytics (GA) is a free analytics tool that is very suitable for most businesses needs. Thankfully. Unless you are a pretty big enterprise or a Fortune 500 company with complex analytics needs, then we’ll go into the realm of Google Analytics 360 or other enterprise tracking solutions which would cost USD 150,000 per year and up. phew.

For all intents and purposes, Google Analytics will be the central hub to all our analytics needs. Where users come from (Acquisition) to how long they stay or what pages they read on your site (Behaviour), to whether they purchase from you or submit an enquiry form (Conversion).
So you see, if you don’t implement any tracking, you don’t know what works, even when something does.
Just by implementing tracking, you can do these two things which will easily increase your return-of-investment.
1) You will be able to eliminate channels which do not work for you. Say you are spending money on a display campaign, but from analytics, you can determine that the traffic quality is poor. Boom, instant money savings.
2) You can double-down on channels which are very effective for you. Say you are running Facebook Campaigns and statistics show that the campaigns work very well. You will then devote more resources to Facebook and scale up.
I’ll probably do a post on Google Analytics for Business Owners separately since the focus today is on how to demystify Google Tag Manager (GTM).
If you don’t have any of these, sign up for them first:
Google Analytics here: https://analytics.google.com/
Google Tag Manager here:
https://marketingplatform.google.com/about/tag-manager/
Google Webmaster Tools: https://www.google.com/webmasters/
Note: For the majority of the screenshots you see in the rest of the articles, sensitive information in the screenshots will be blurred for privacy.
Why Google Tag Manager? According to Google, it’s supposed to manage tags (tracking code etc) easy.

Well, to be honest, it took me a while to get over the initial hurdle as well. First the shock, and then the AHA moment. GTM is indeed made for marketers to make life easier. The goal of this article is to get you there just a little sooner than it got me. Cool?
In case you are still confused about what GTM is at this point:
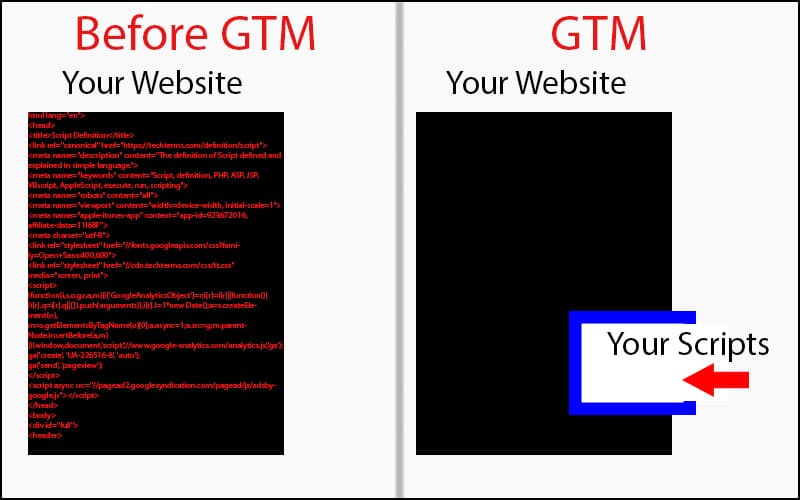
So before GTM, you have to open up the website, dig into the code and insert your tracking script and other code. Now, the box is the gateway to drop all your code snippets in an easy manner without having to do any coding on your website (mostly). And yes, you can switch codes, start OR stop a tracking code without having to bother your developer (mostly!).
Pardon the ugly drawing. Hope this analogy works for you!
It’s oversimplifying things, of course!
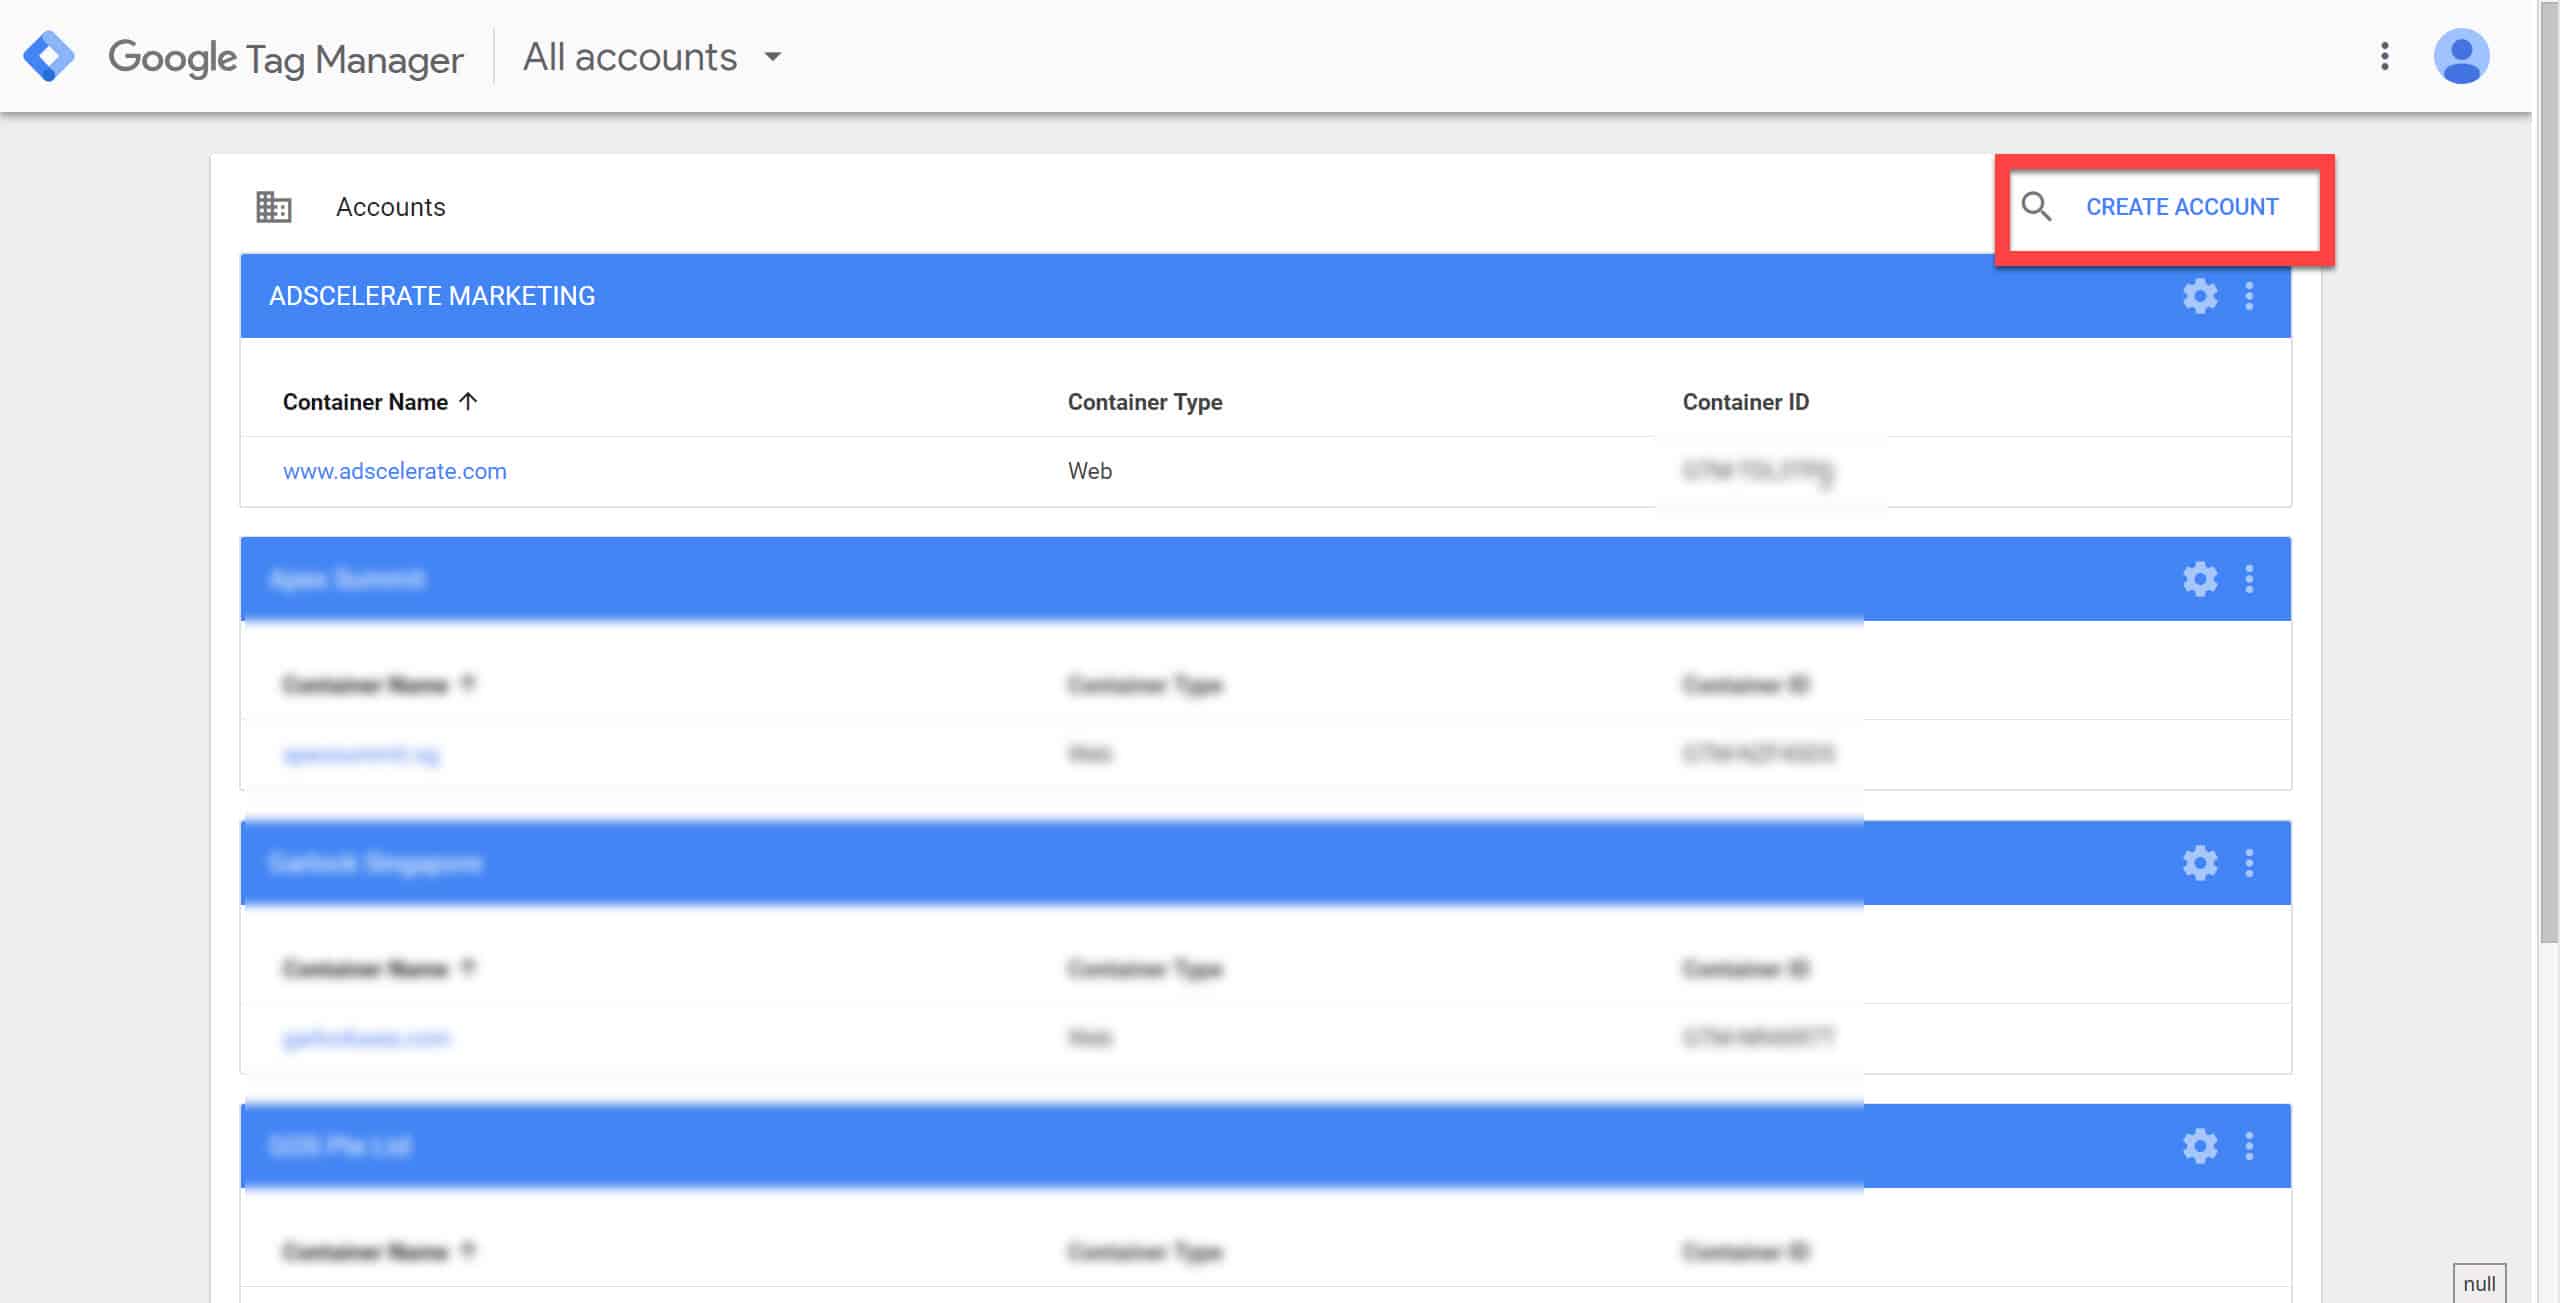
So now that you’ve signed up to Google Tag Manager –
Click on Create Account to start. I would break it down into one account per site. Just follow the procedure until you reach the Install Google Tag Manager Screen, like so:
Step 1:
Step 2:
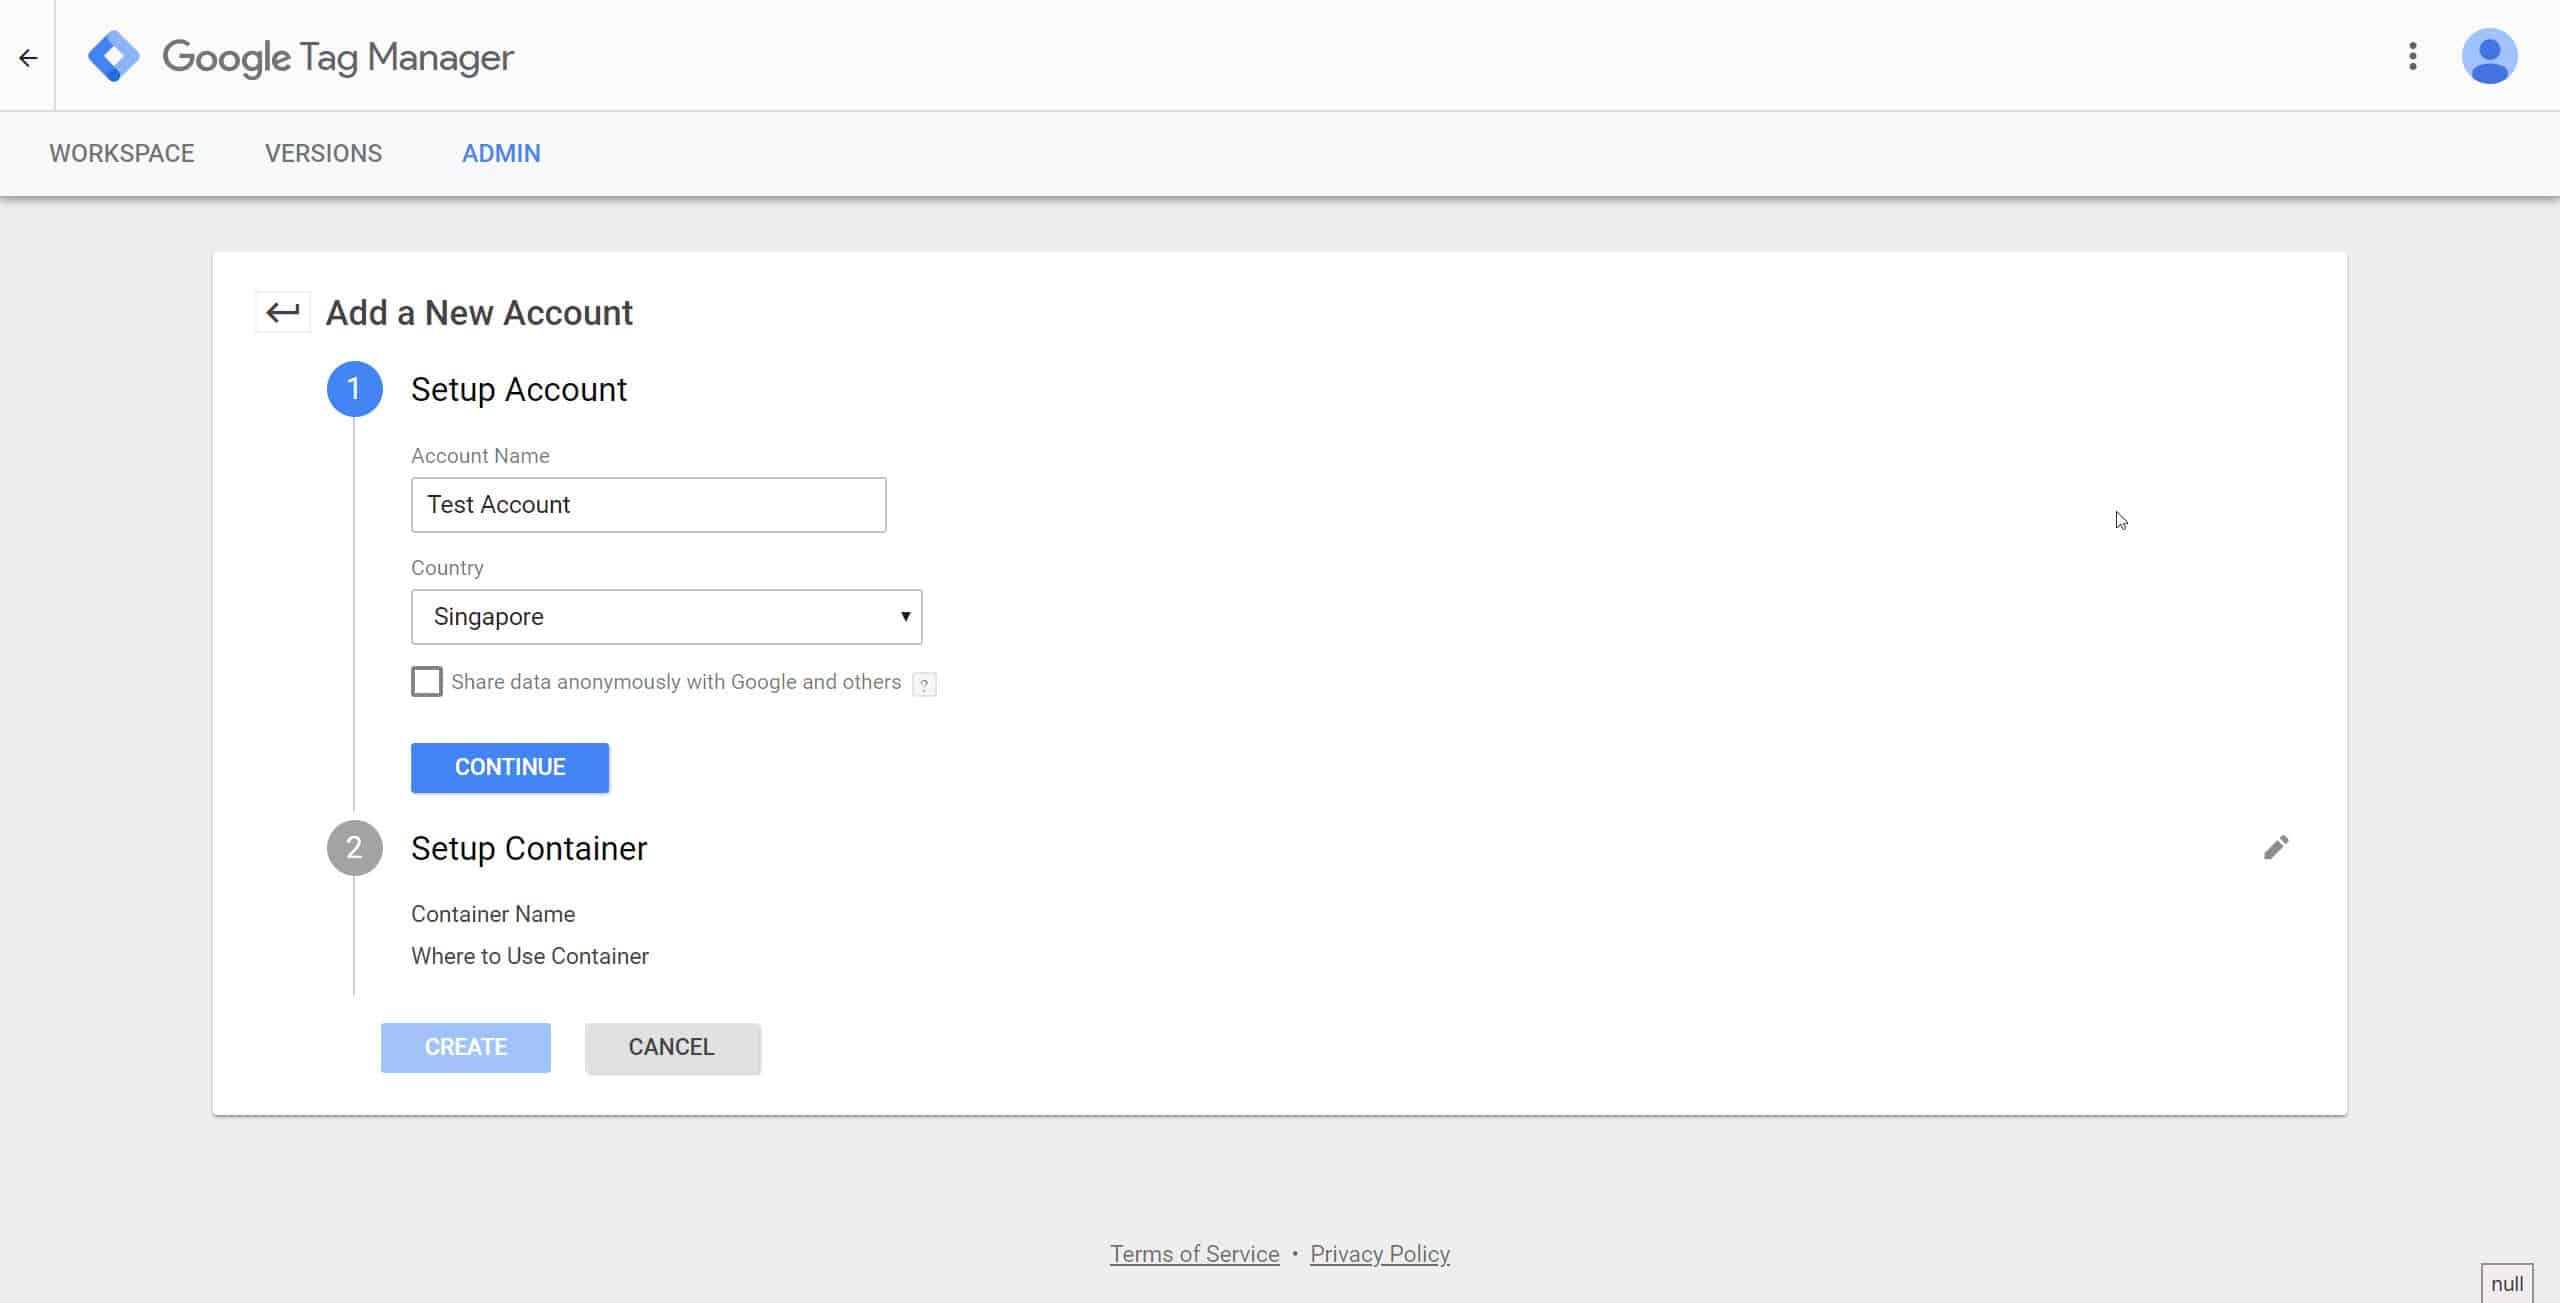
Step 3:
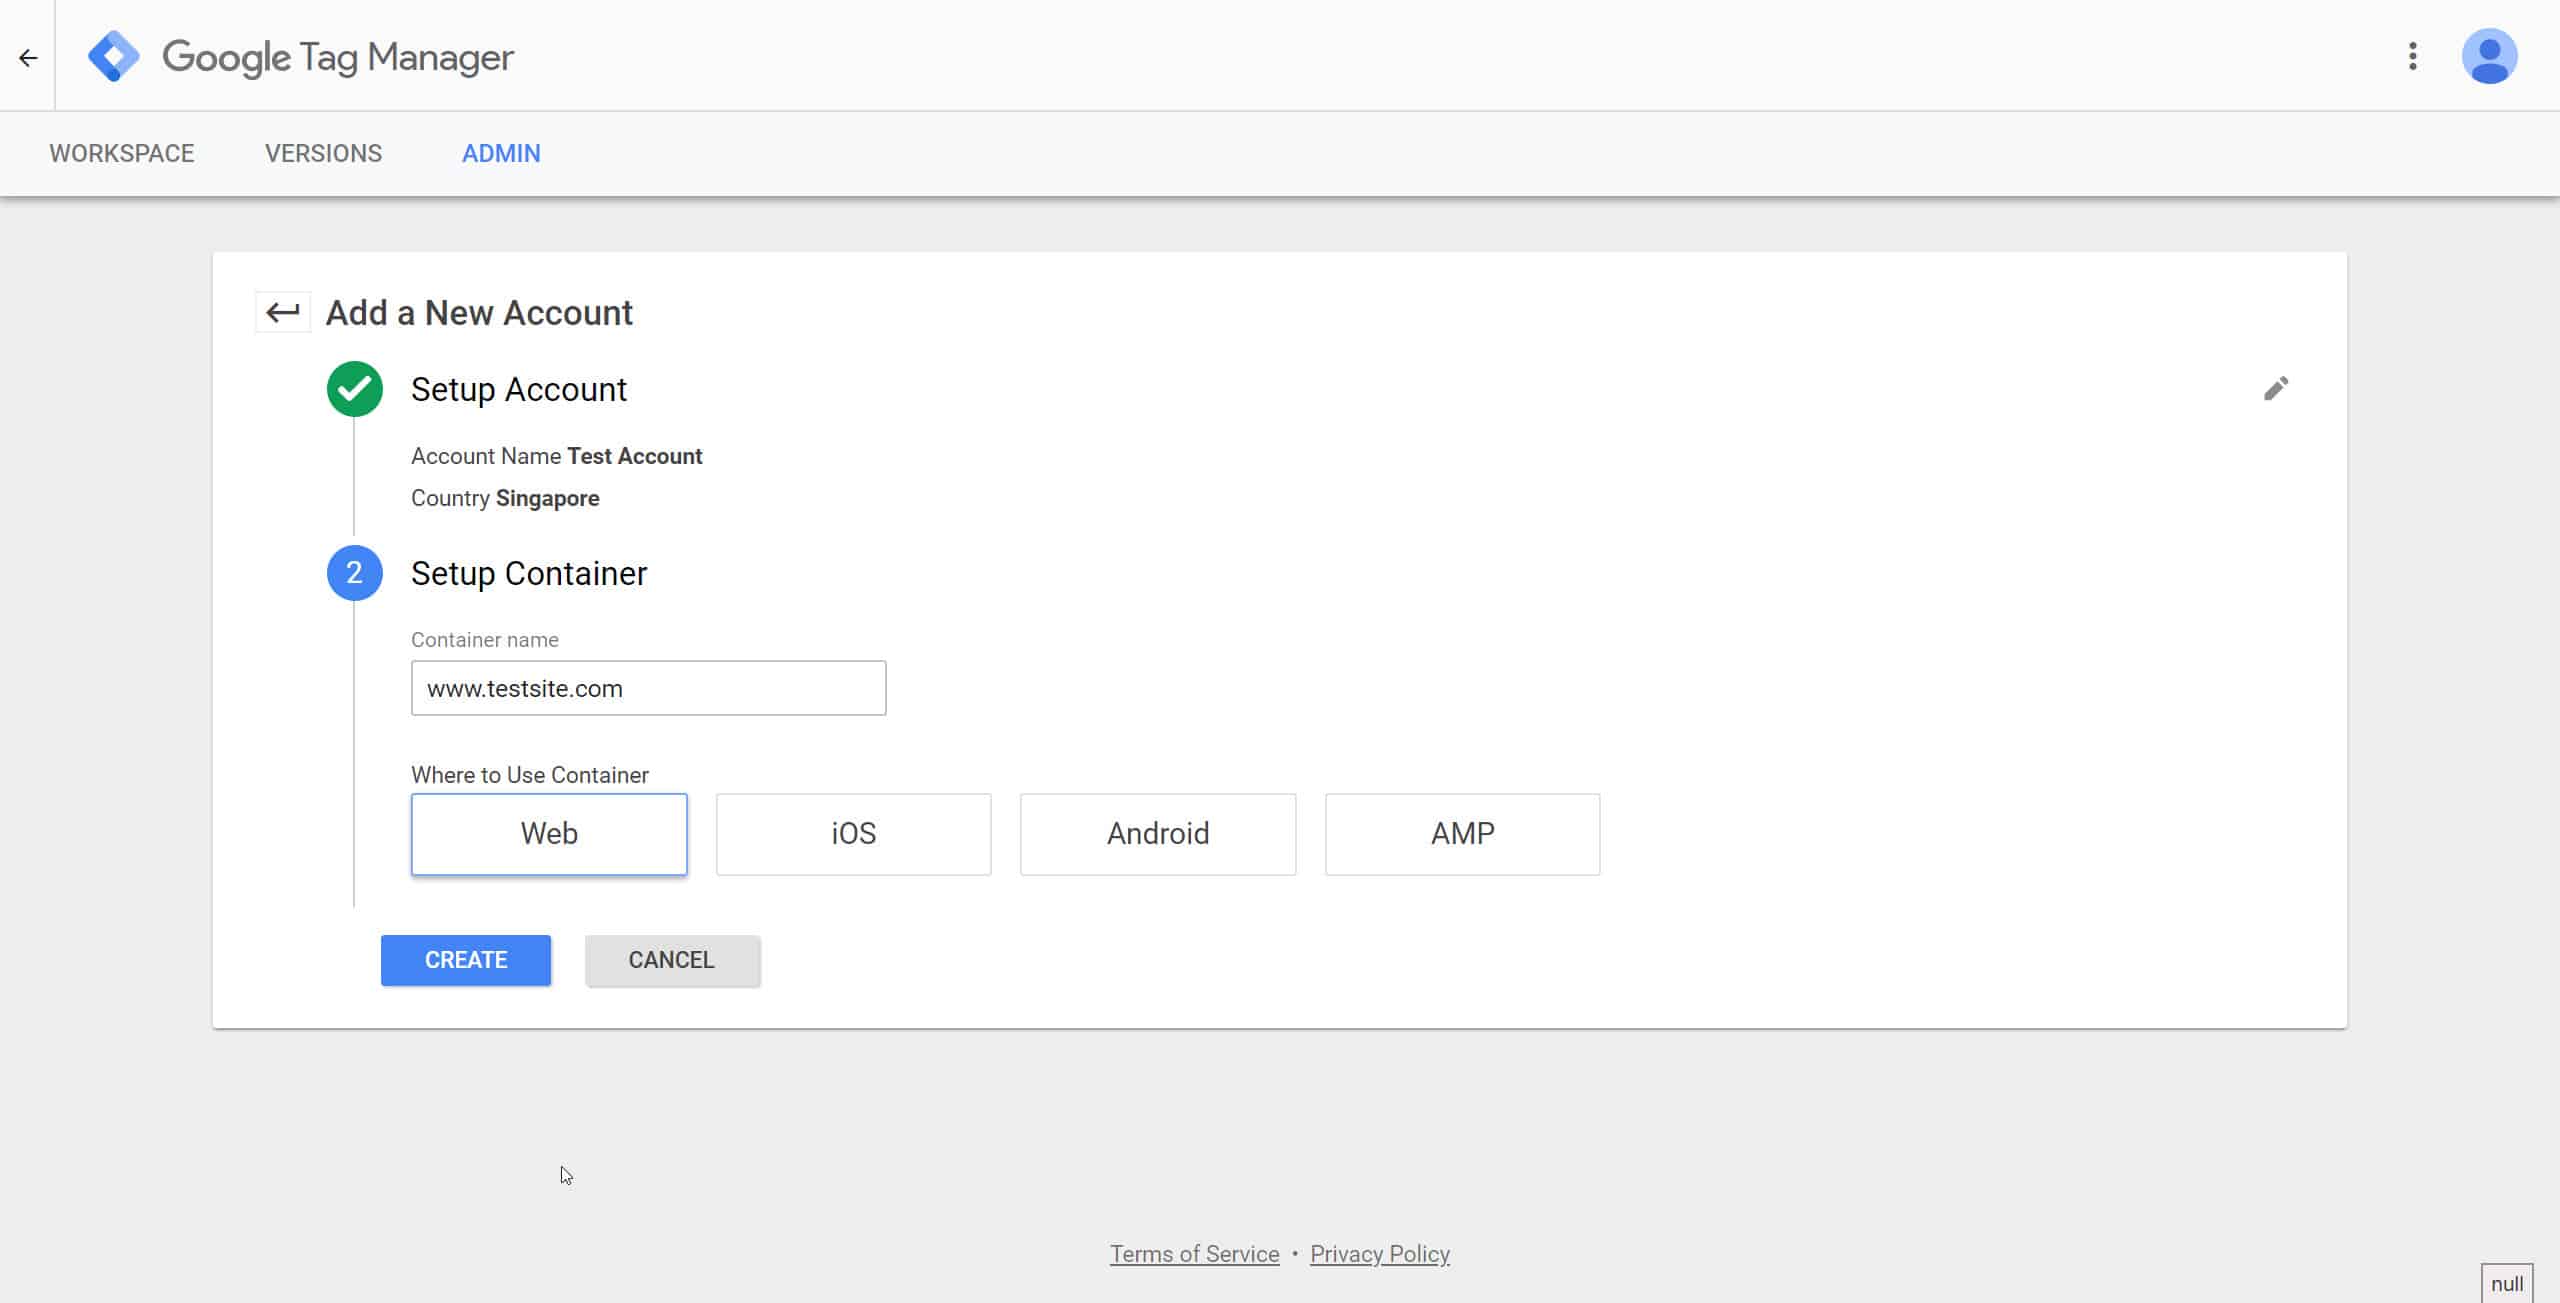
Step 4:
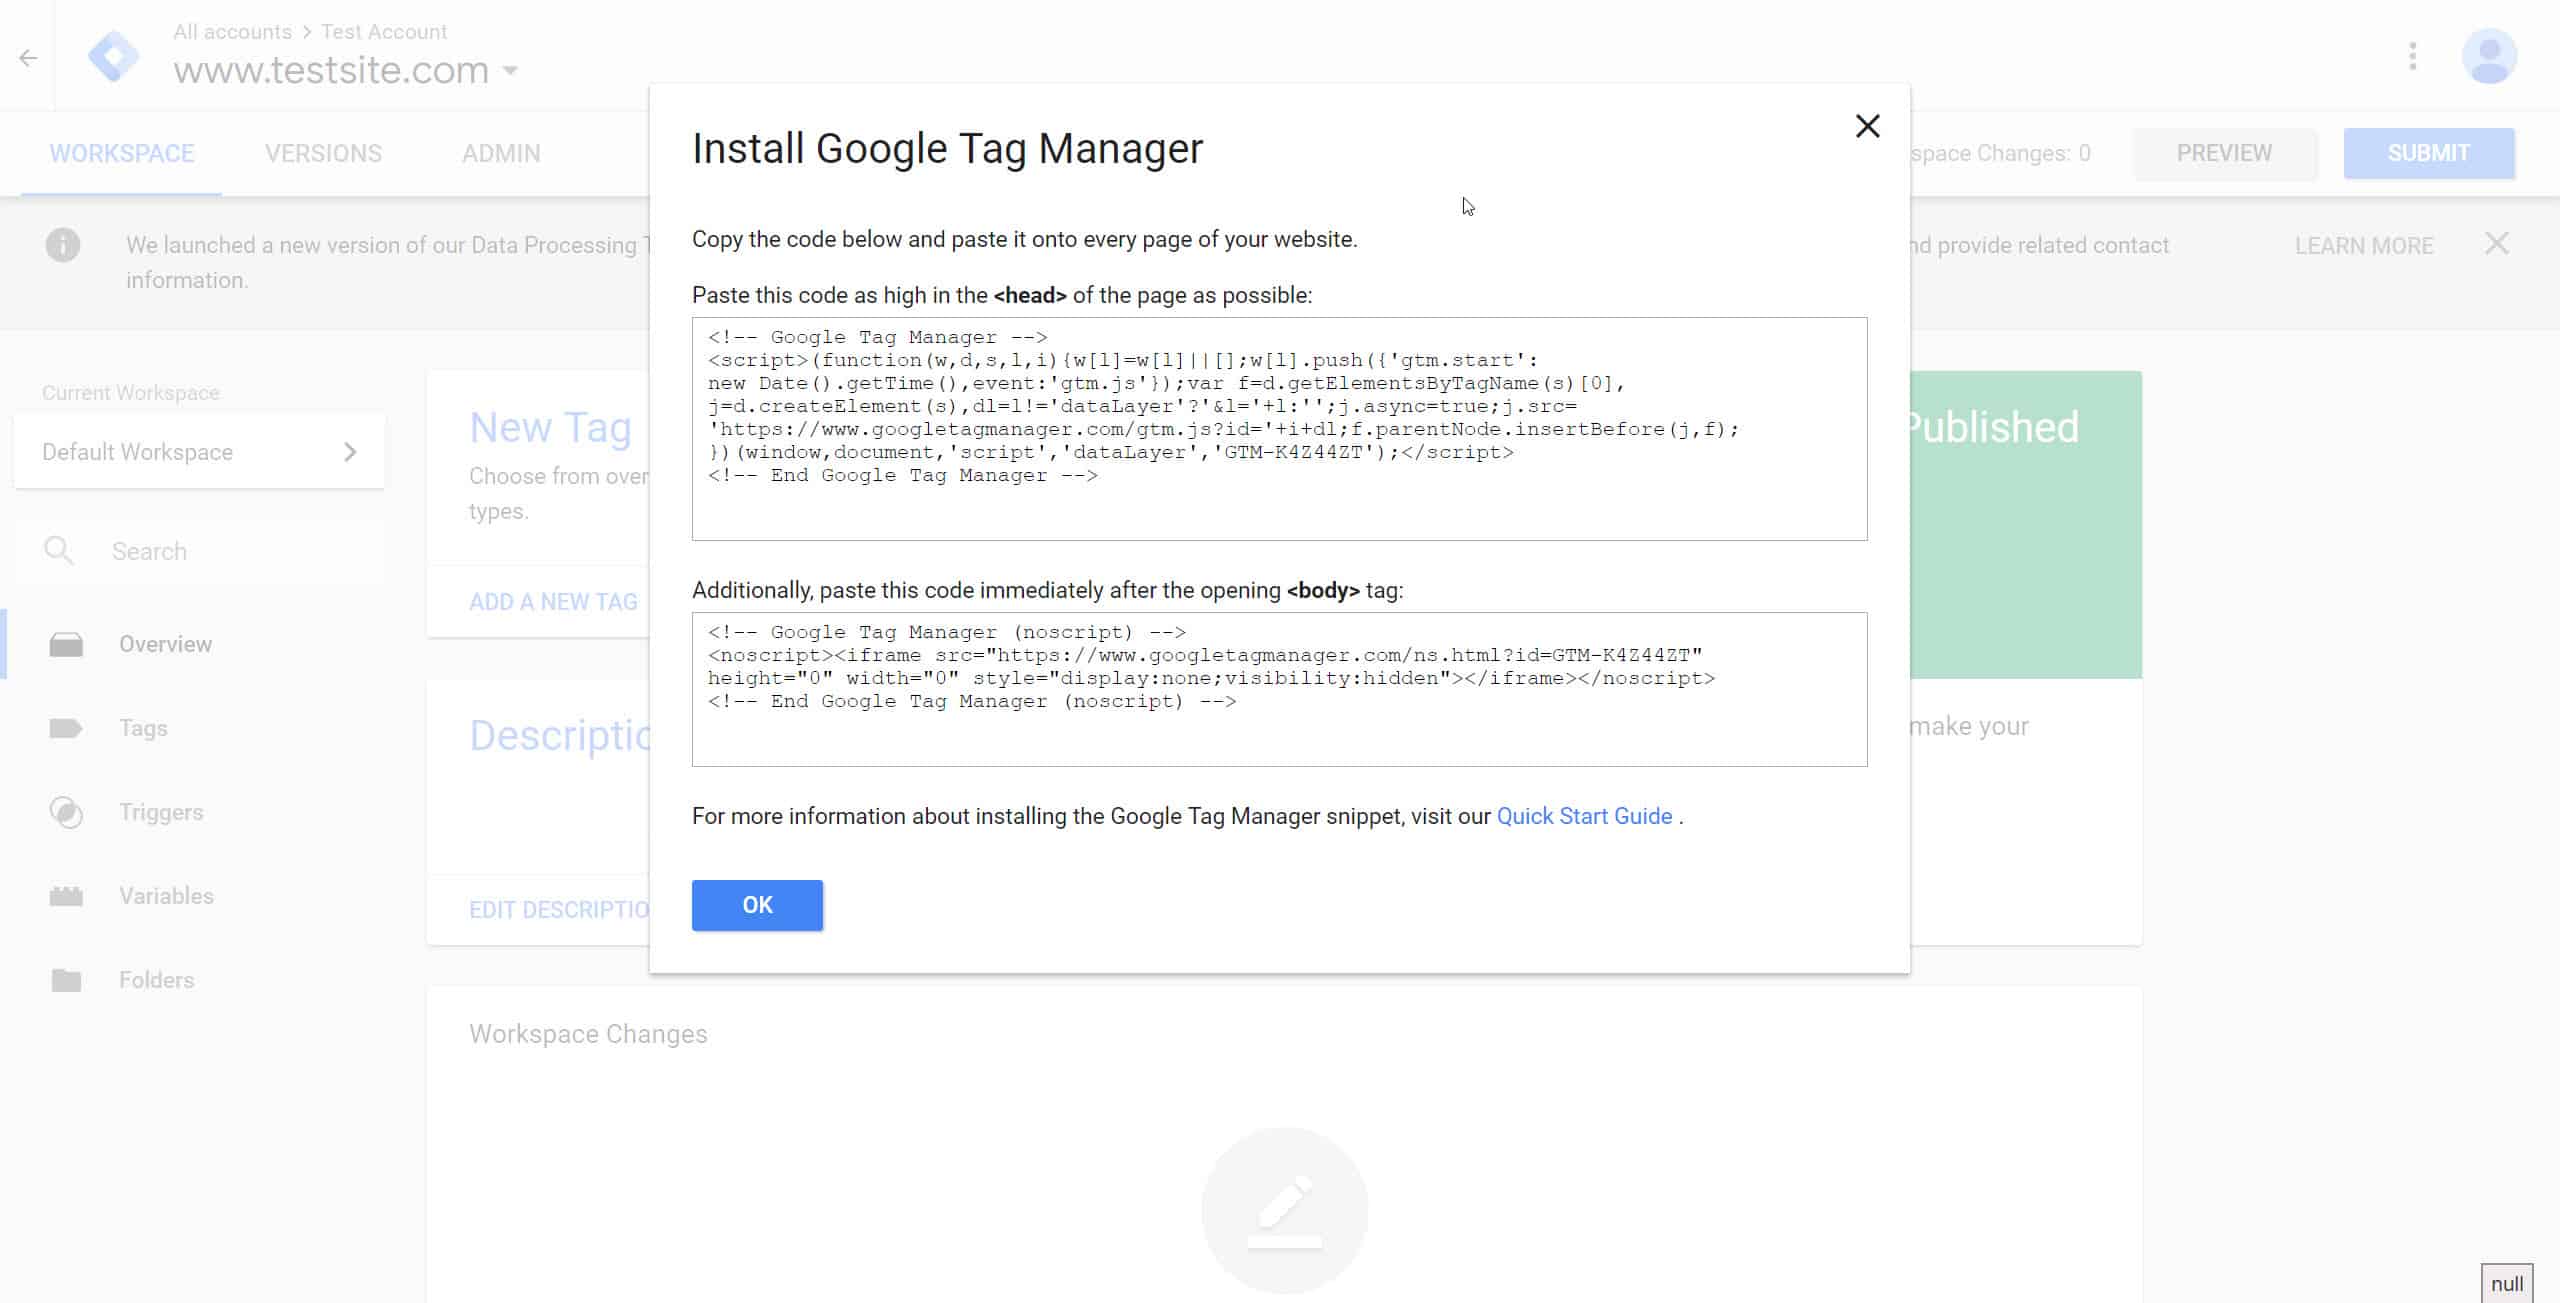
Okay so at first glance this seems scary if you don’t know any code whatsoever. Just hand this off to your developer and they should know what to do. Or else, consult Youtube.
If you know how to find where your <head> and <body> portions of your website, then just drop the codes in the areas the instructions have told you to do so.
This is just about the only thing you need to do get Google Tag Manager to work for you. Now you have the gateway to your website installed. Let’s dive right into GTM!
How to implement Google Analytics with GTM
First off, let’s go grab our Google Analytics Tracking ID.
Once you’ve logged in, follow these steps. The GA Code for Universal GA looks like this UA-11111111-1.
Log into Google Analytics, then go to your Admin Panel.
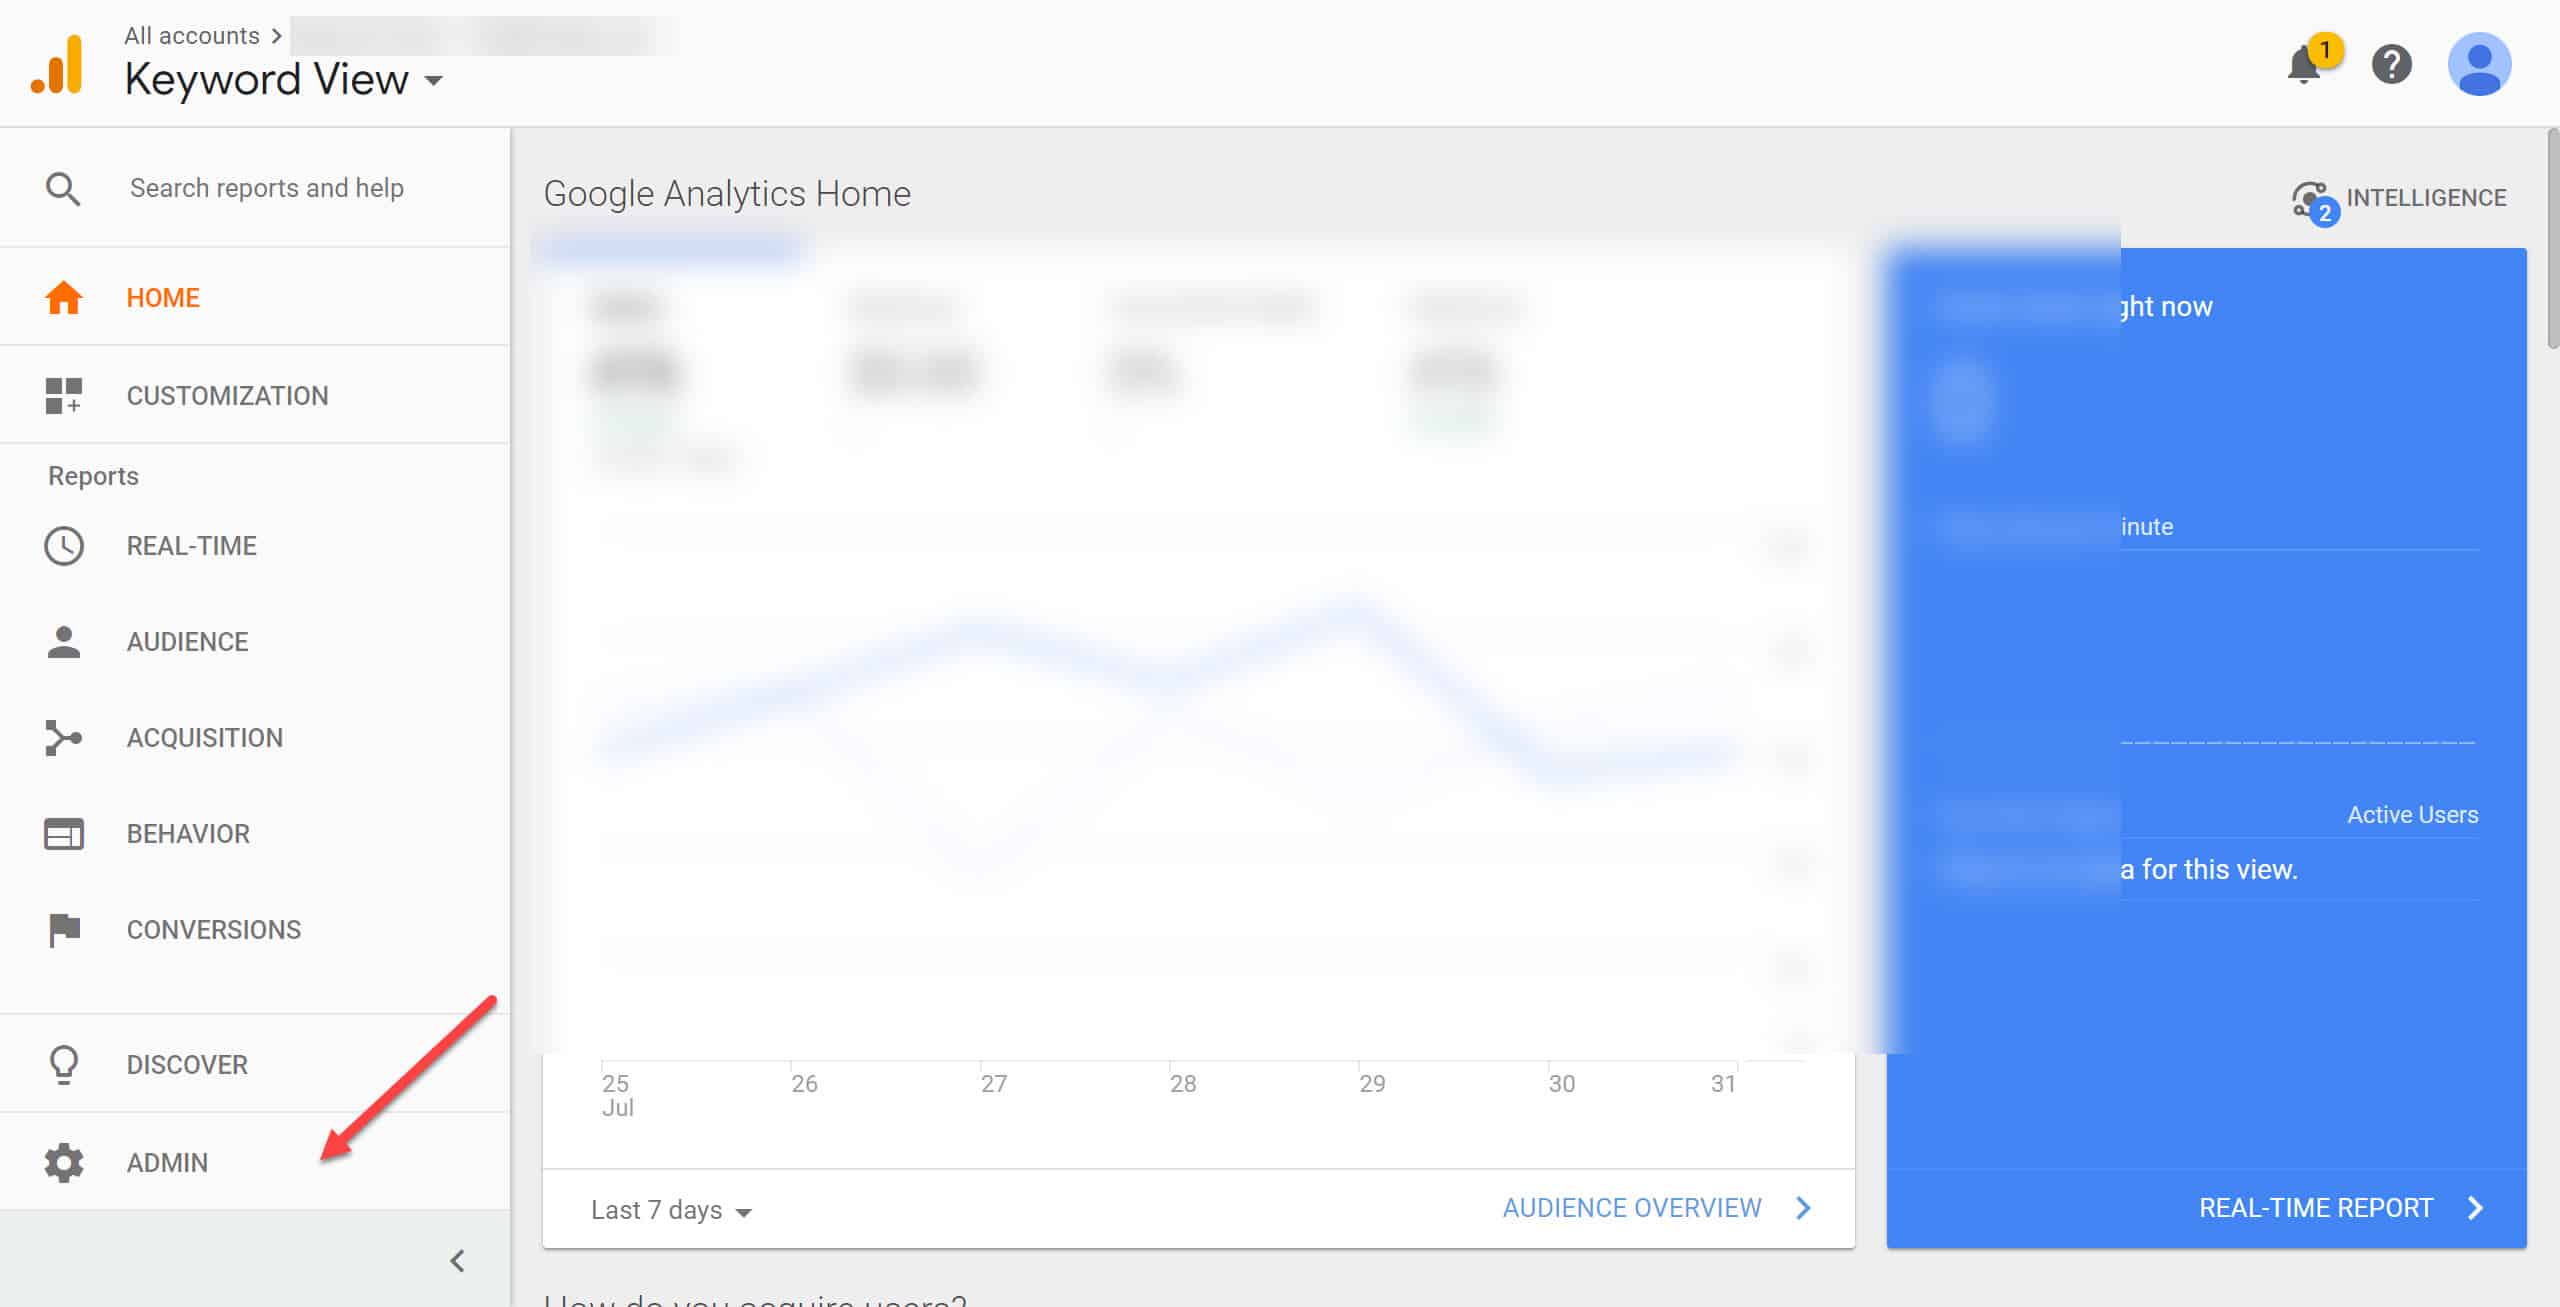
Go to the Property Settings and you’ll find your tracking ID.
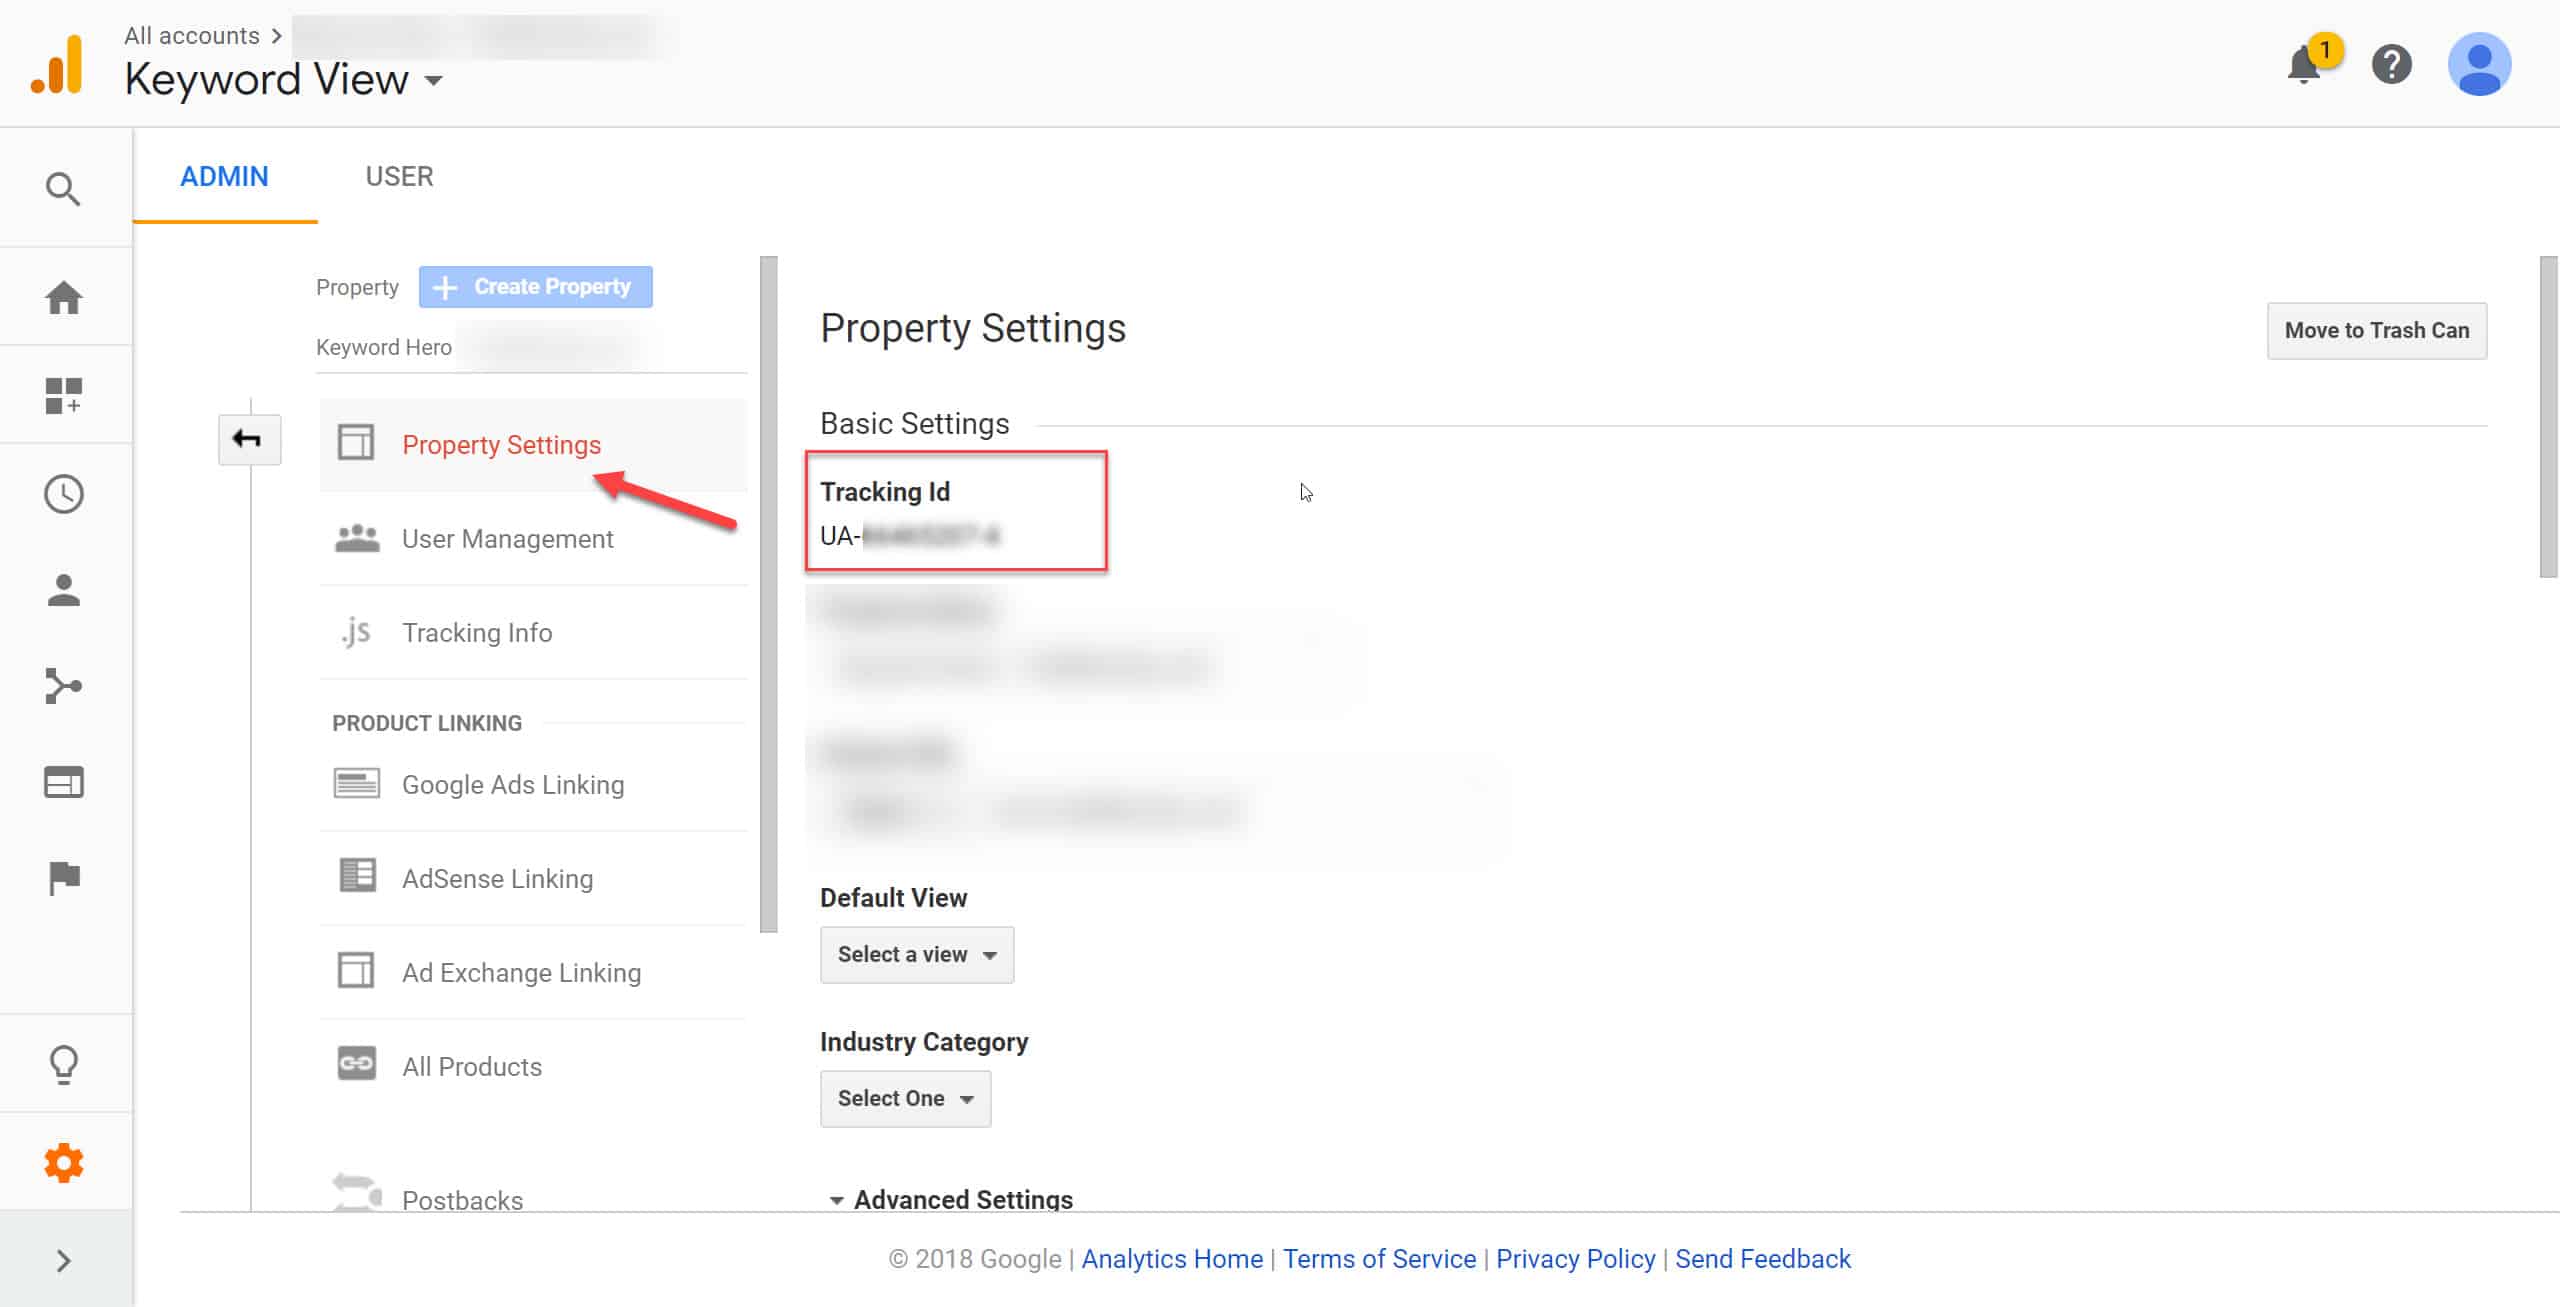
Write it down on Notepad or something, and head back to the GTM dashboard.
Now before I show you “what“ to do with it, I’m going to teach you “how and why” to do it. I’m going to drill this concept throughout this article until you finally get it. This concept help you understand Google Tag Manager and to stop fearing it.
Google Tag Manager works with a Tags and Triggers concept.
Now if you’ve heard of If This, Then That (IFTTT), it works with the same principle. Like so:
If Milo is HOT (If This), Then Put Some Ice (Do That)
If Milo is Not HOT (If This), Then Drink (Do That)
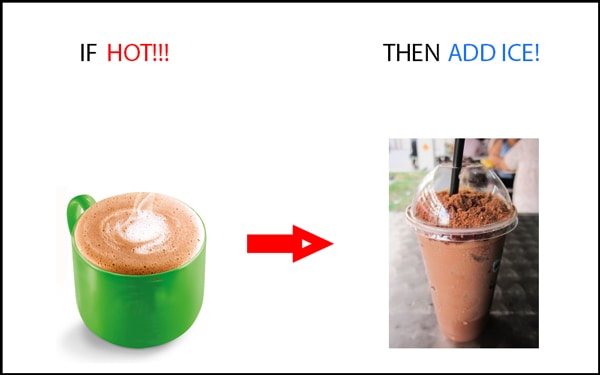
And who doesn’t like iced milo with heaps of extra powder?
Need More Examples?
If it Rains (If This), Then Bring Umbrella (Do That)
In Google Tag Manager, Triggers are the (If This), and Tags are the (Do That)
So with that analogy, let’s revisit how to use Google Analytics with GTM.
Your Google Analytics ID that you have written down earlier is your (Tag).
Concept Drilling Time. IFTTT Folks.
If URL = X (Trigger), Then Put GA Code (Tag.)
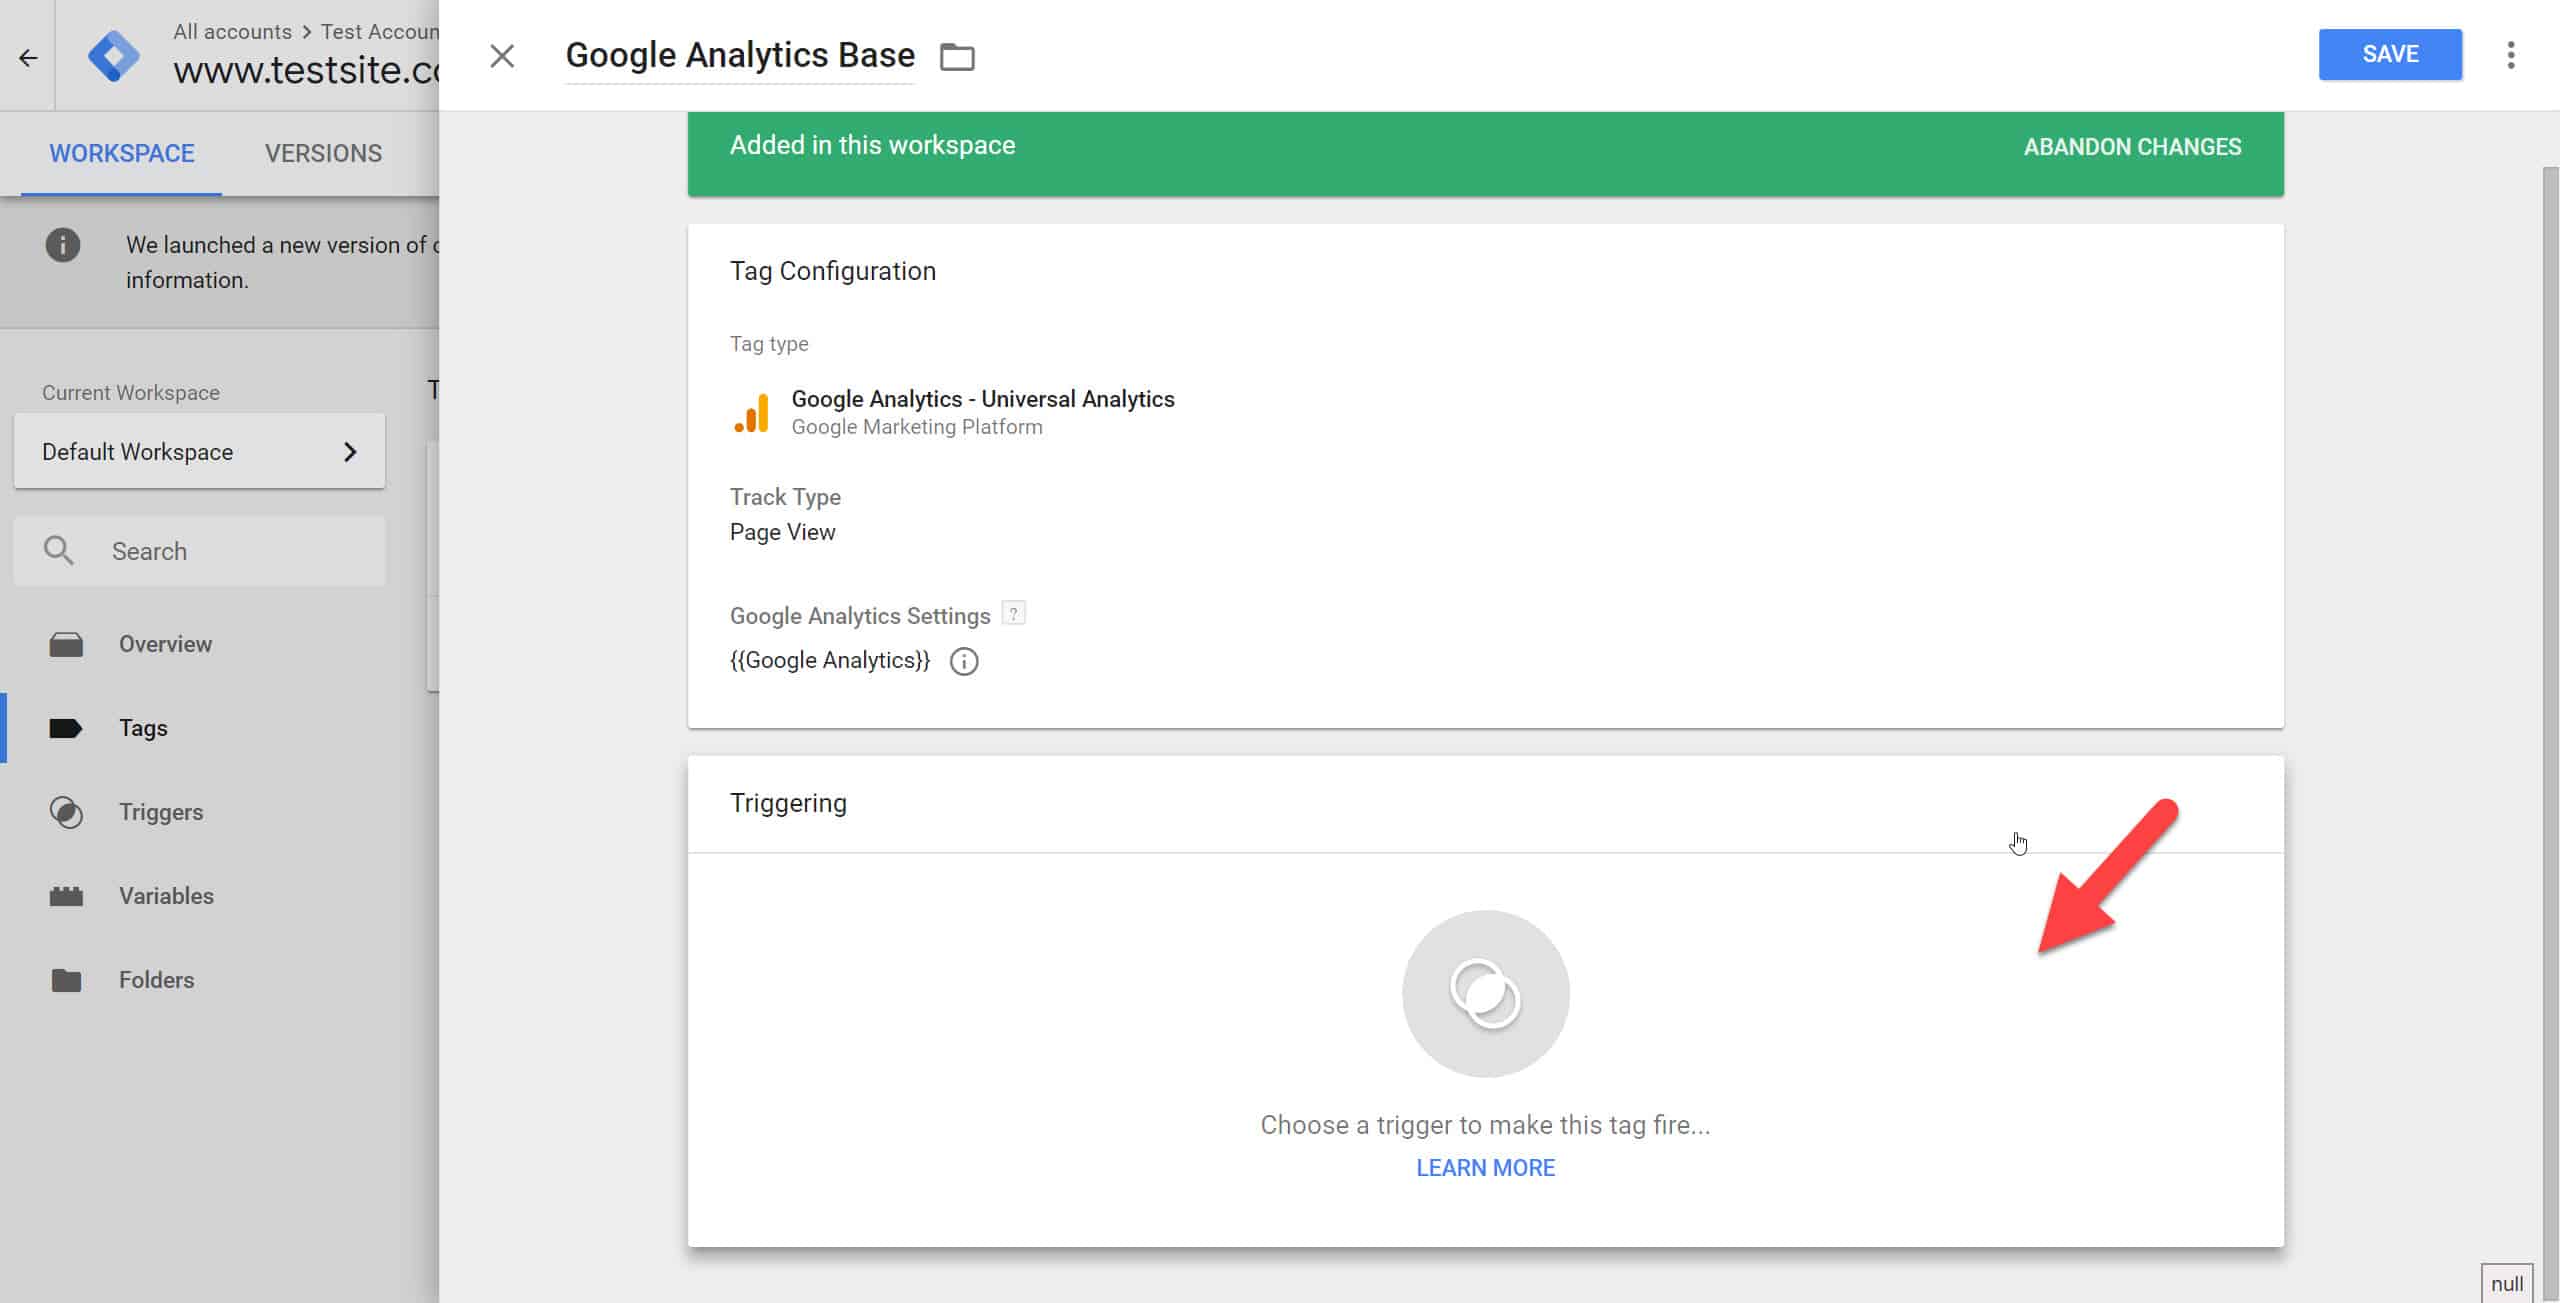
Let’s go ahead and add your GA ID as a Tag like so:
- Add your Google Analytics into a variable.
- You can use this variable in various places later, like this Google Analytics Tag.
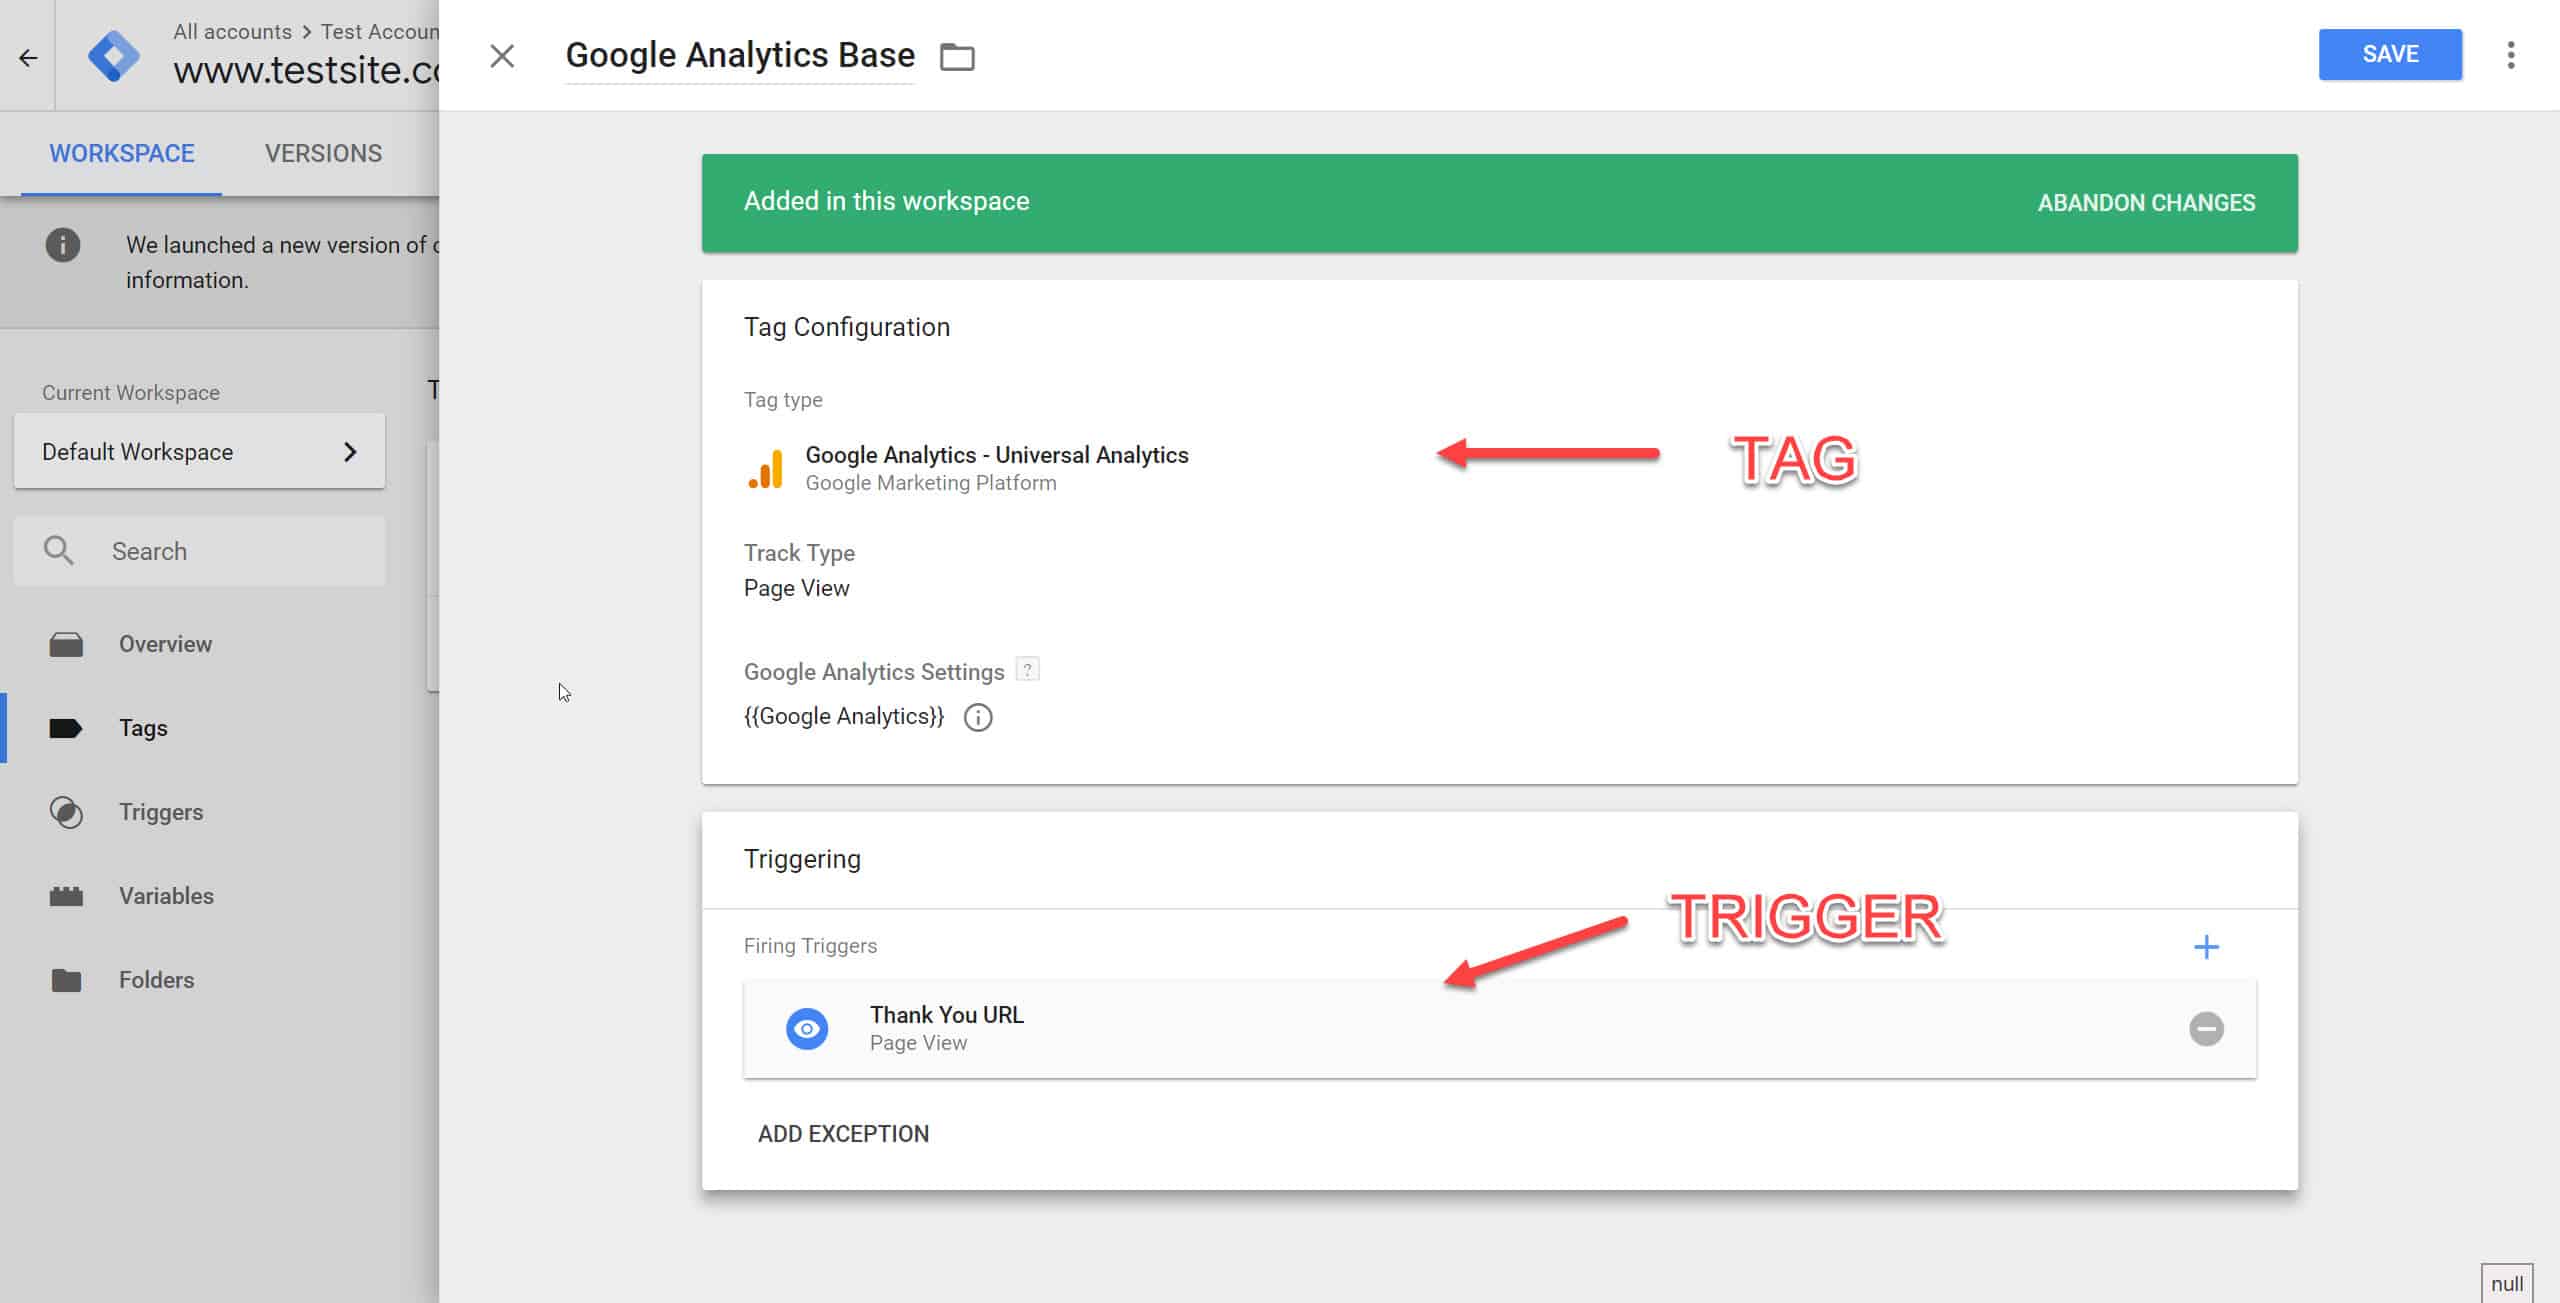
Every Tag is always matched up with a Trigger. Cause (Trigger) & Effect (Tag).
Now, where do you want your Google Tracking Code to go to? Probably every page on the site right?
Let’s create a Trigger that occurs for every page then. Click on the + Sign to create a New Trigger and add All Pages.
So now, we basically have a trigger-tag pair.
The thought process goes like this:
- If the visitor triggers the conditions we’ve set (URL = All Pages),
- Then put the GA tracking code there.
Now all you need to do is to hit “Submit”, and you are done!
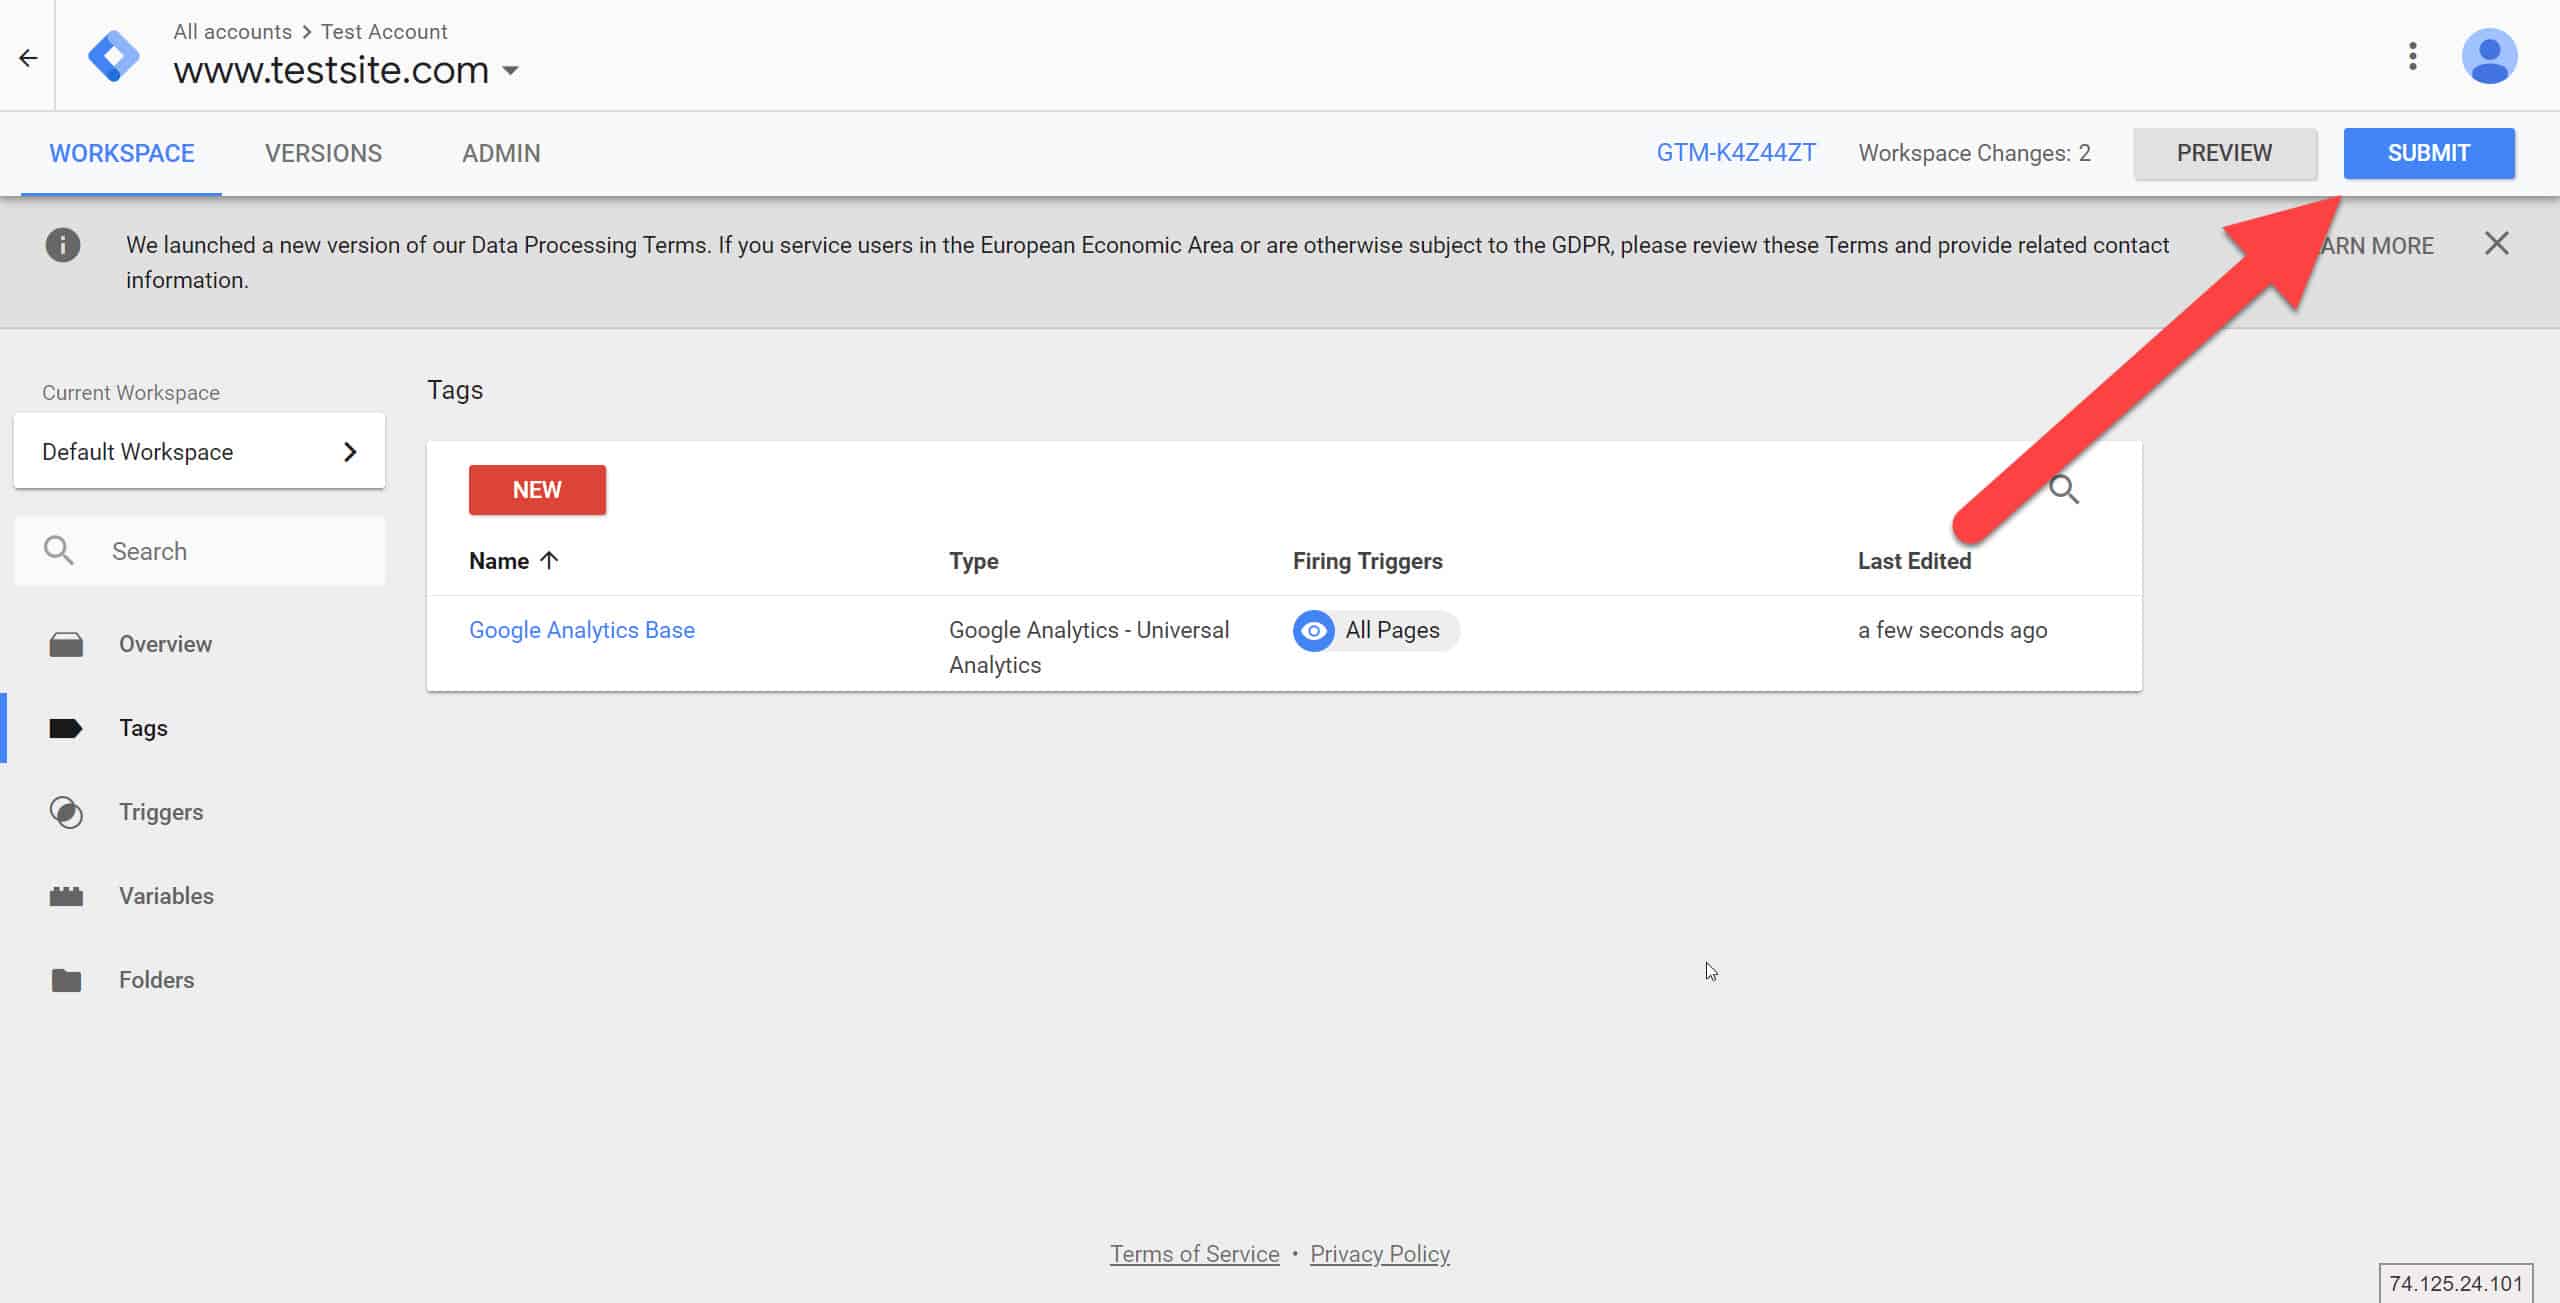
You have successfully implemented Google Analytics using GTM. Not too difficult right?
Now some people will ask, Jonathan, what if I don’t want the GA script to be firing on every page?
Well sure!
All you need to do is to change the trigger. I’ll normally create a new one. Do it like so:
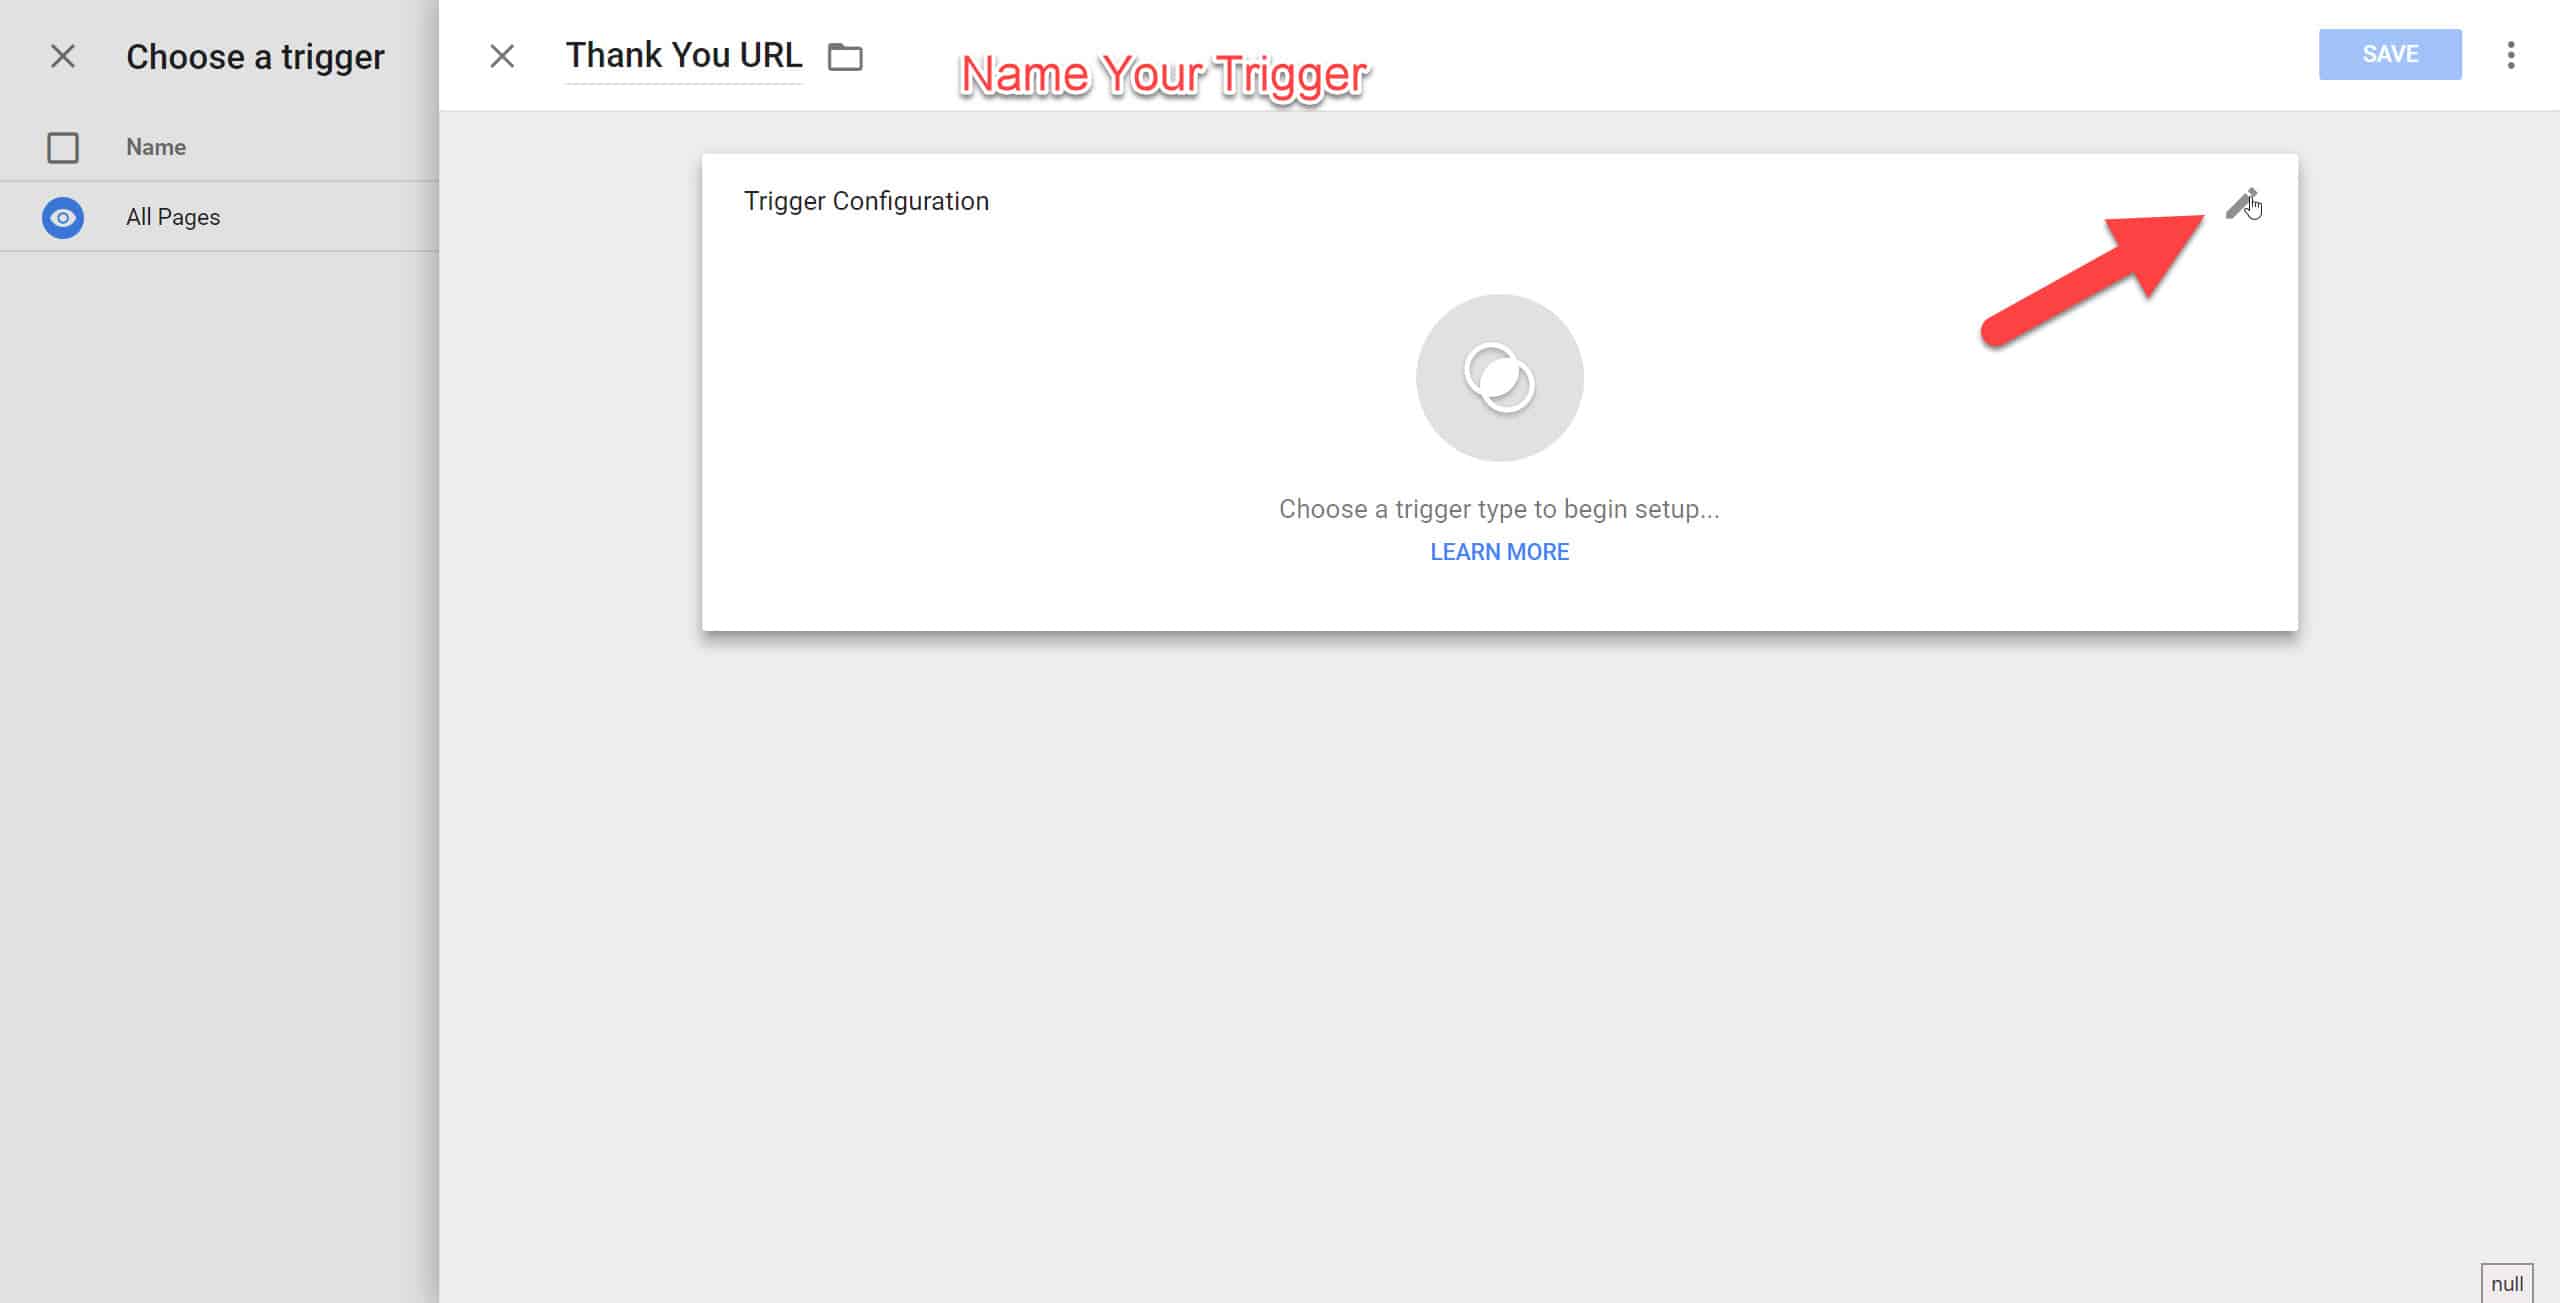
Click on the + Sign

Name Your Trigger, and Click on the Pencil Sign
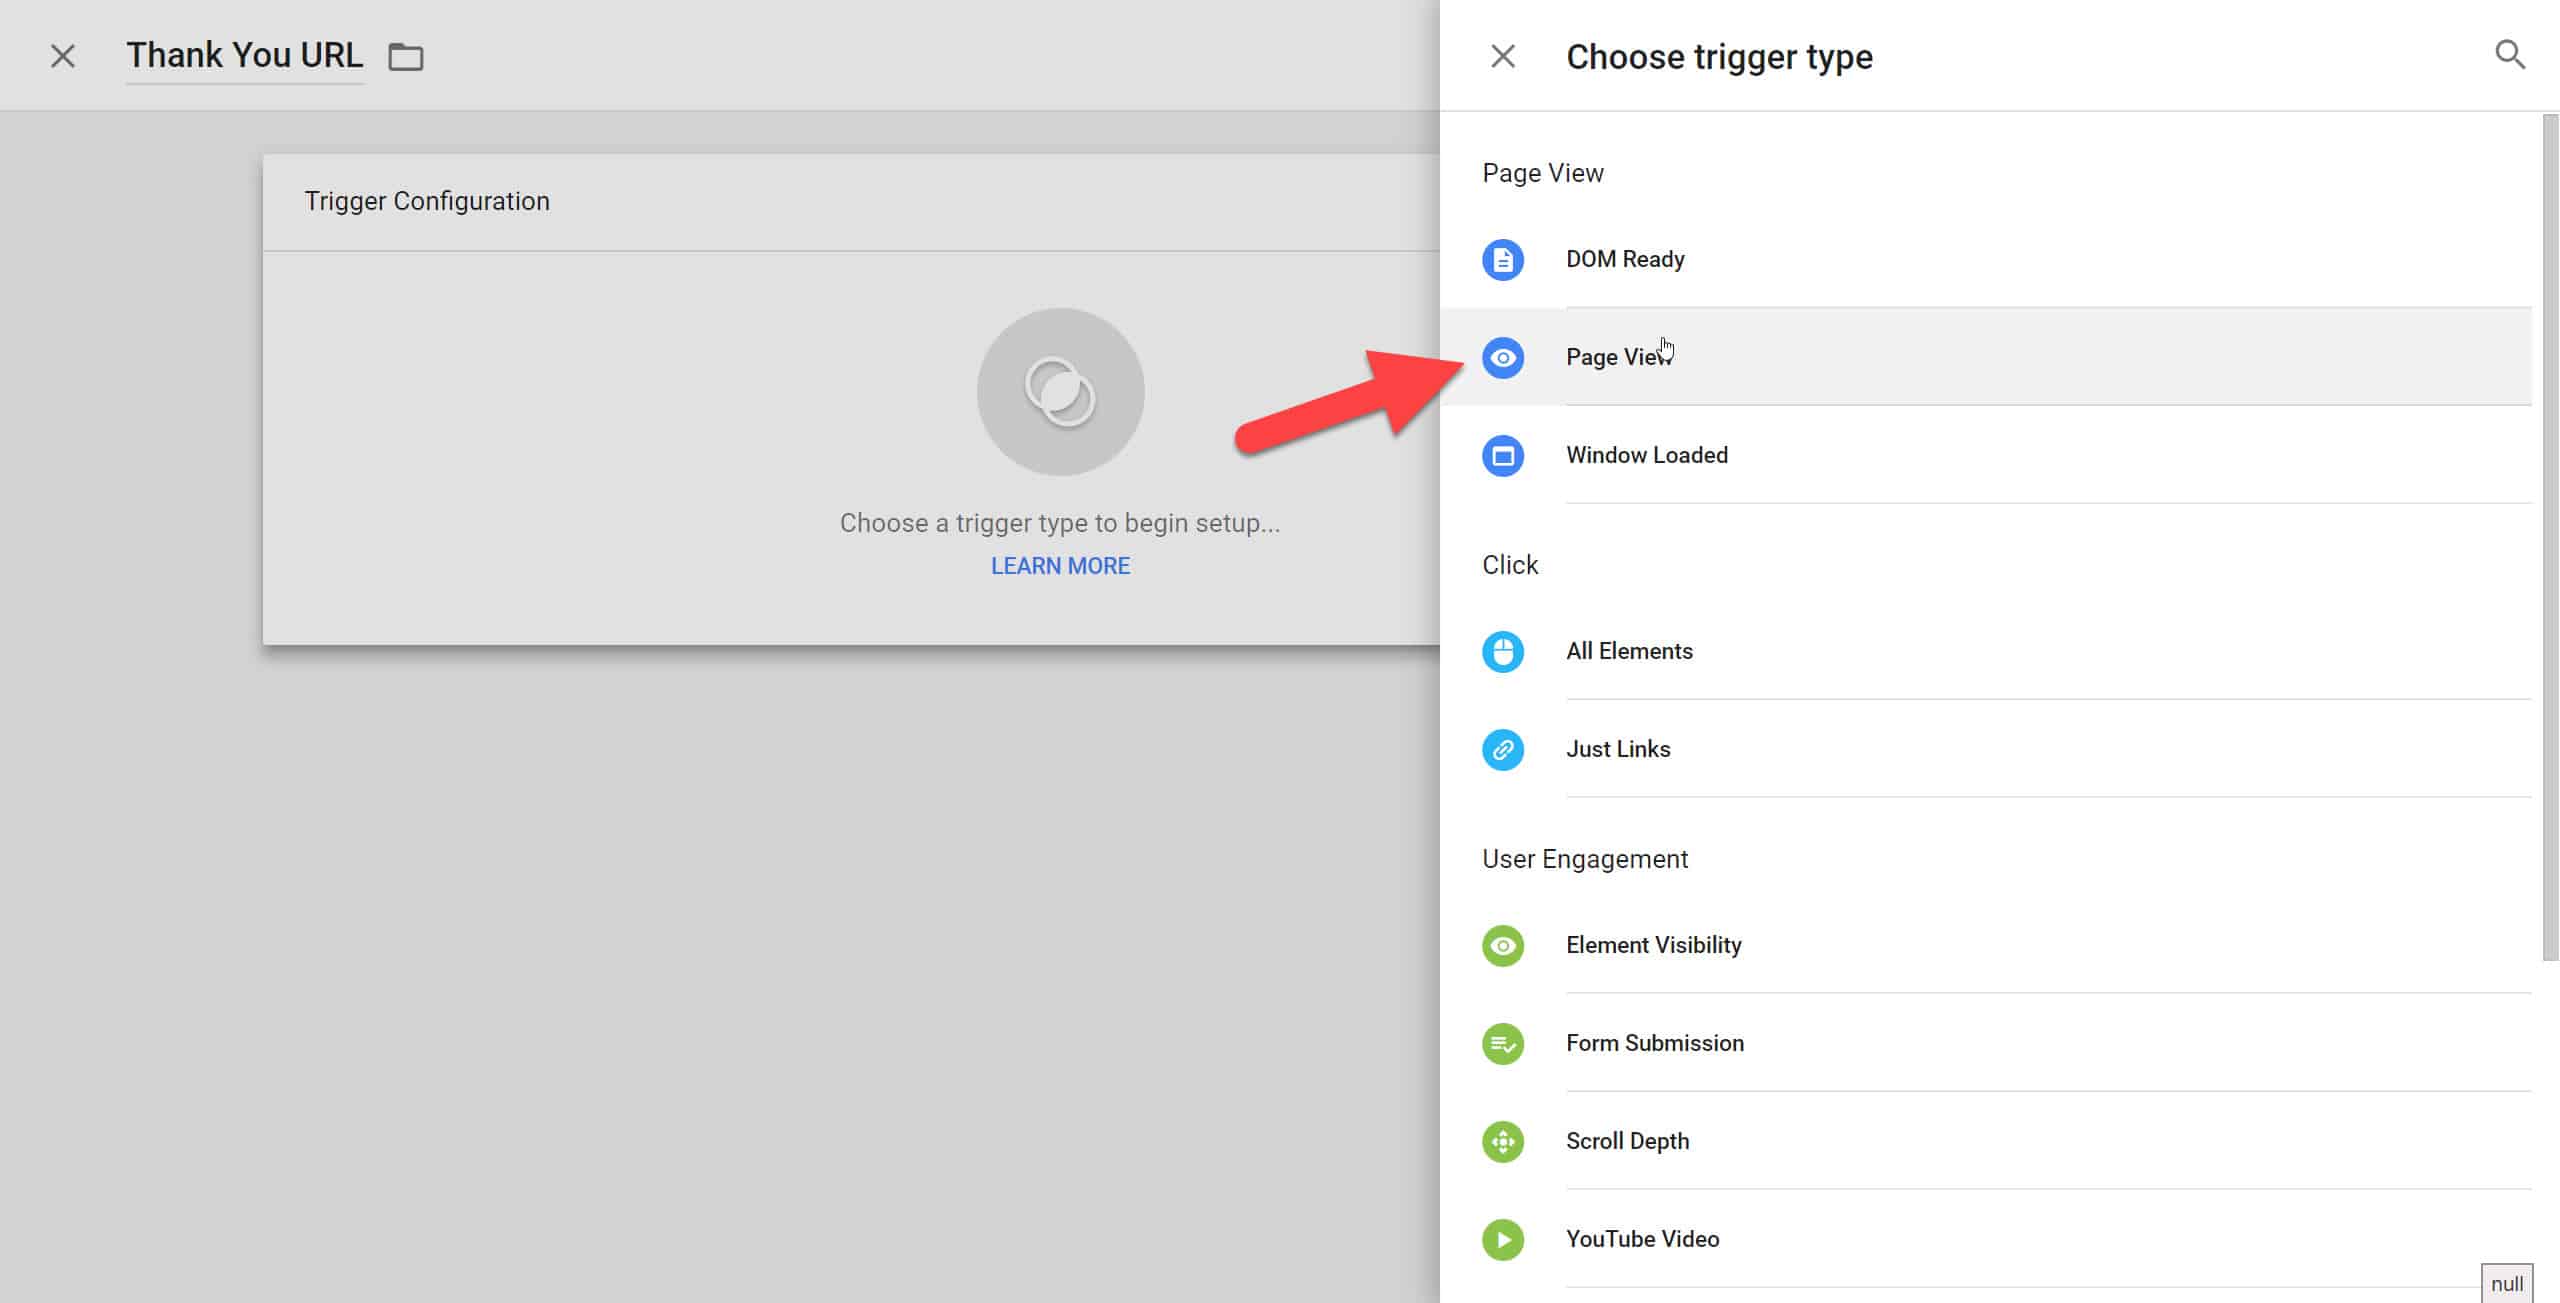
Choose the Page View Trigger:
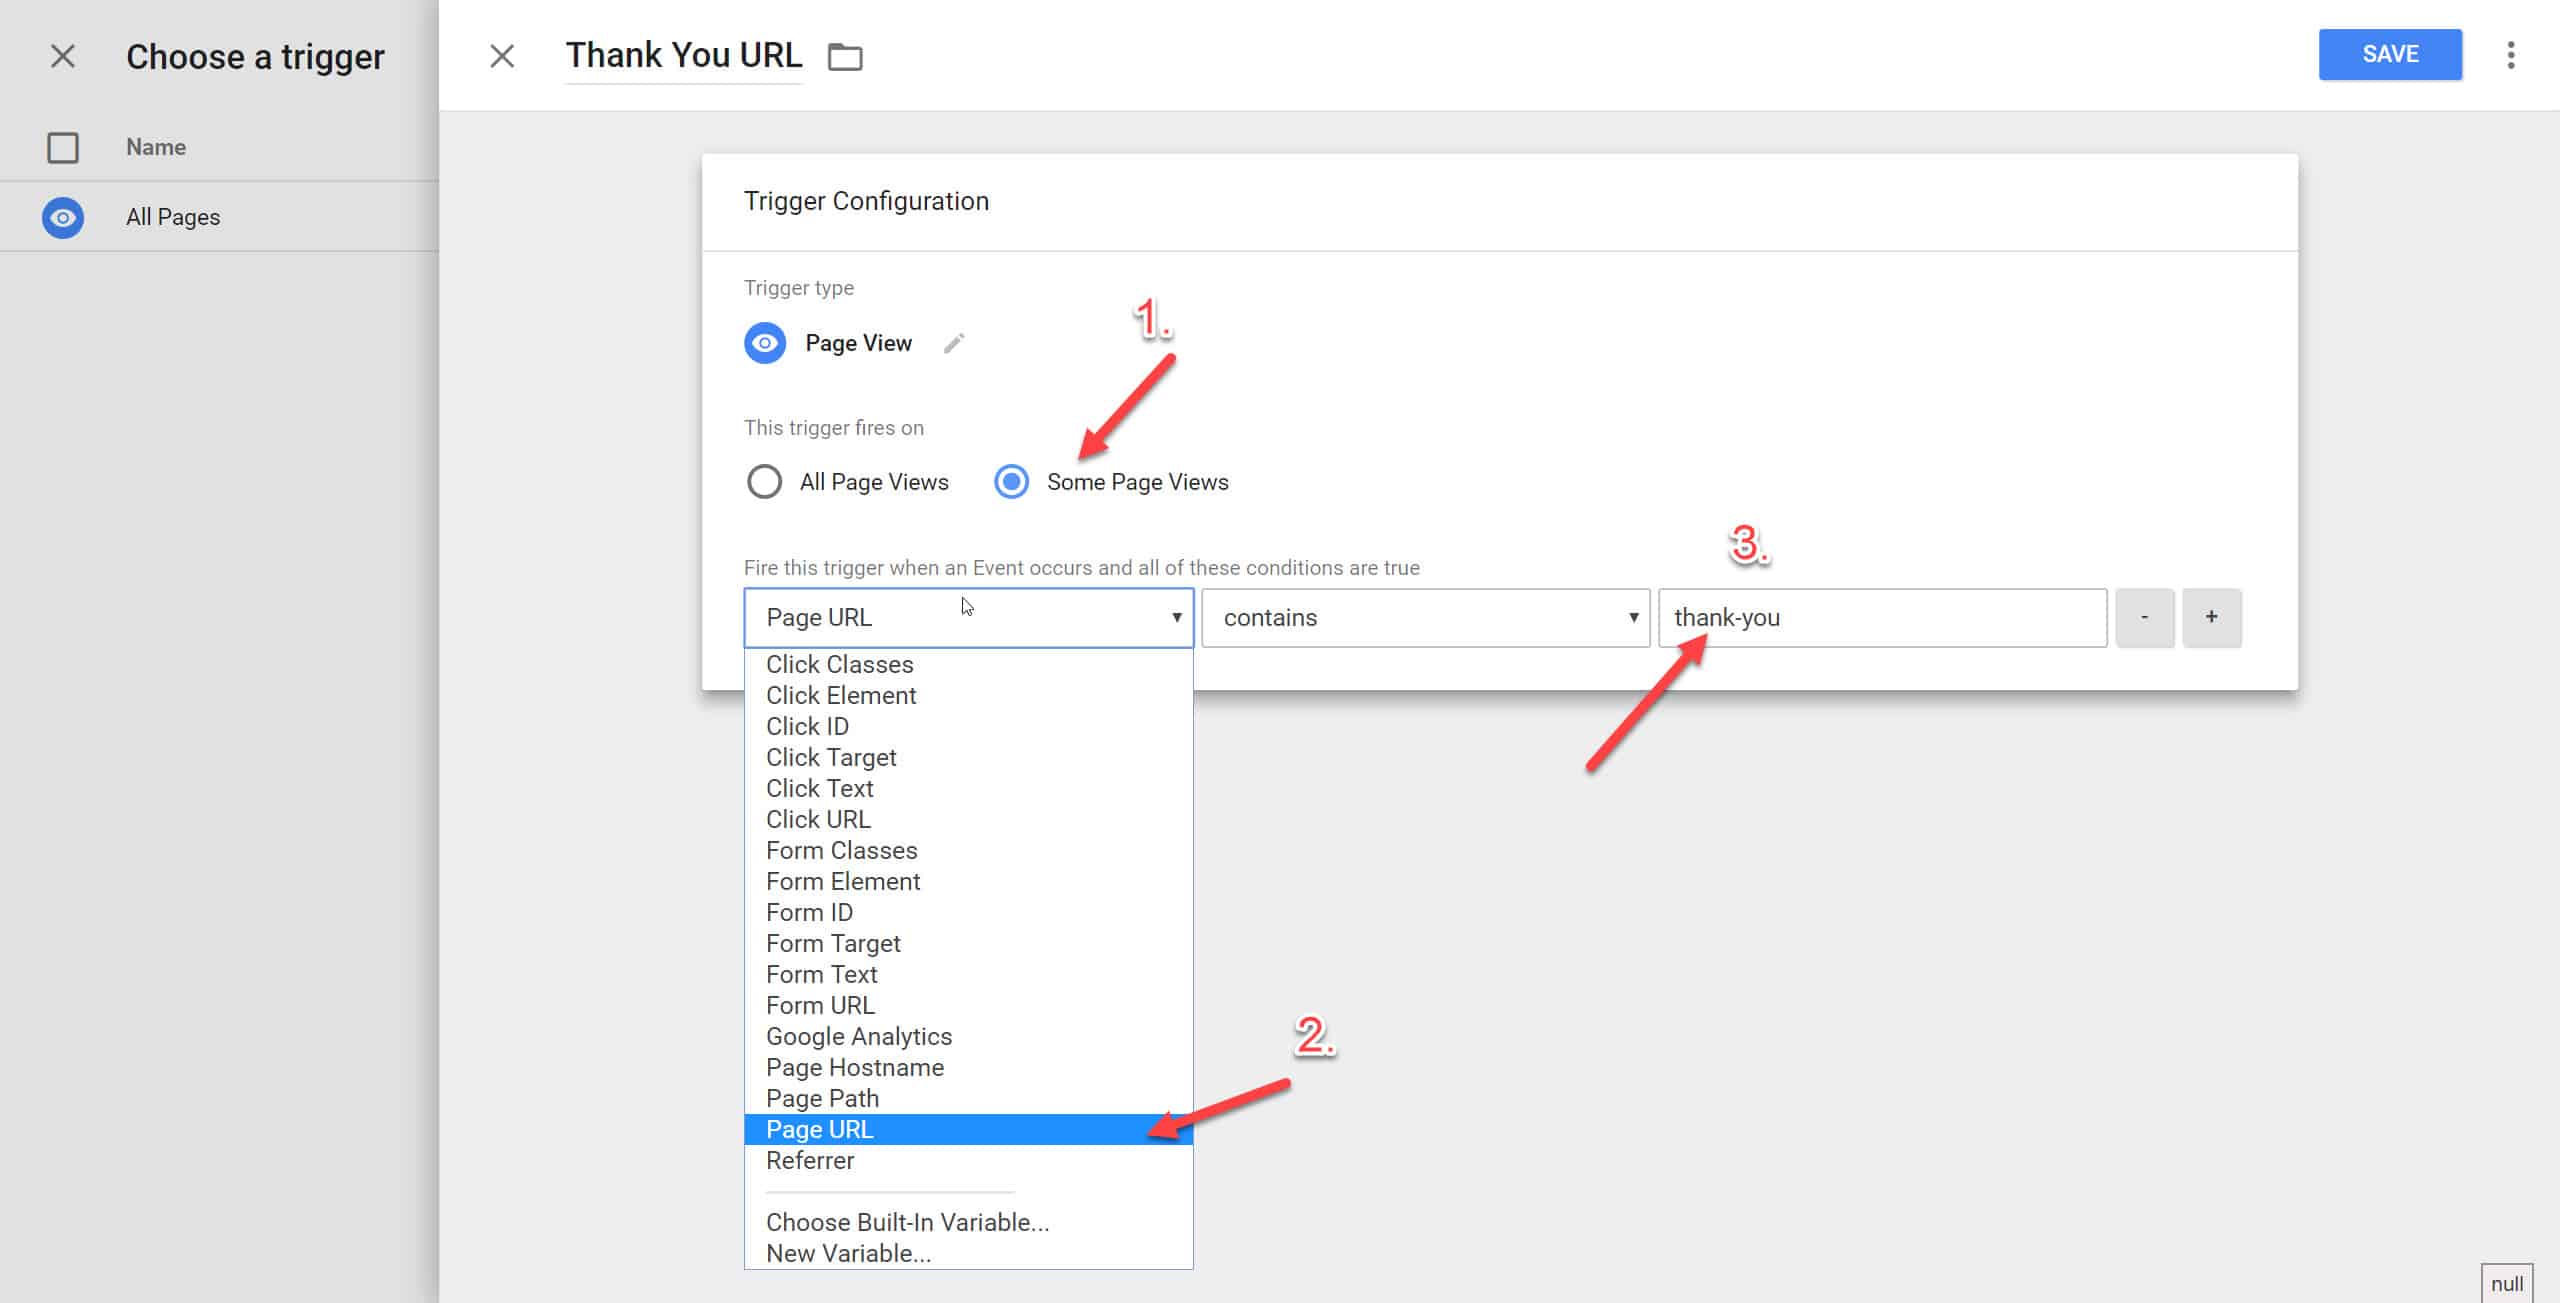
Select “Some Page Views”, Choose “Page URL”, and then I’ll put the URL string in.
In this case, if I want to create a thank you page at www.adscelerate.com/thank-you, I will put “thank-you” in the 3rd column. Do note that the logic “contains” will trigger if you have similar naming pages such as thank-you-all. So if you do have similar naming pages you might want to consider changing “contains” to “equals” and use the full URL.
Done! You just need to click Save and Submit.
Now you have a trigger that fires at your page(s) of choice!
Which leads us to the next common question we have. How do we track Adwords conversions?
How to put Adwords Conversion Pixel with GTM
The Adwords Conversion Script is typically inserted into a thank you page of some sort, like www.example.com/thank-you or something to that effect.
We’ve just covered how to set a trigger to only fire on specific pages right?
All we need to do now is to create a Tag to put the script in, and pair it with the trigger of choice.
Let’s choose this and simply drop in your code.
Go back to the screen when you are adding the trigger and choose “Custom HTML”.
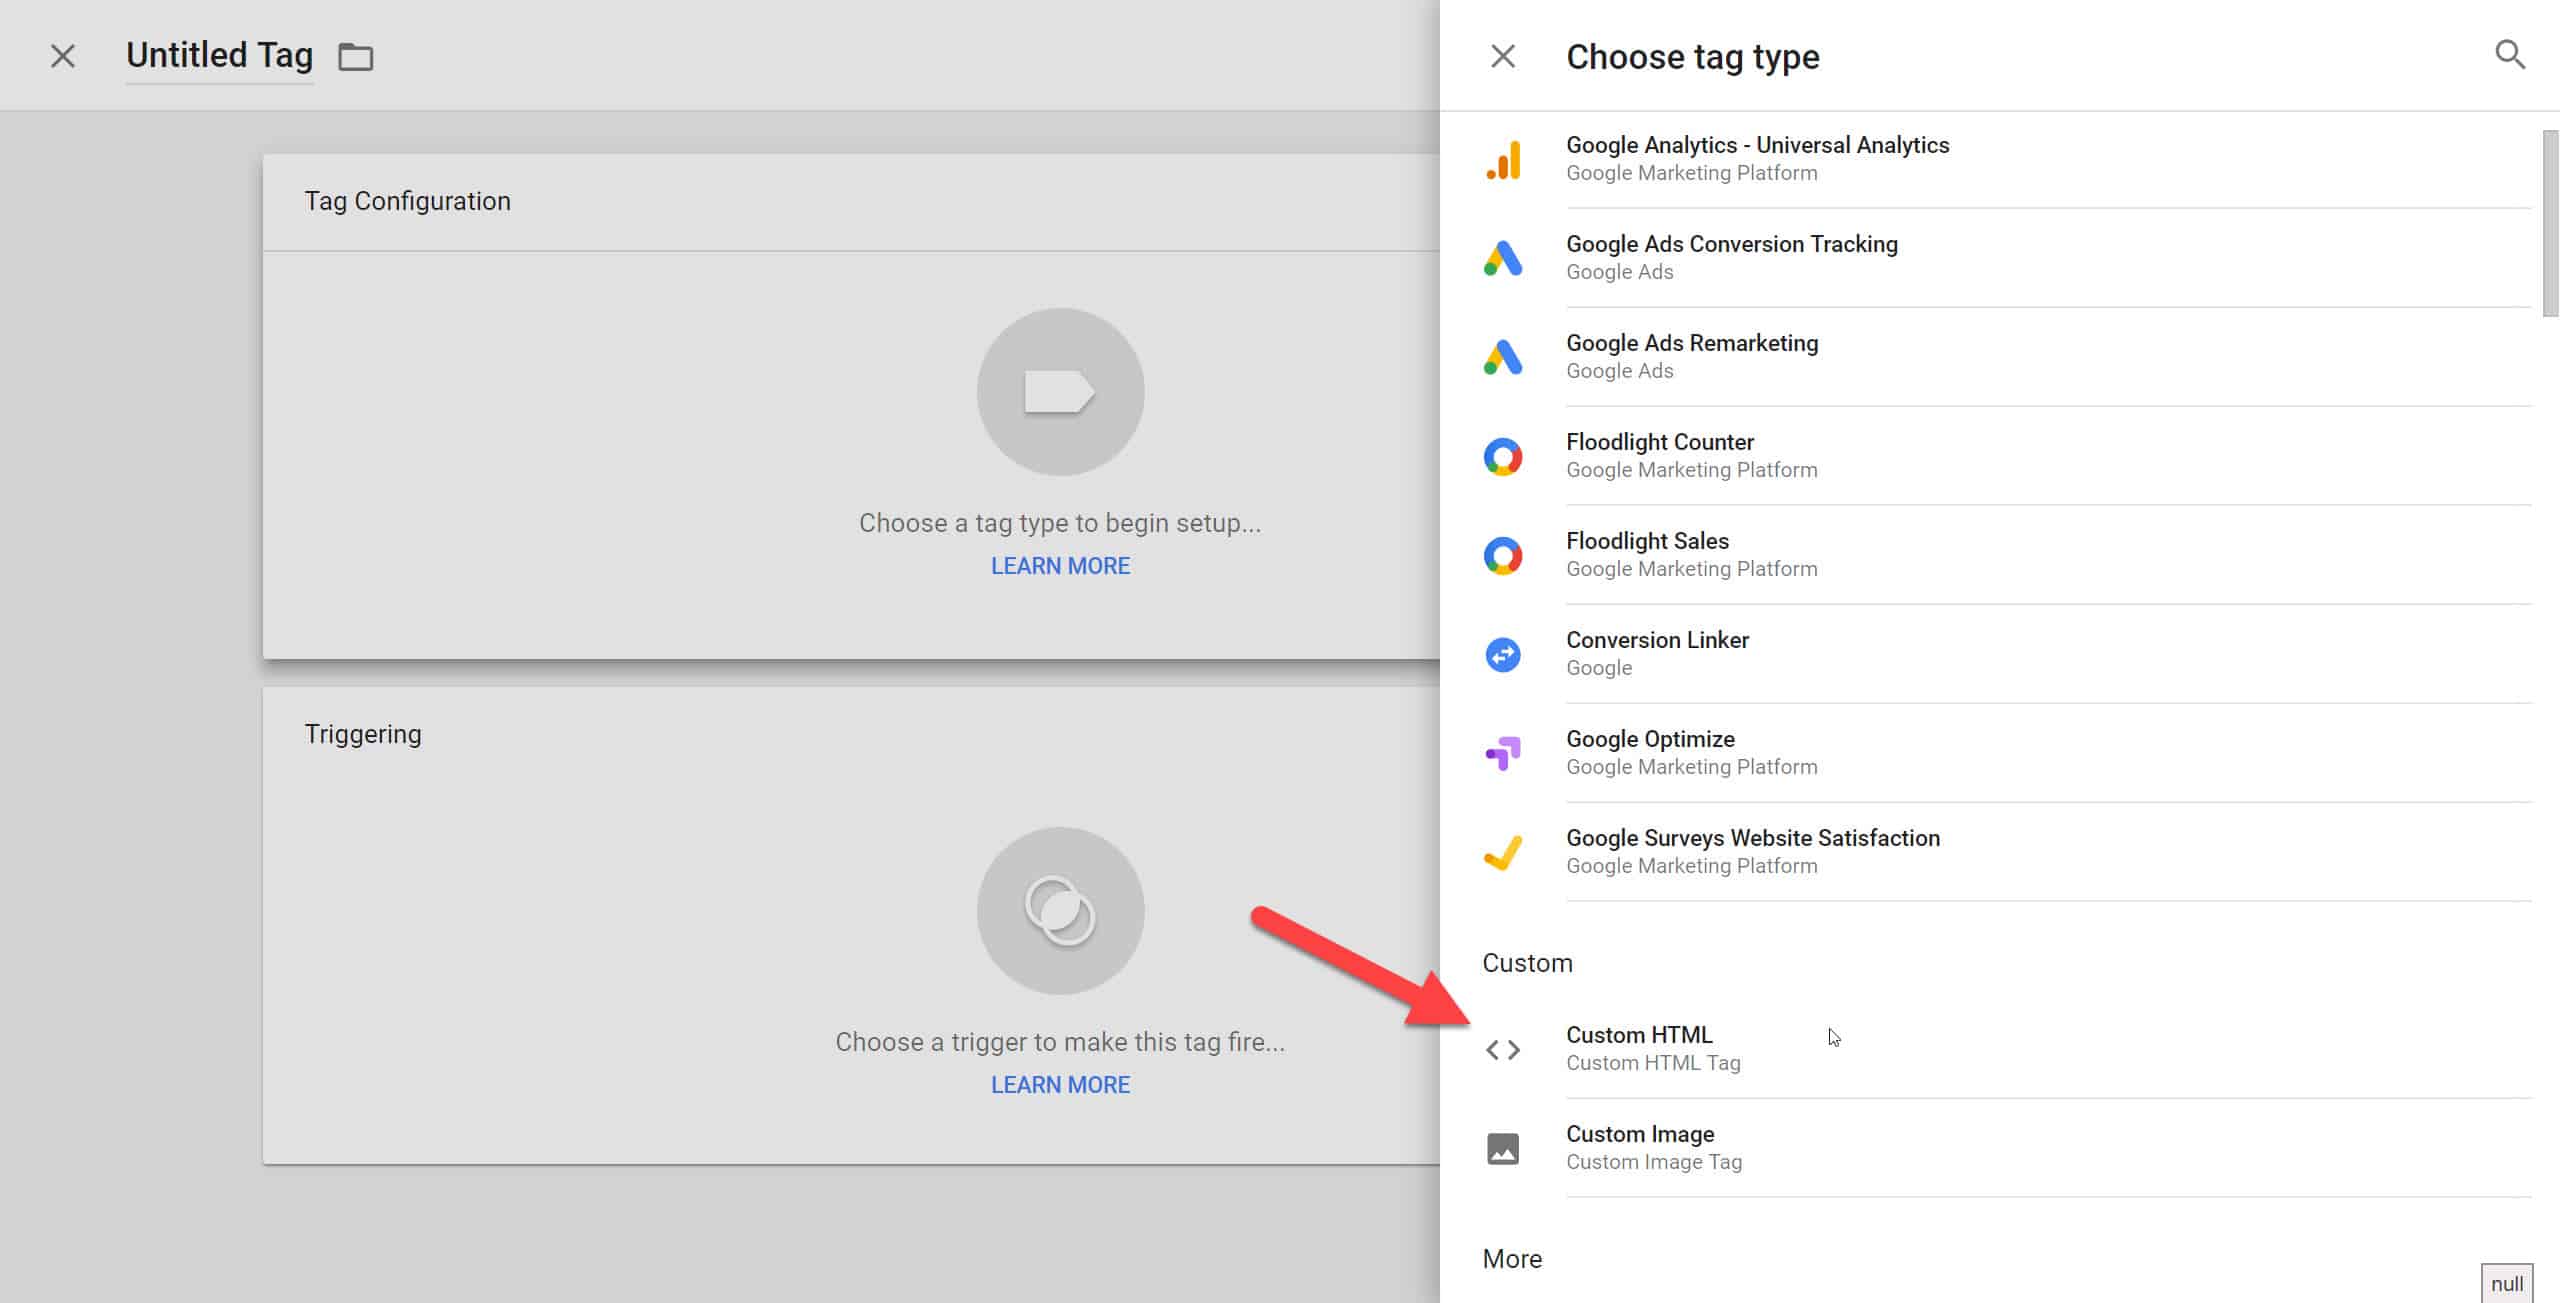
Drop in your Page Load event snippet (which you will want to occur on the thank you page). You would still want the global adwords tag on all pages though.
Done!
Google Tag Manager now offers another way to integrate Adwords Conversions with GTM (you can see the option on the right-hand side), though I still think this is still the easier method 🙂
Events Tracking – How to Track Form Submits
What if you have forms that don’t go to a thank-you page and the URL stays the same after the submit button is clicked?
(these are probably AJAX forms, AJAX mean Asynchronous JavaScript And XML, and I’ve no clue what that is.)
This is the point where we delve just a little into code reading. Bear with me a little.
First, yet another reminder. GTM works with Tags and Triggers. IF this, Then That.
So we need to identify our Trigger, which is in this case, is when the form submit button is clicked.
Let’s do that.
Every form typically has a class and ID assigned to it.
Navigate to the website and Right Click + Inspect your submit button.
You will find either your Class or ID of that form. The element should have a standard “submit” type for the next step to work, so if your form submit button isn’t, you’ll have to ask your developer to make the change.
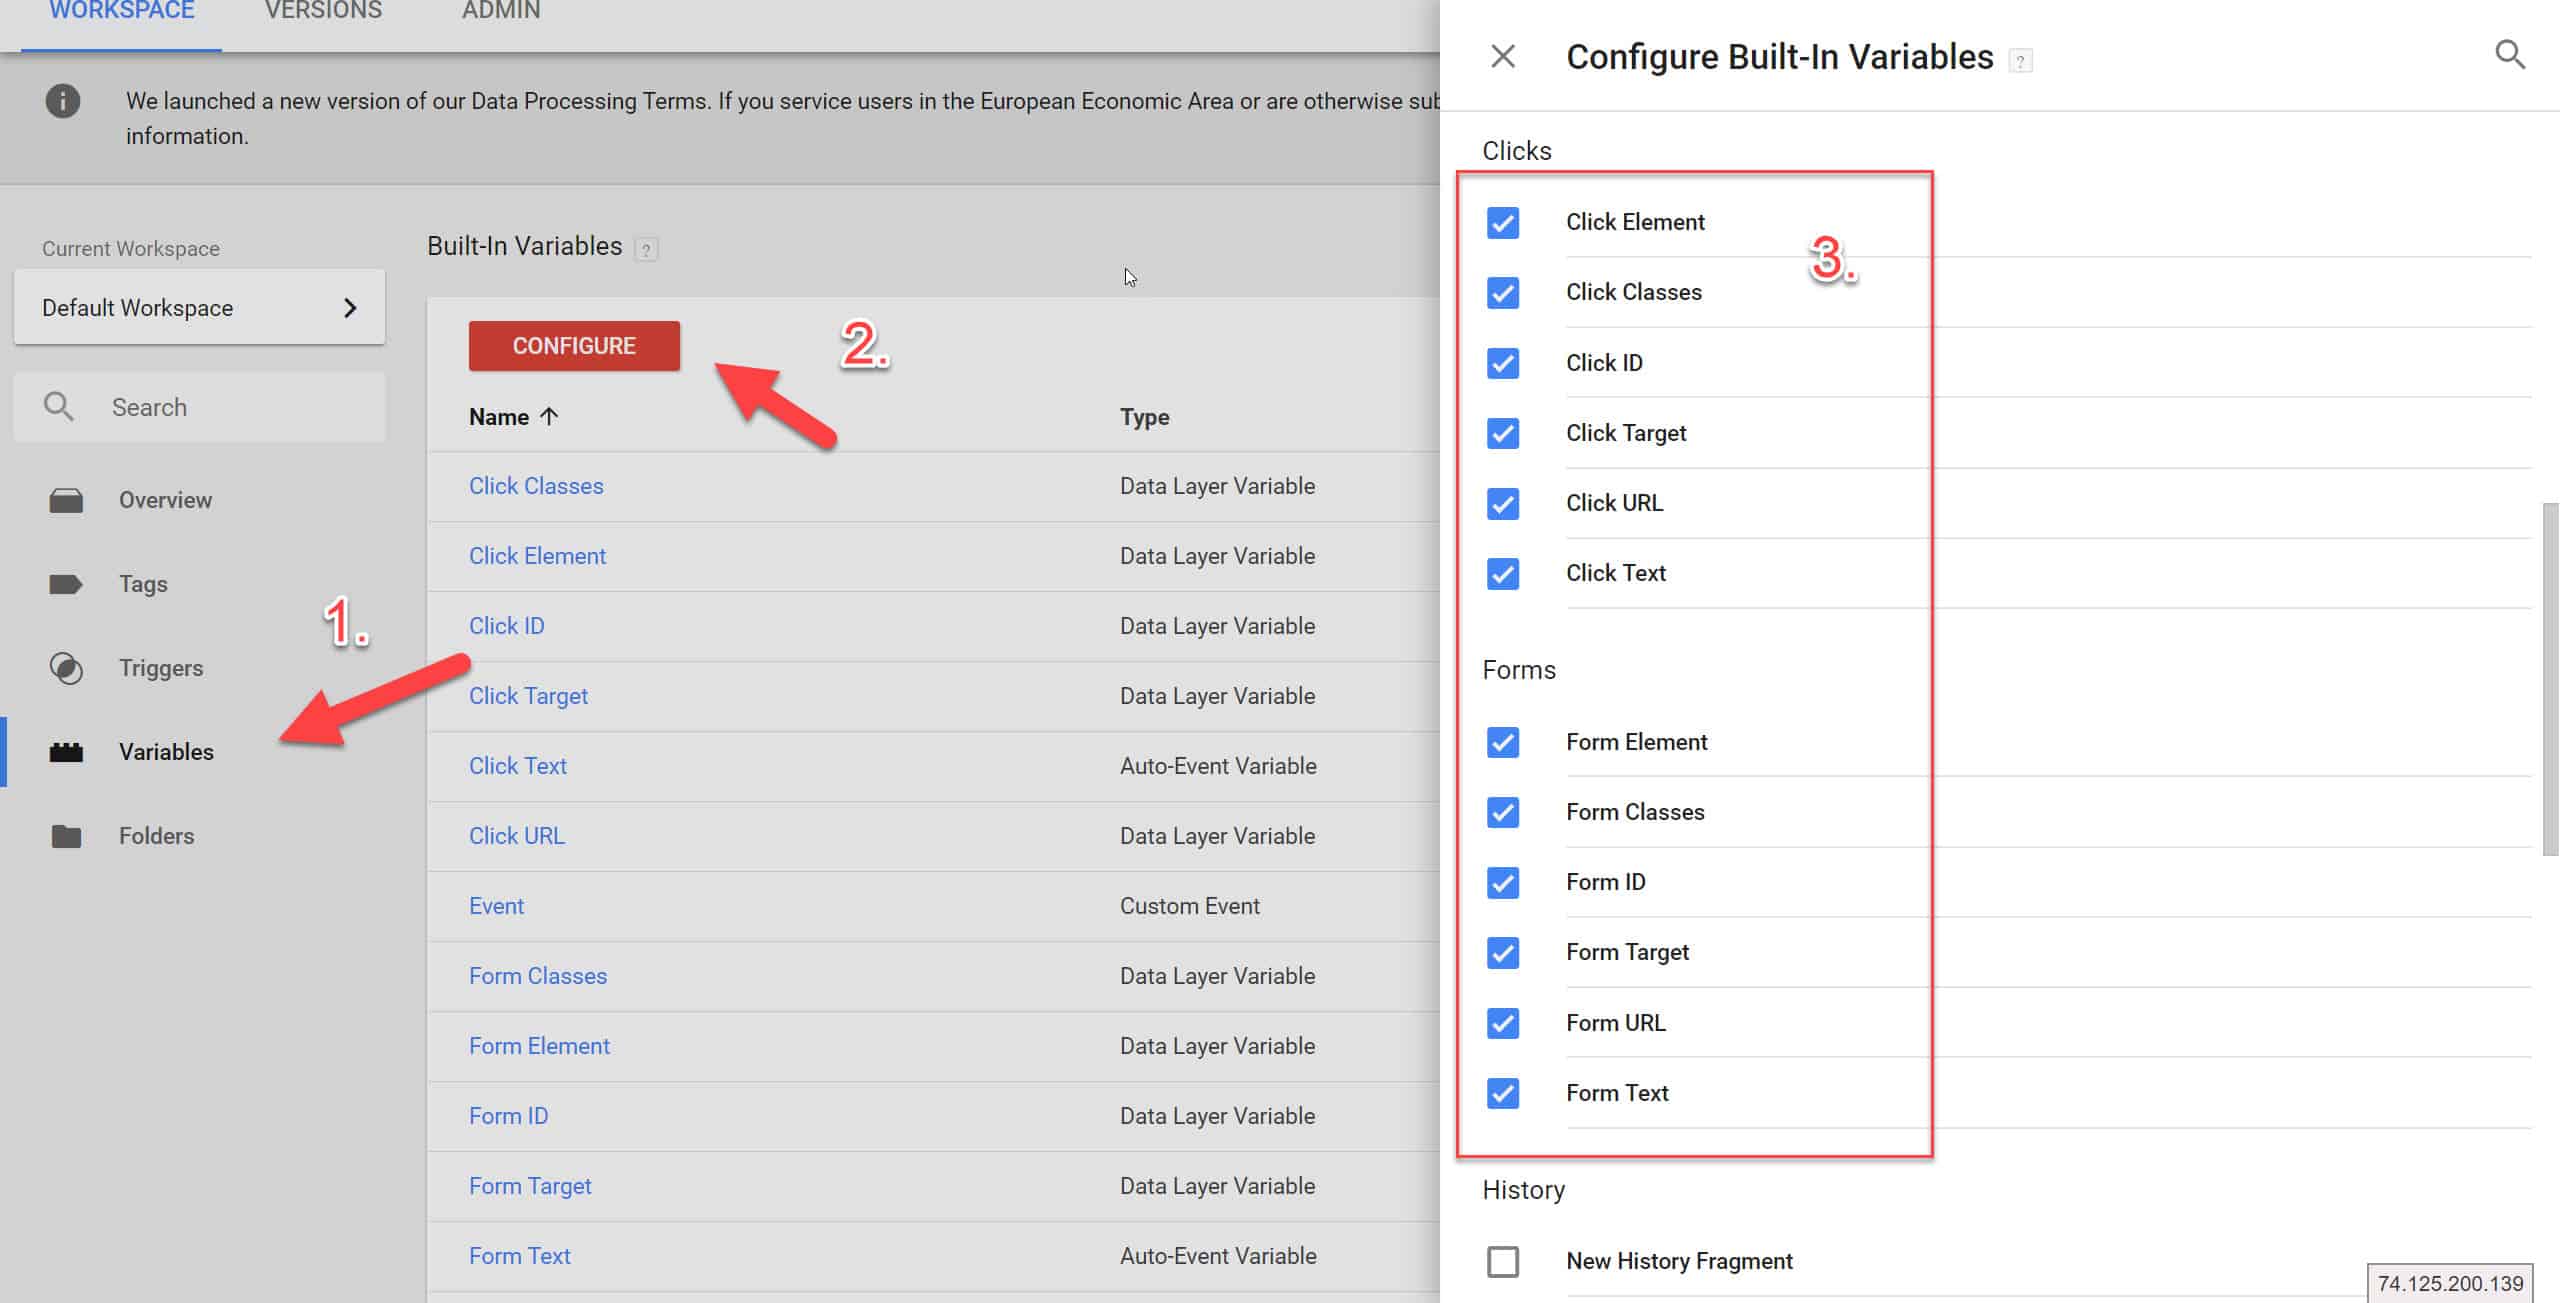
Let’s go back to Google Tag Manager and firstly enable these variables so that Google Tag Manager is able to “listen” to them.
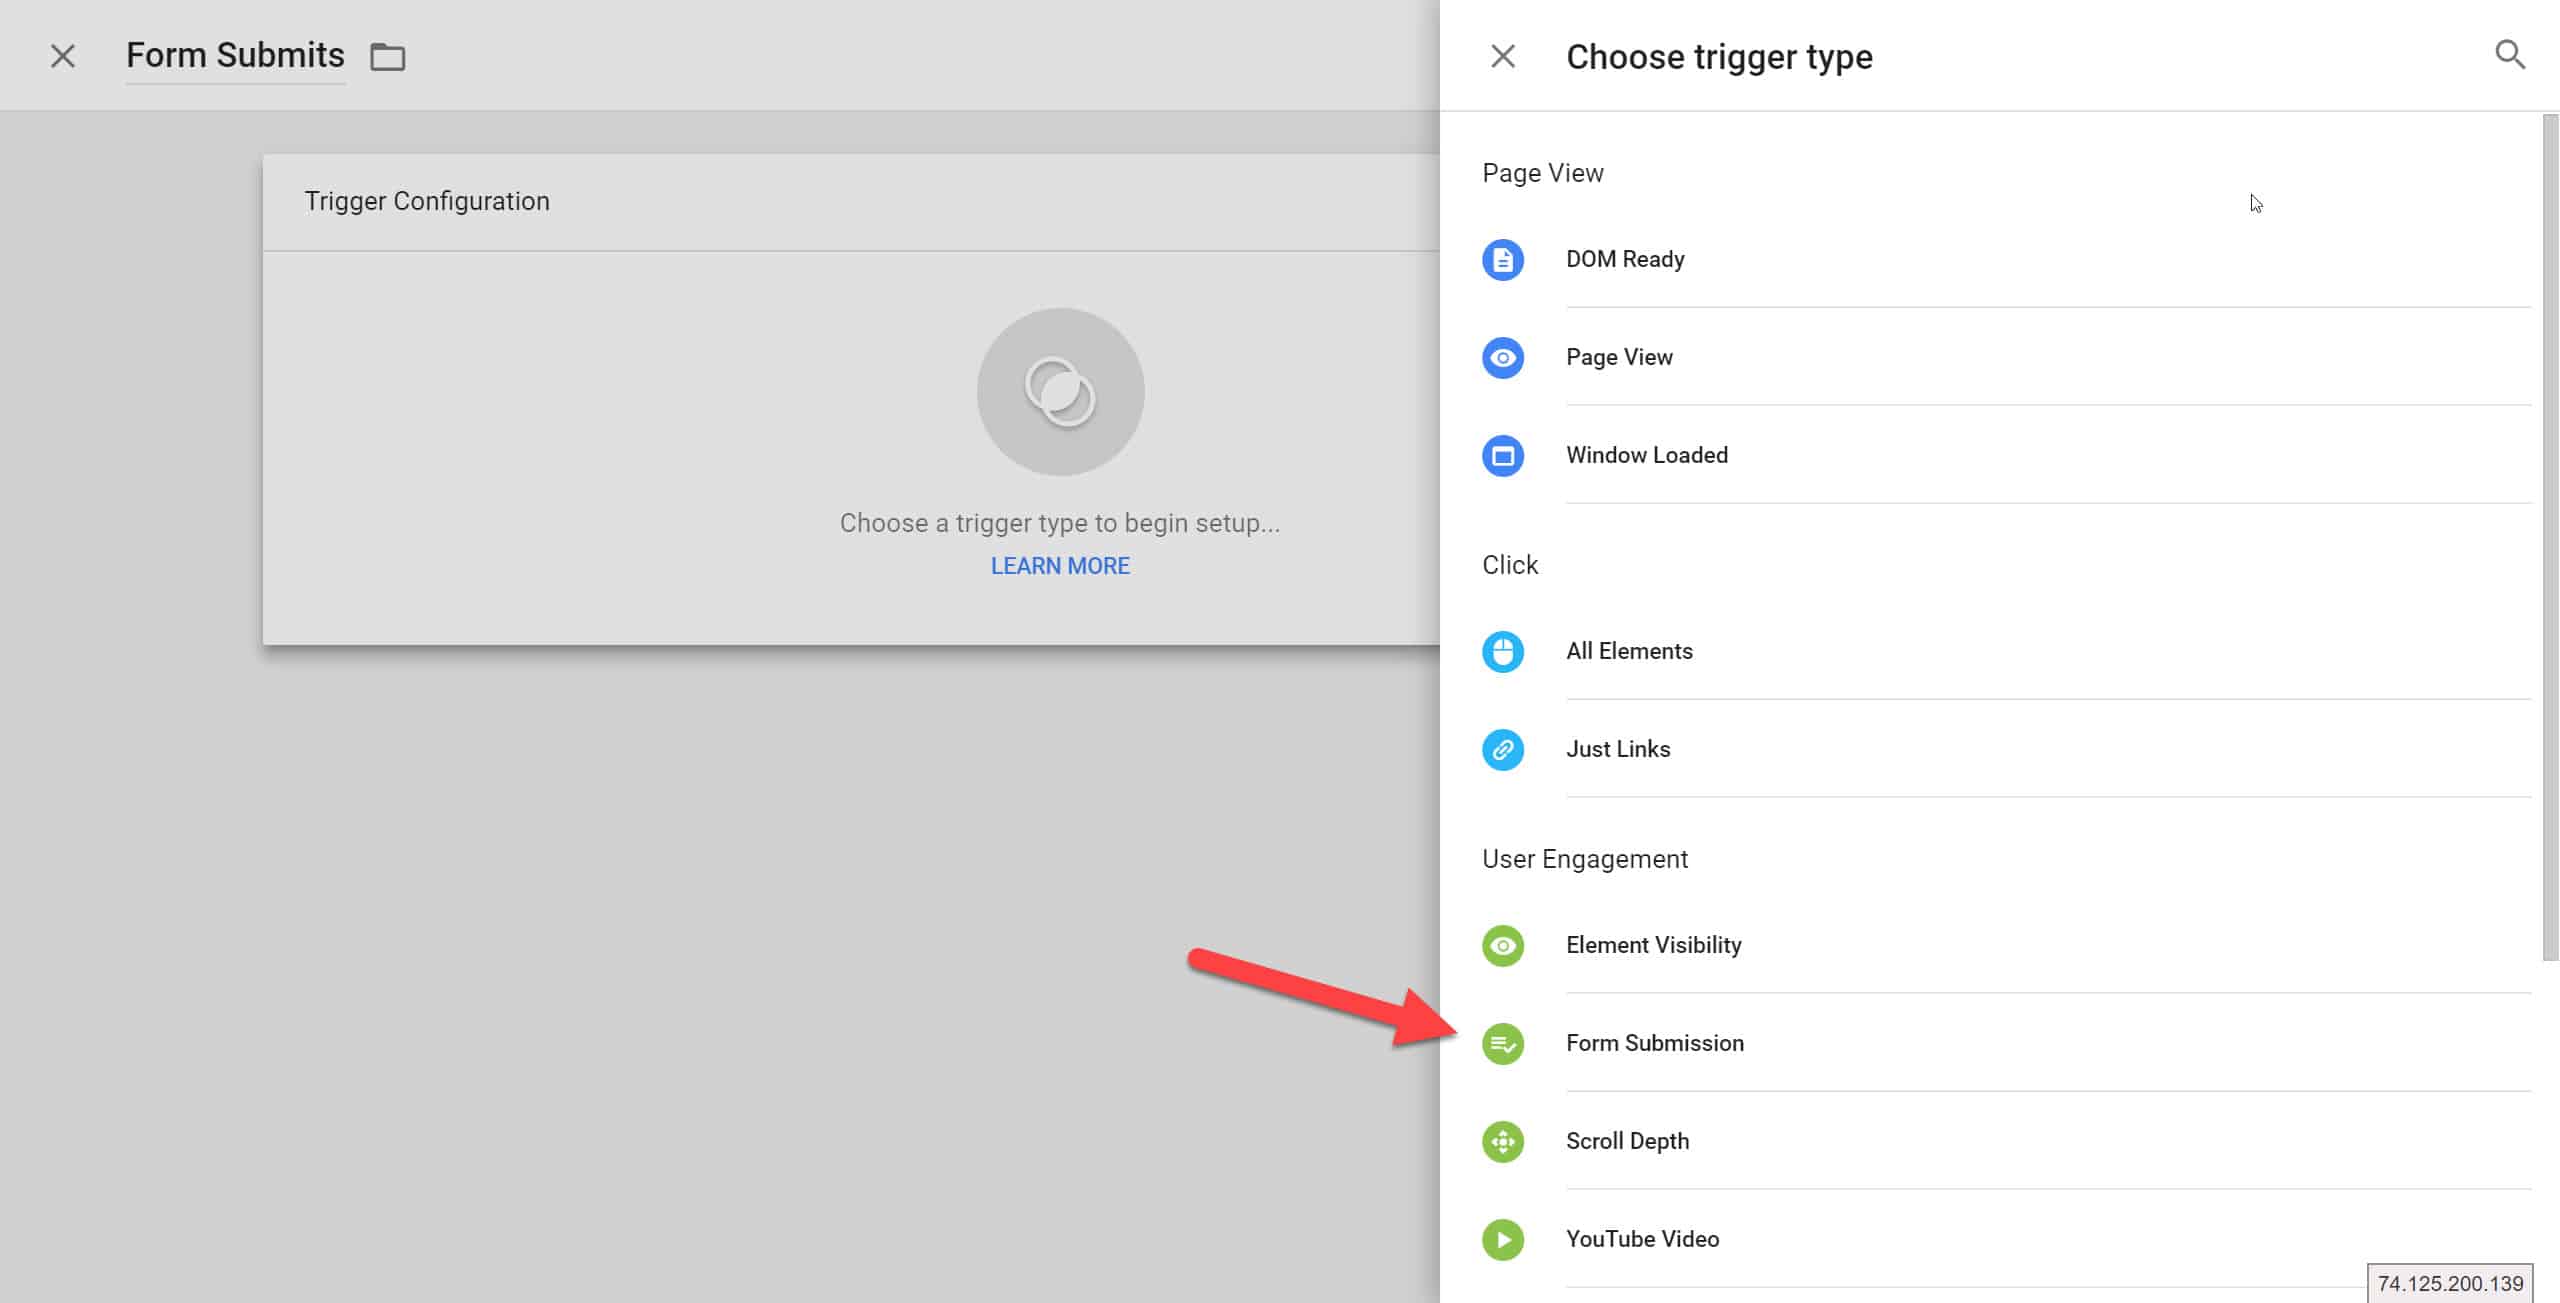
Now, let’s create our trigger.
Click on Check Validation. That will ensure that this trigger only occurs when the form actually submits successfully.
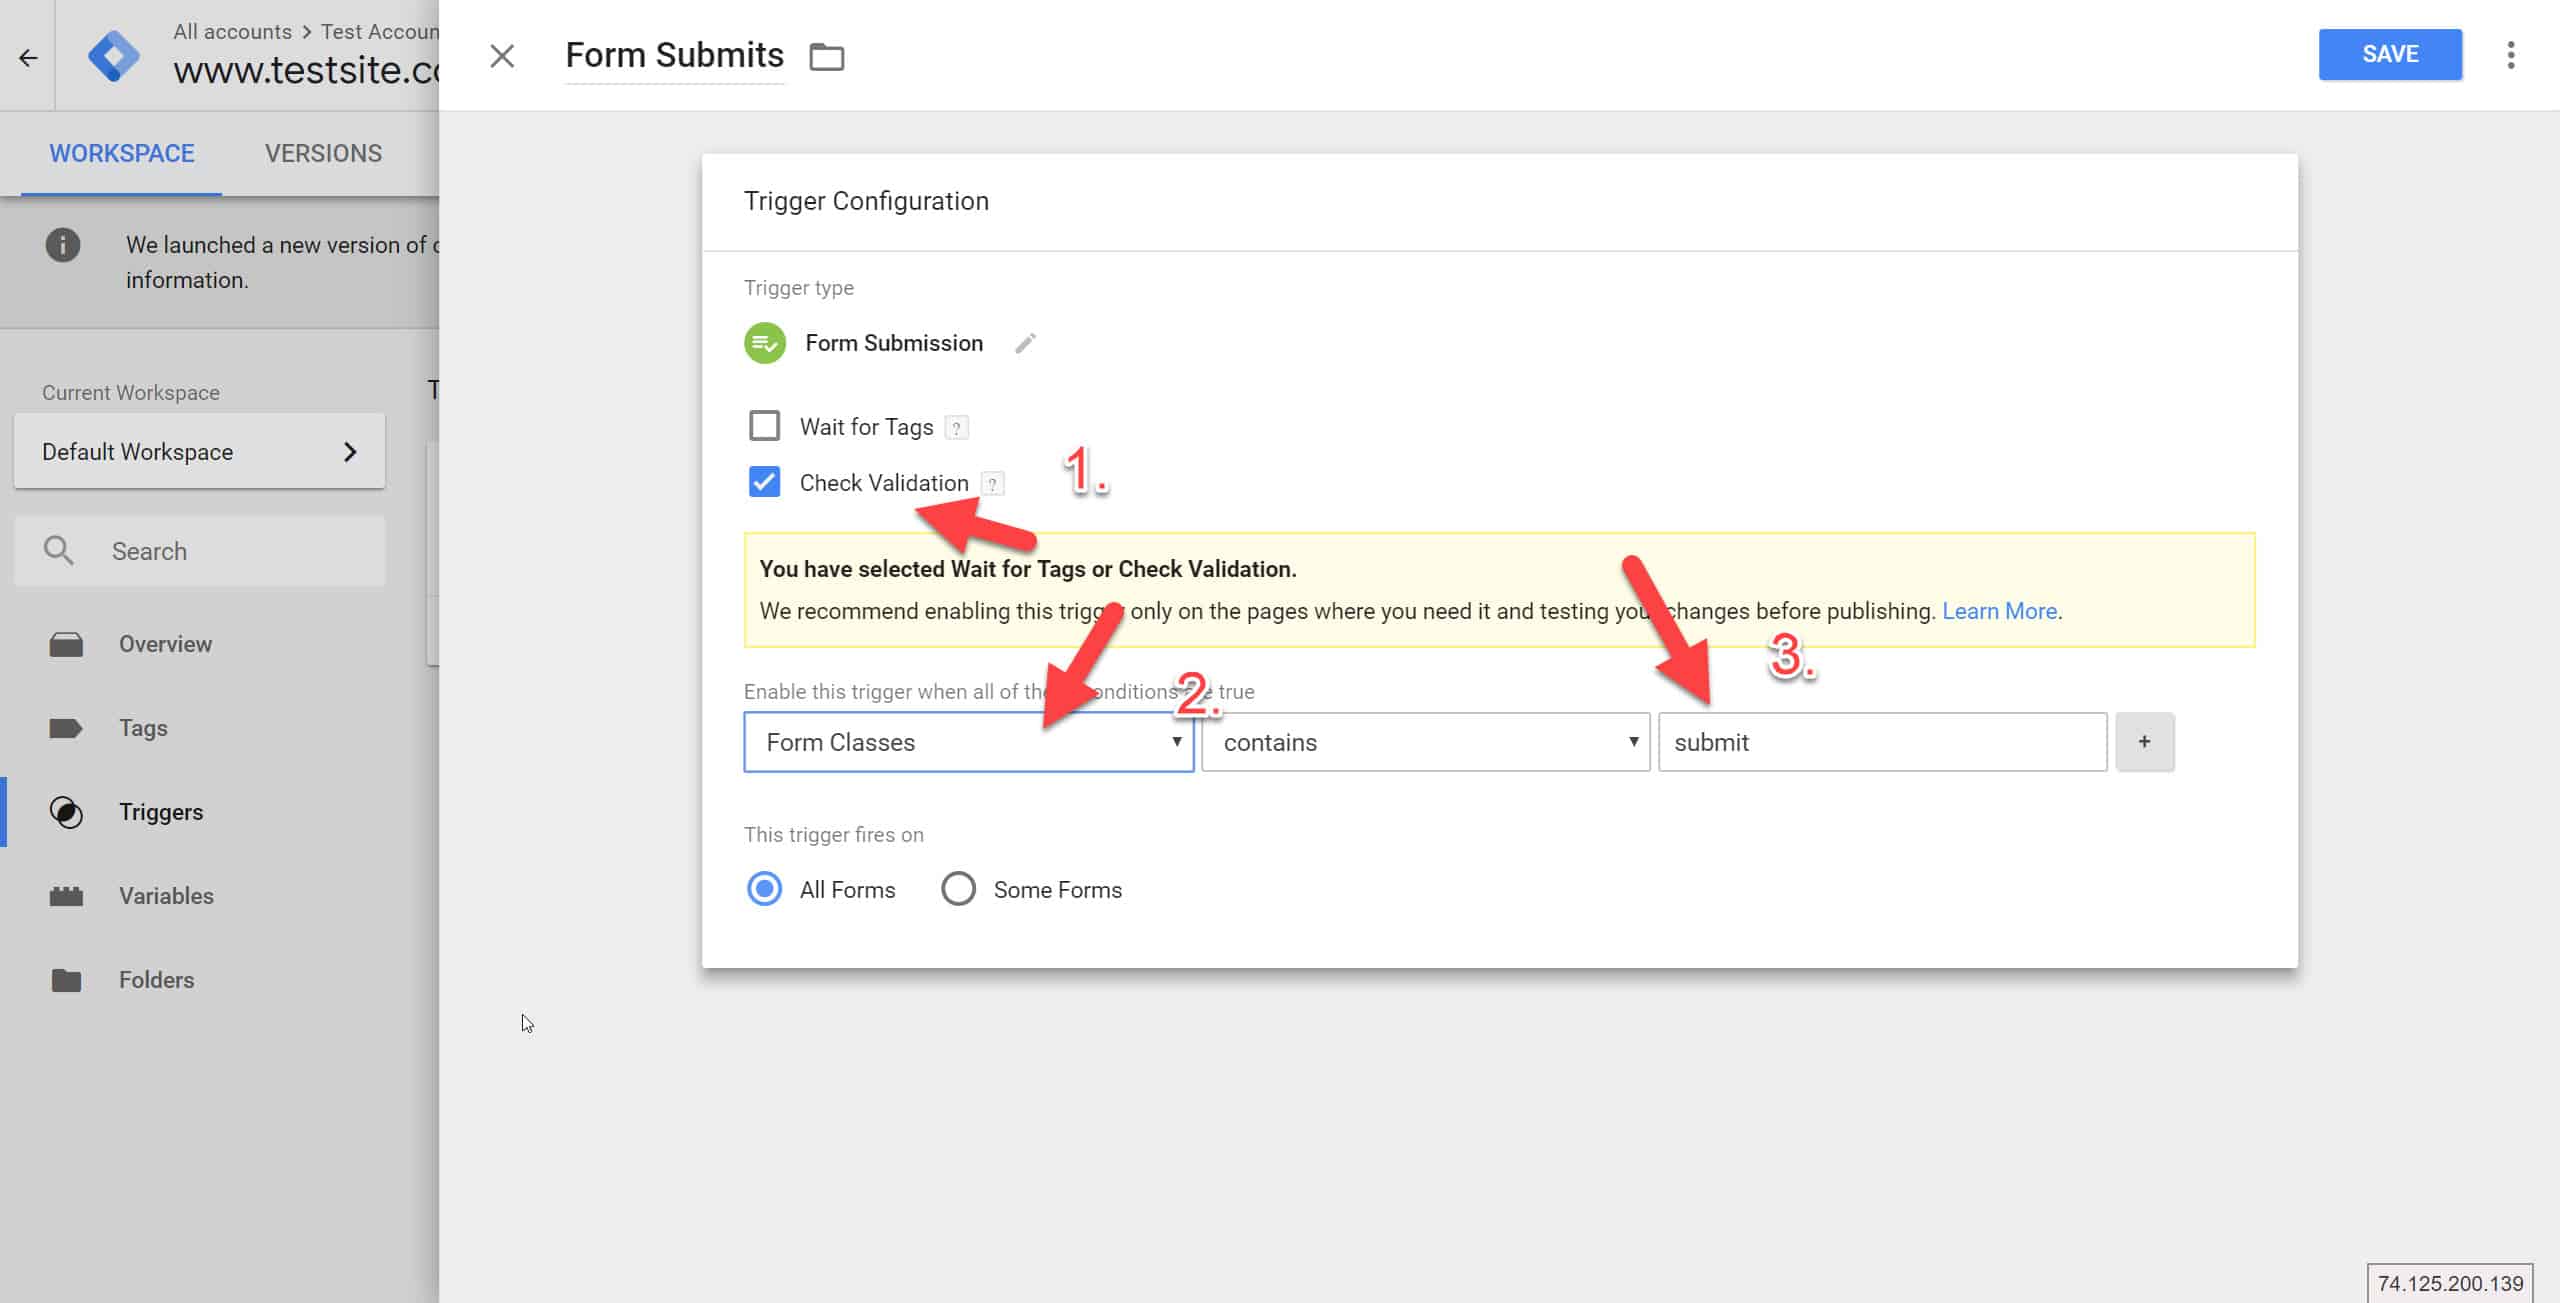
This will trigger on all forms on your website if their form classes =”submit”.
Let’s say you have different forms for different purposes, we can track them separately.
While you can label all form classes “submit”, you should be having unique form IDs for each form. Like form-1, form-2, or however it is already labeled on the site. If you’ve obtained this information previously, you can input them here for the form of your choice.
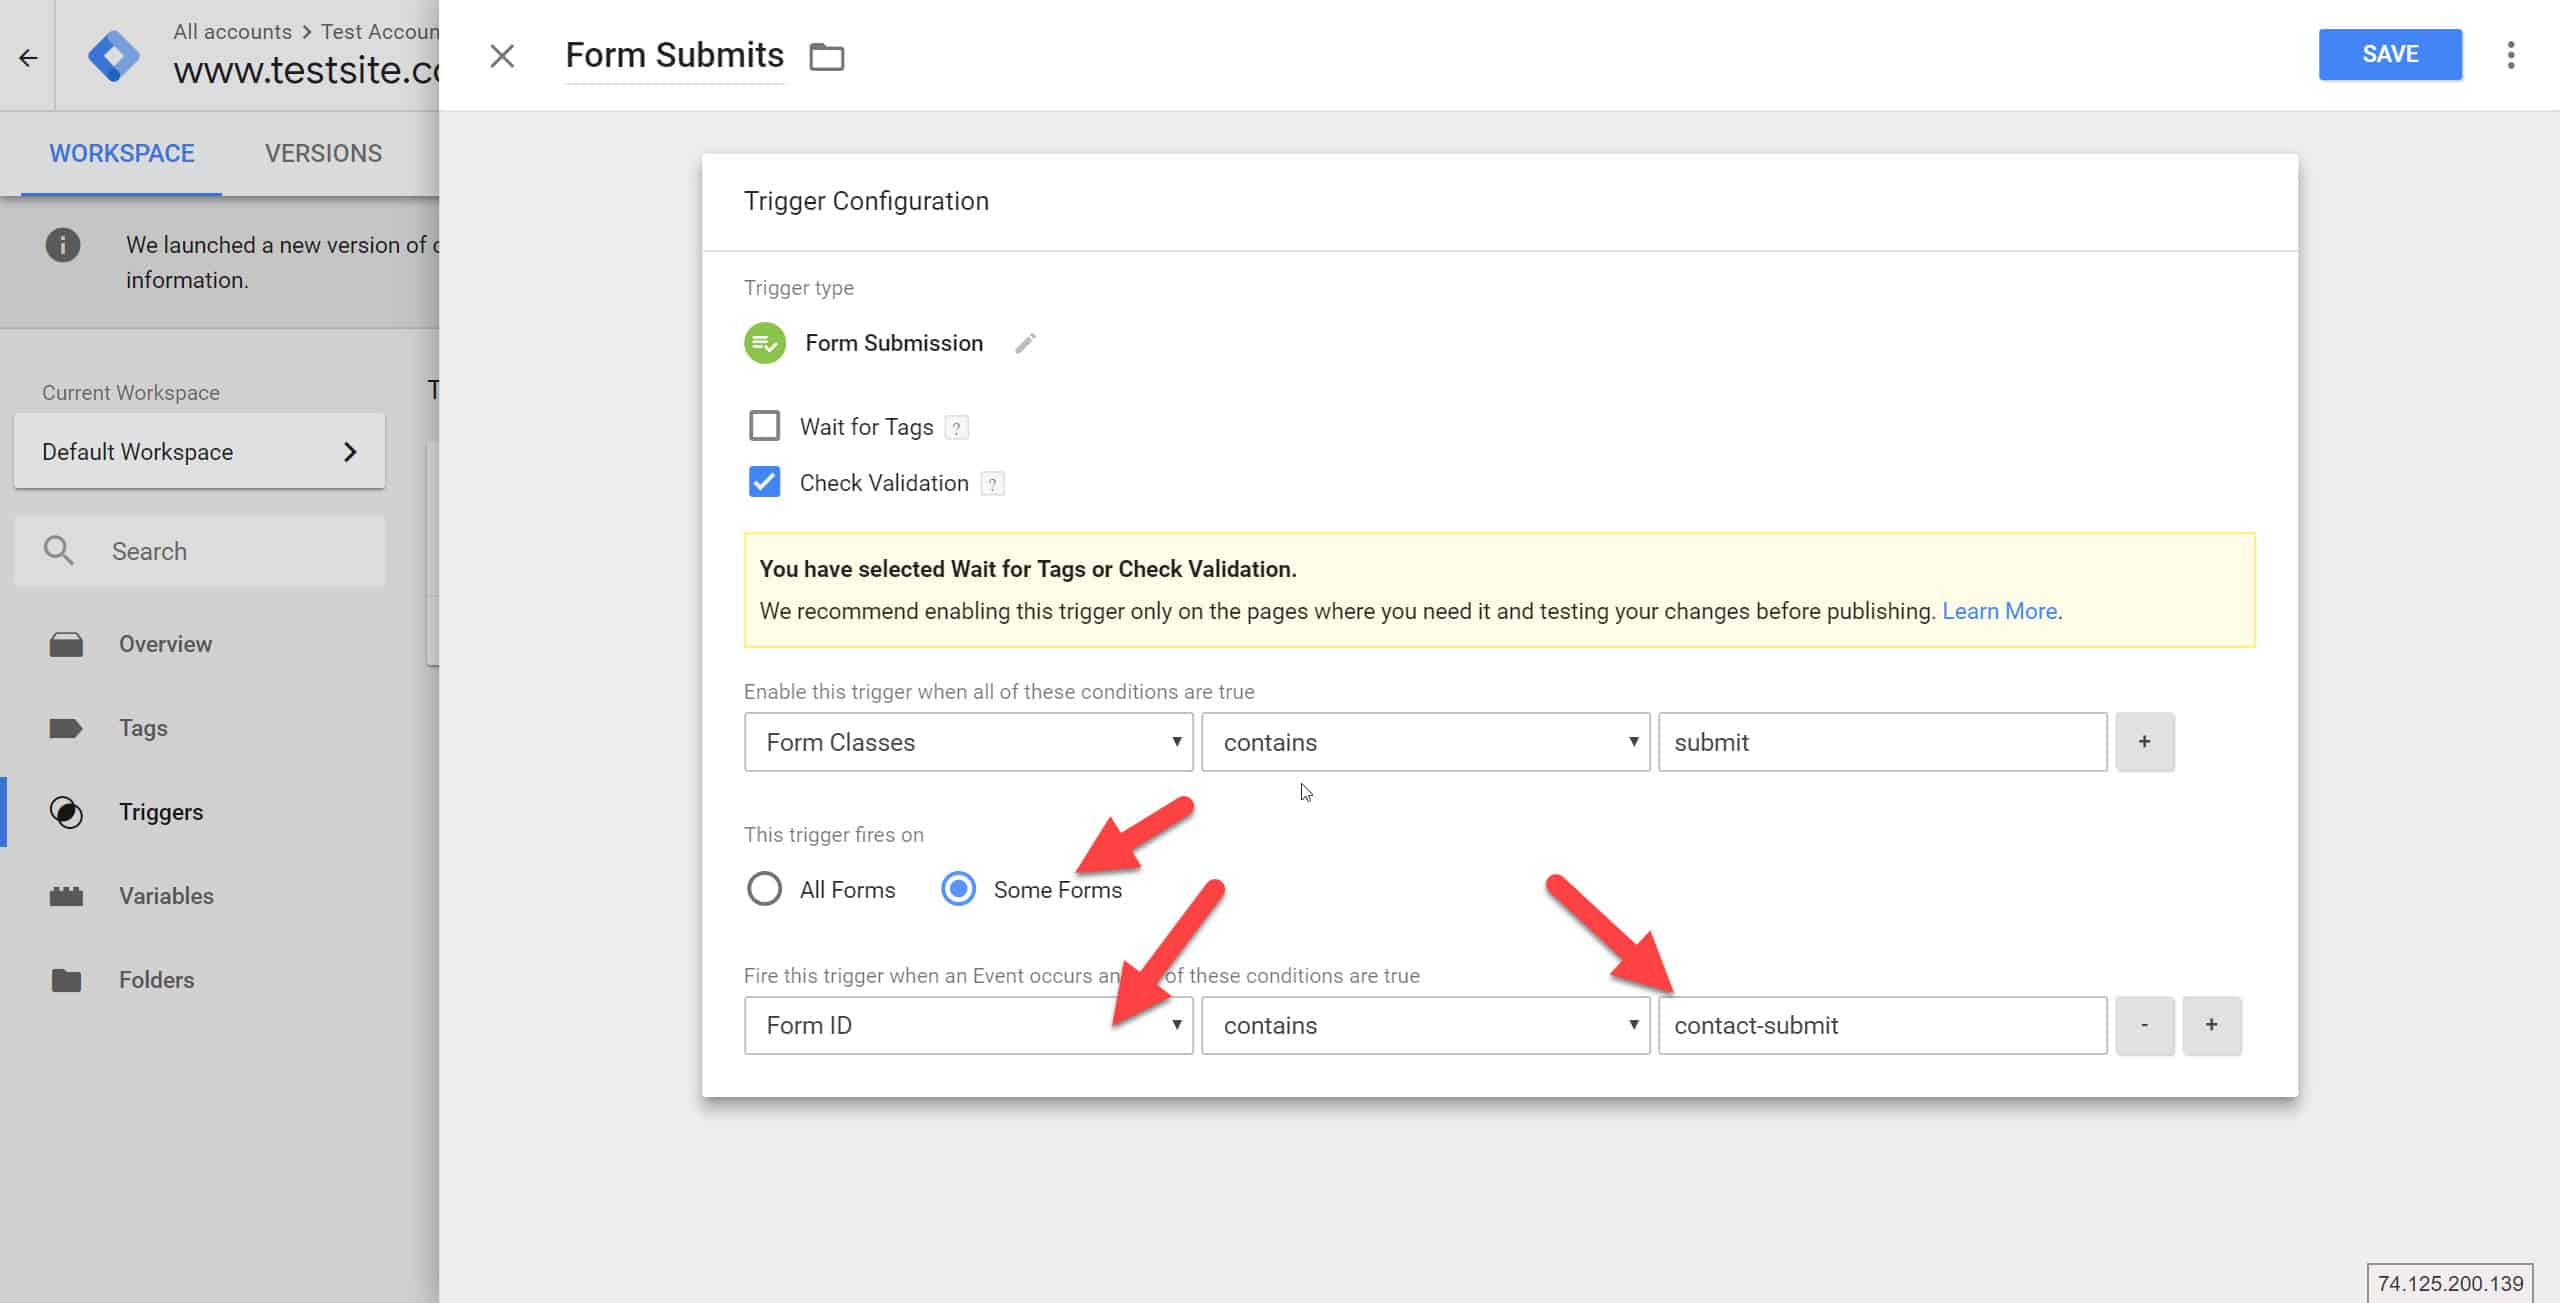
You see, once this condition is set, we will track all forms with the class=”submit”. If your form uses another name, then you need should get your developer to change it (to avoid the need for a more complicated set up in GTM involving datalayers and stuff like that.)
And there’s your Trigger.
The question comes next. What do you want to track?
Let’s assume we want to track a form submit as an objective for our site. Typically with Google Analytics, we will set a destination goal for a thank-you URL. With an AJAX form submit, we could track events as a goal.
Firstly, we create a tag in GTM that fires a Google Analytics Event. This is arbitrary and something we define. We would want to name it sensibly of course, if we were to make sense of what we’re doing later down the line.
Let’s do it like so. Go back to the option of creating your Tags and Choose the GA – Universal Analytics Option.
Make sure you have Track Type: Event selected.
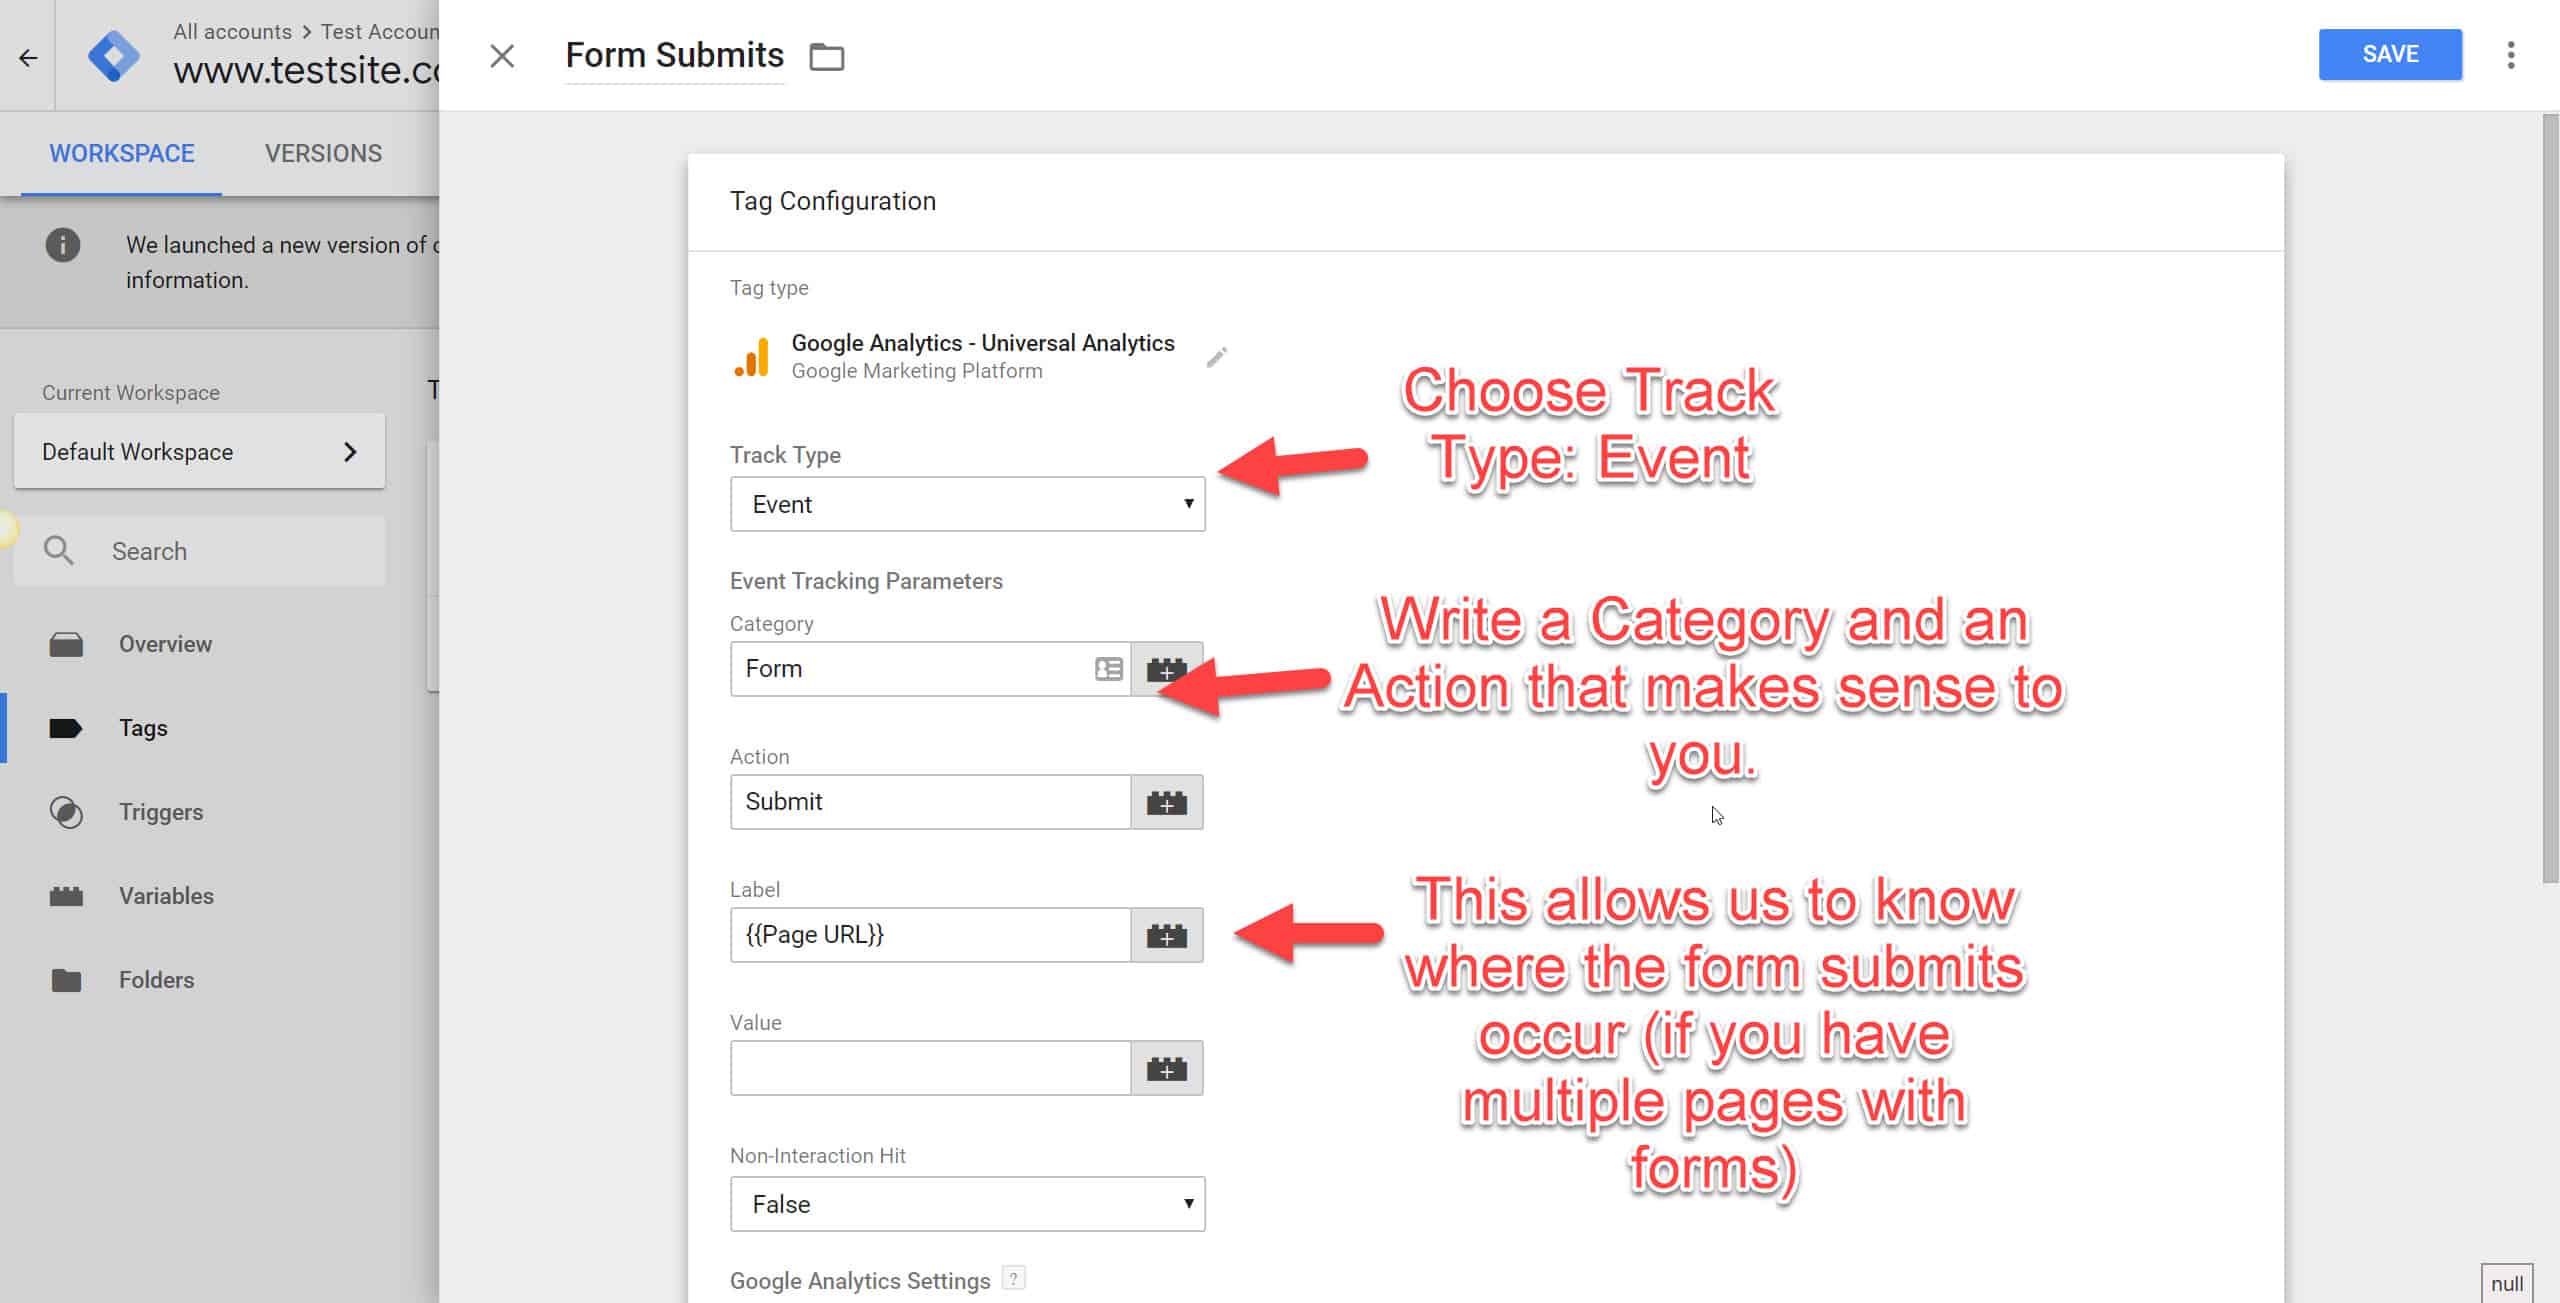
Remember to input your Google Analytics Settings as well.
Label your Event Category, your Event Action. I’d like to leave Event Label as a variable. This will mean if a form submit occurs on the url /enquiry, the Event Label will be /enquiry, and if the form submit occurs on another page, the Event Label will input that Page URL accordingly. This allows to look into the various form submits that we have at a granular level (without) having to do a Tag + Trigger for each form.
Thus, when the form submit is pressed (the trigger), the tag (GA Event) will fire and an Event will be recorded in Google Analytics with the following information:
Event Category: Form (fixed)
Event Action: Submit (fixed)
Event Label: A URL (which will vary depending on the url where the form was submitted from.)
Now, when we define that event in Google Analytics as a Goal, every time this happens, a goal or conversion is counted.
And there we have it!
Just in case you don’t know how to do that, let’s run through how to do so in Google Analytics.
Go to the Admin Panel, click on Goals and then click on +New Goal.
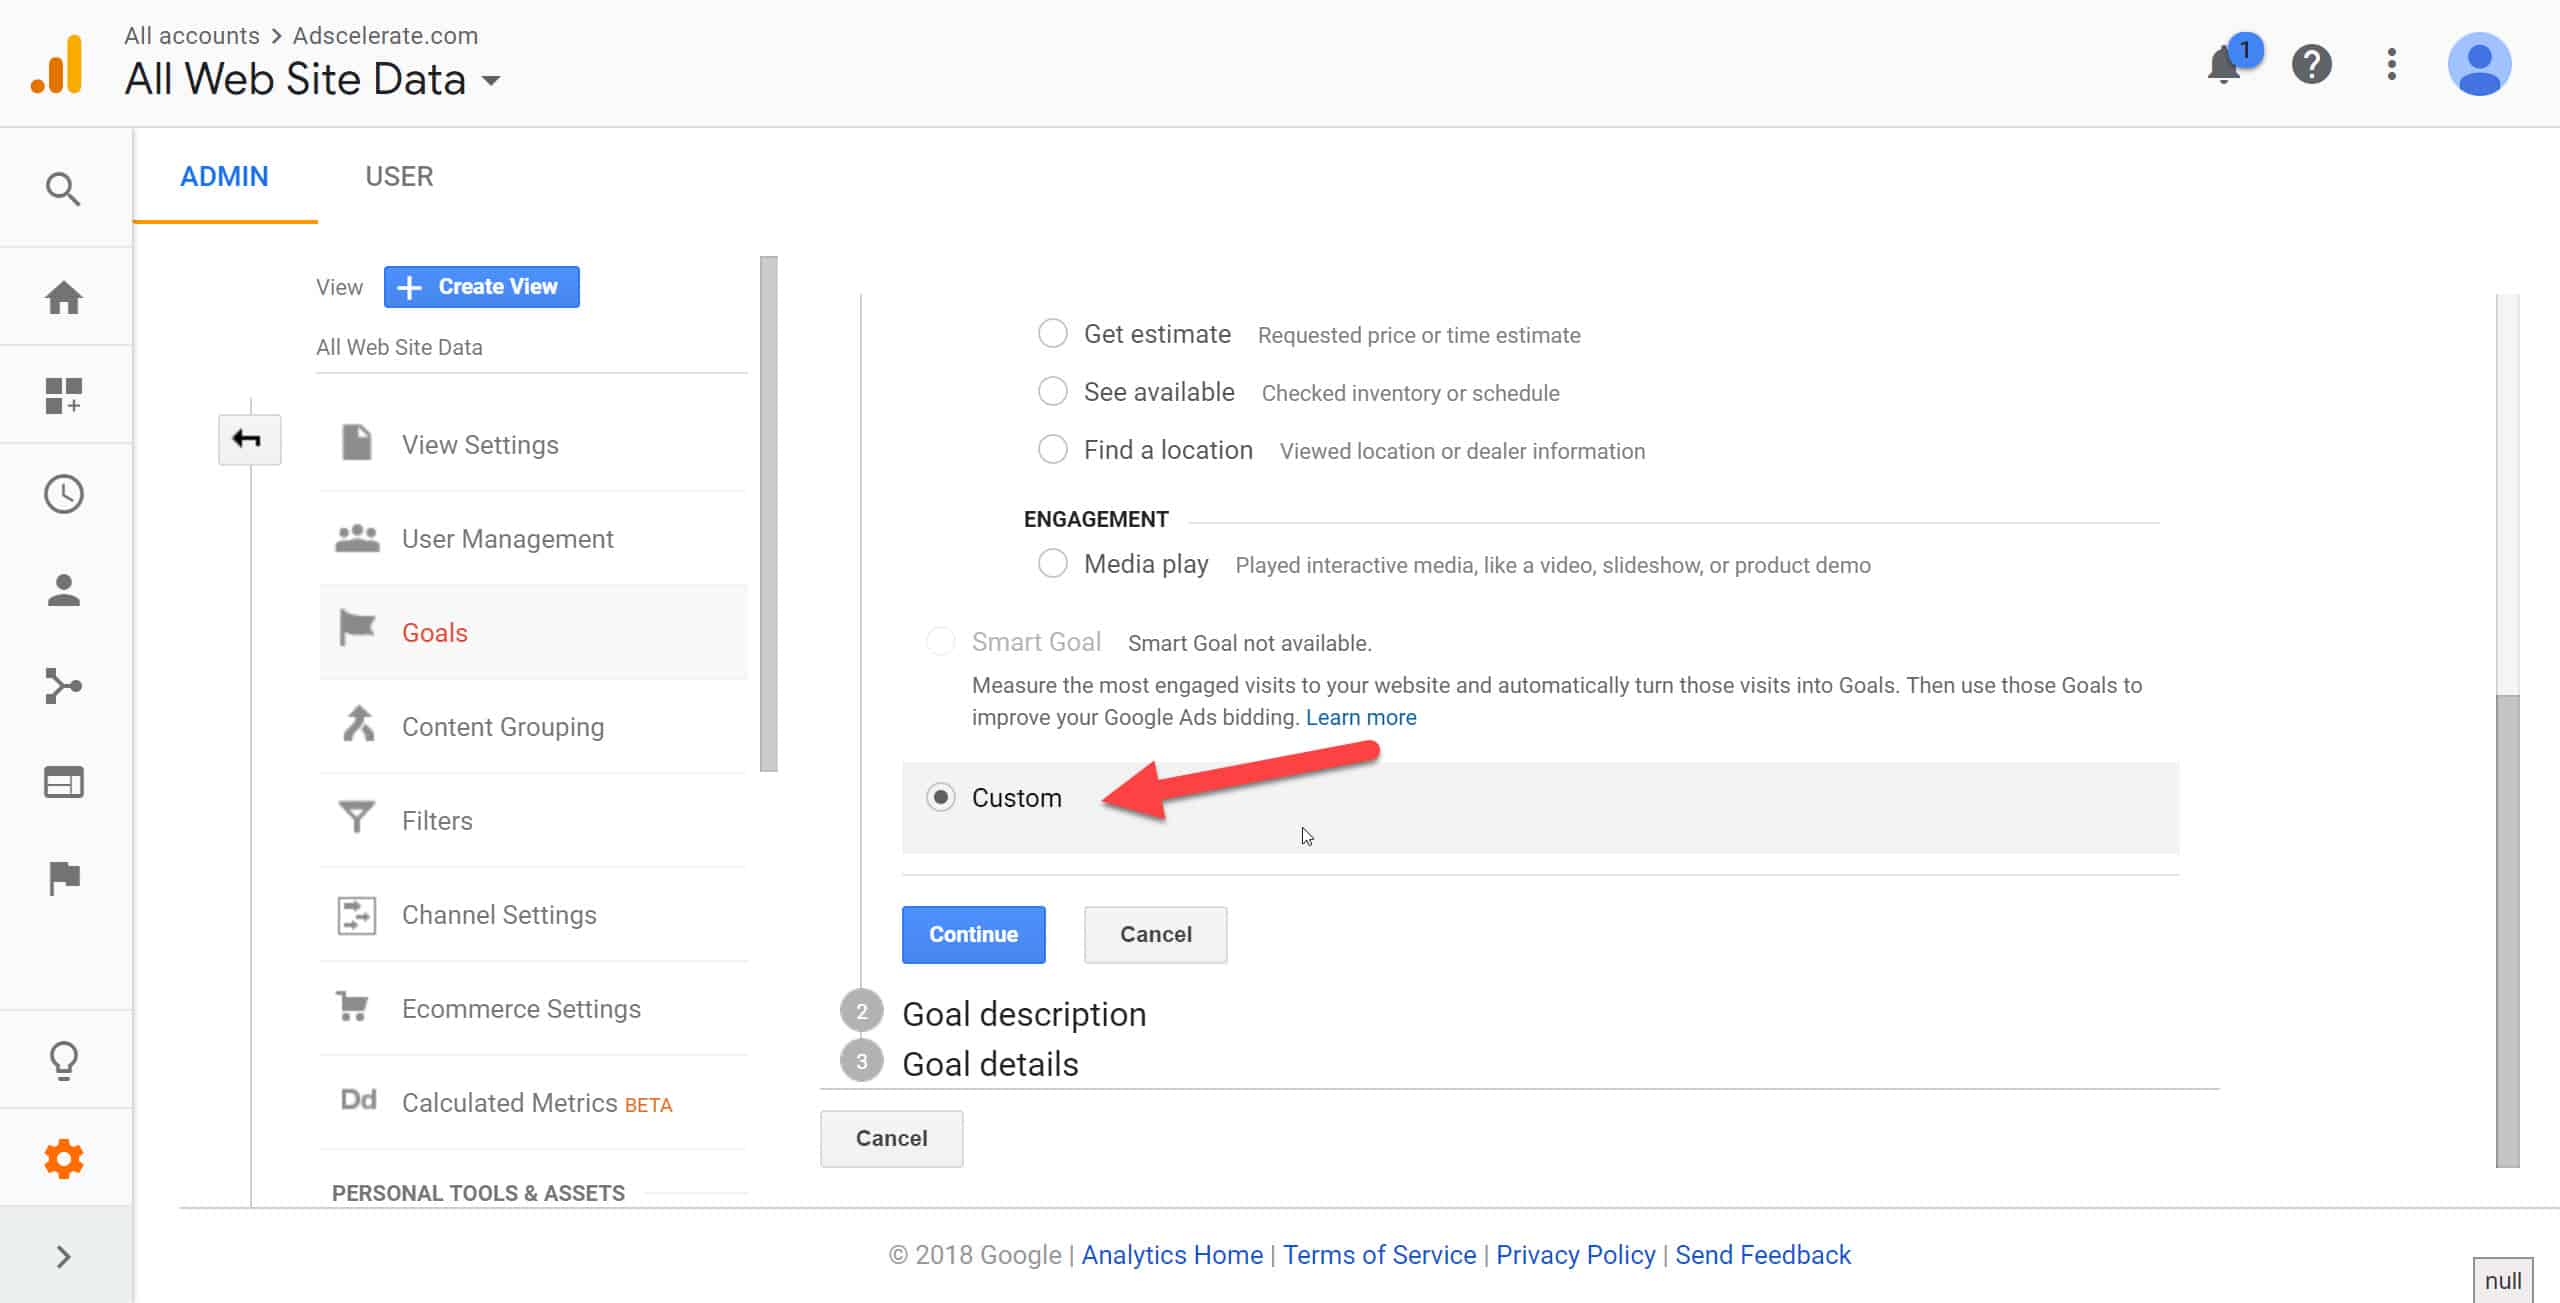
Click on the Custom option for Step 1.

Name your Goal and then choose Type: Event, then click continue.
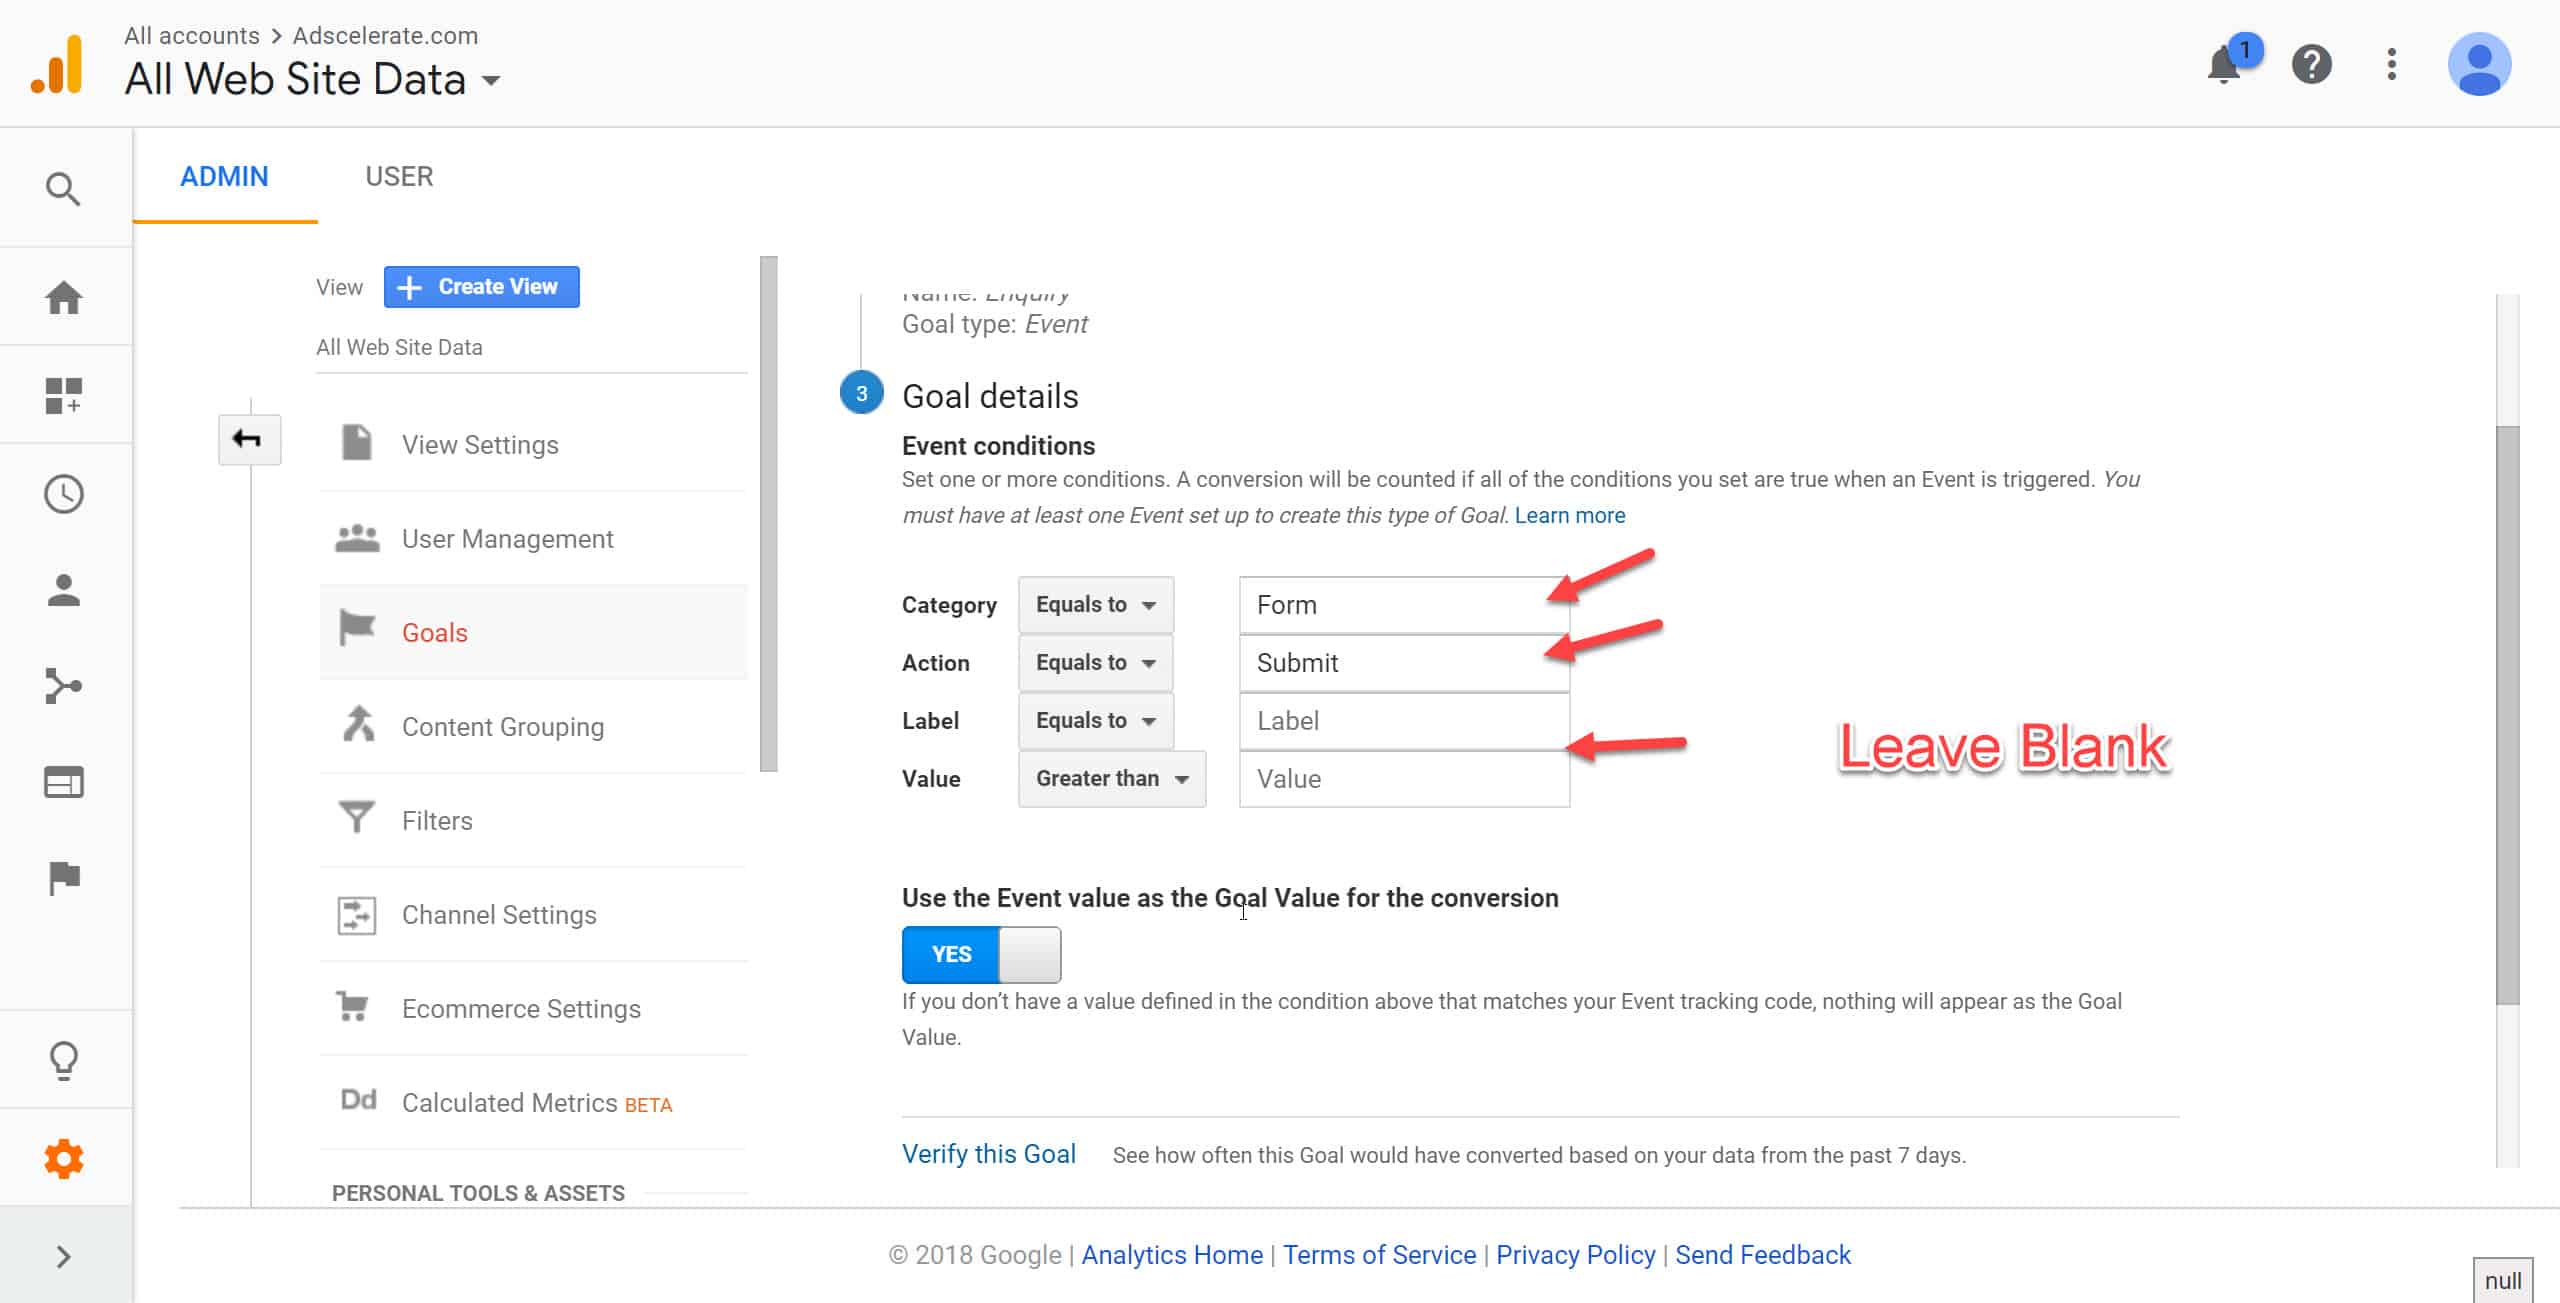
Now remember the GA Event Tag we just created? Make sure you input the conditions exactly as it is spelt.
So we have Category as “Form”, and Action as “Submit”.
We can leave the Event Label blank as we might have different URLs as an input. If we do put something there and the URL doesn’t match, we wouldn’t get a Goal counted if we didn’t input the right one. Makes sense?
Same goes for Value. Unless these are purchases or leads that you do have an associated money value to it, you can choose to define it on both Google Tag Manager’s side and on Google Analytics side.
Once again, just make sure the all the Event Categories and Actions you created in Google Tag Manager match the ones th at you will input into Google Analytics and it will work.
Events Tracking – How to Track Calls with GTM
The other thing that is very often missed out, is call tracking. Users don’t just submit forms, they click on call buttons or on numbers that are visible on your website.
While there are better and actual call tracking solutions out there which I would recommend using with conjunction with Google Analytics, the method I’m about to cover is a quick & dirty way to track calls – with limitations.
It’s a bare-minimum set up if you do not have access to proper call tracking solutions or Google Forwarding Numbers.
Pseudo-Call Tracking, if you will.
Firstly, every number on your site should have the correct markup. Like tel:+111-1111-1111 with the appropriate html for links.
This will turn into a clickable link that has a tel markup. If you need an example, just visit my footer at the bottom and hover over the phone number.
Like our previous example, we’re going to make this into our trigger.
Mantra Time:
If This, Then That.
If click url contains tel, then fire the Google Analytics event.
Let’s set up the trigger and GA event in Google Tag Manager like so.
Create The Trigger and Choose “All Elements” (Just Links will work as well.)
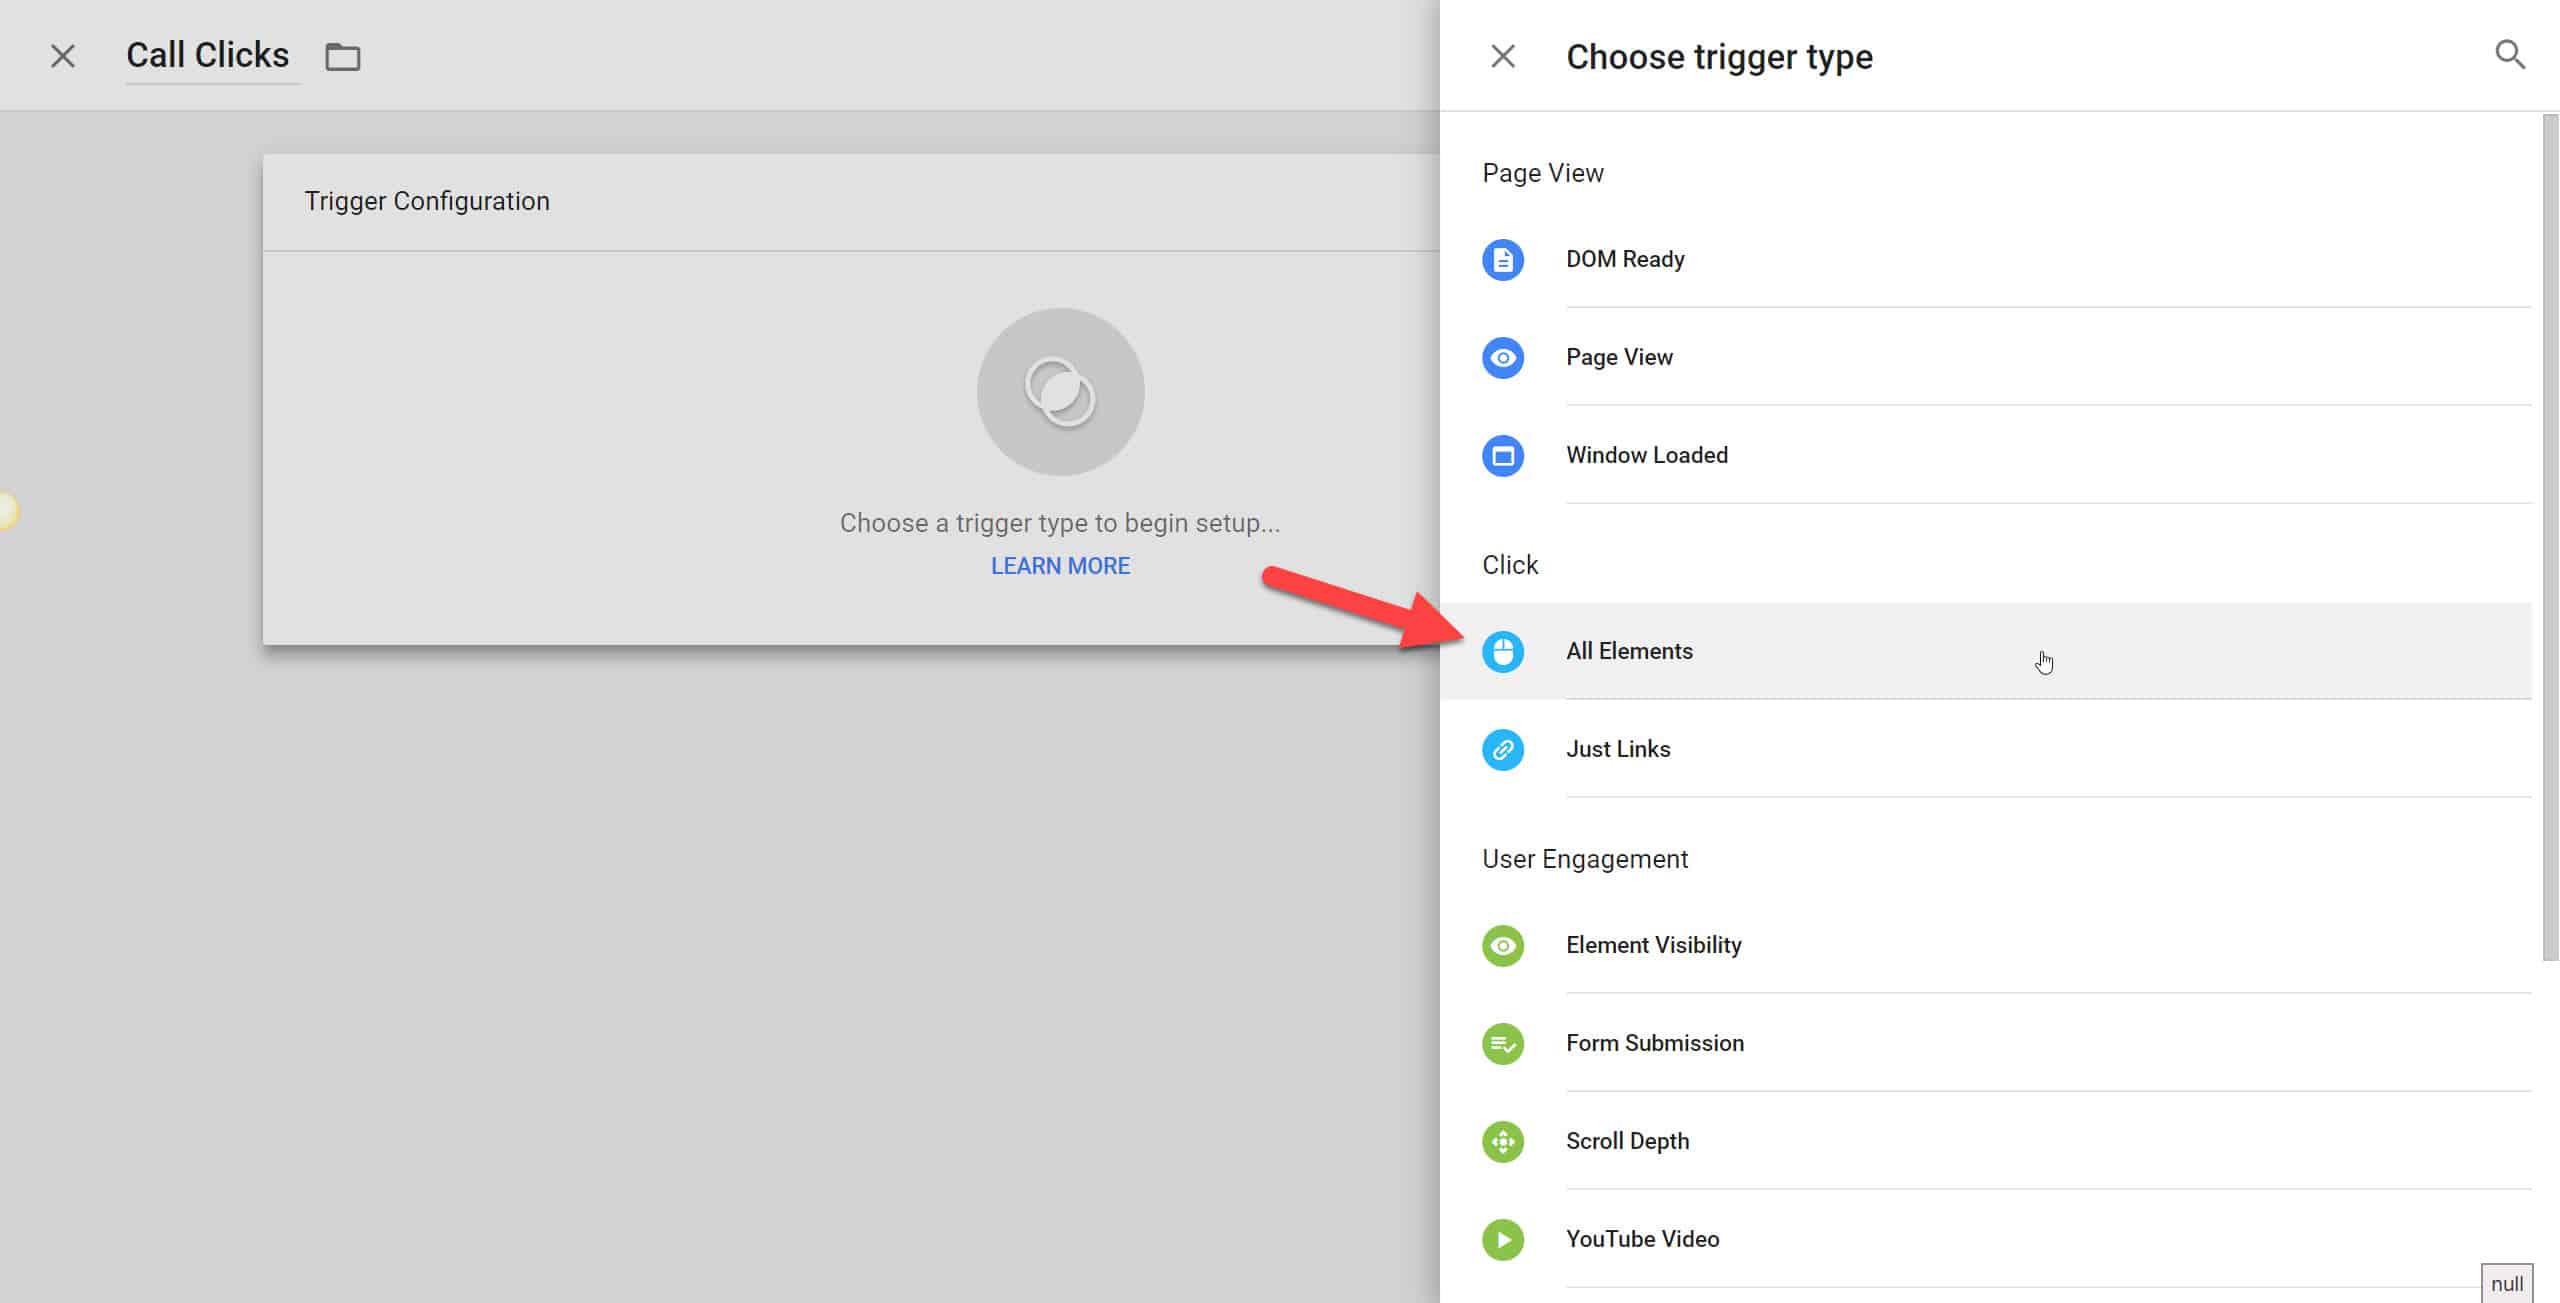
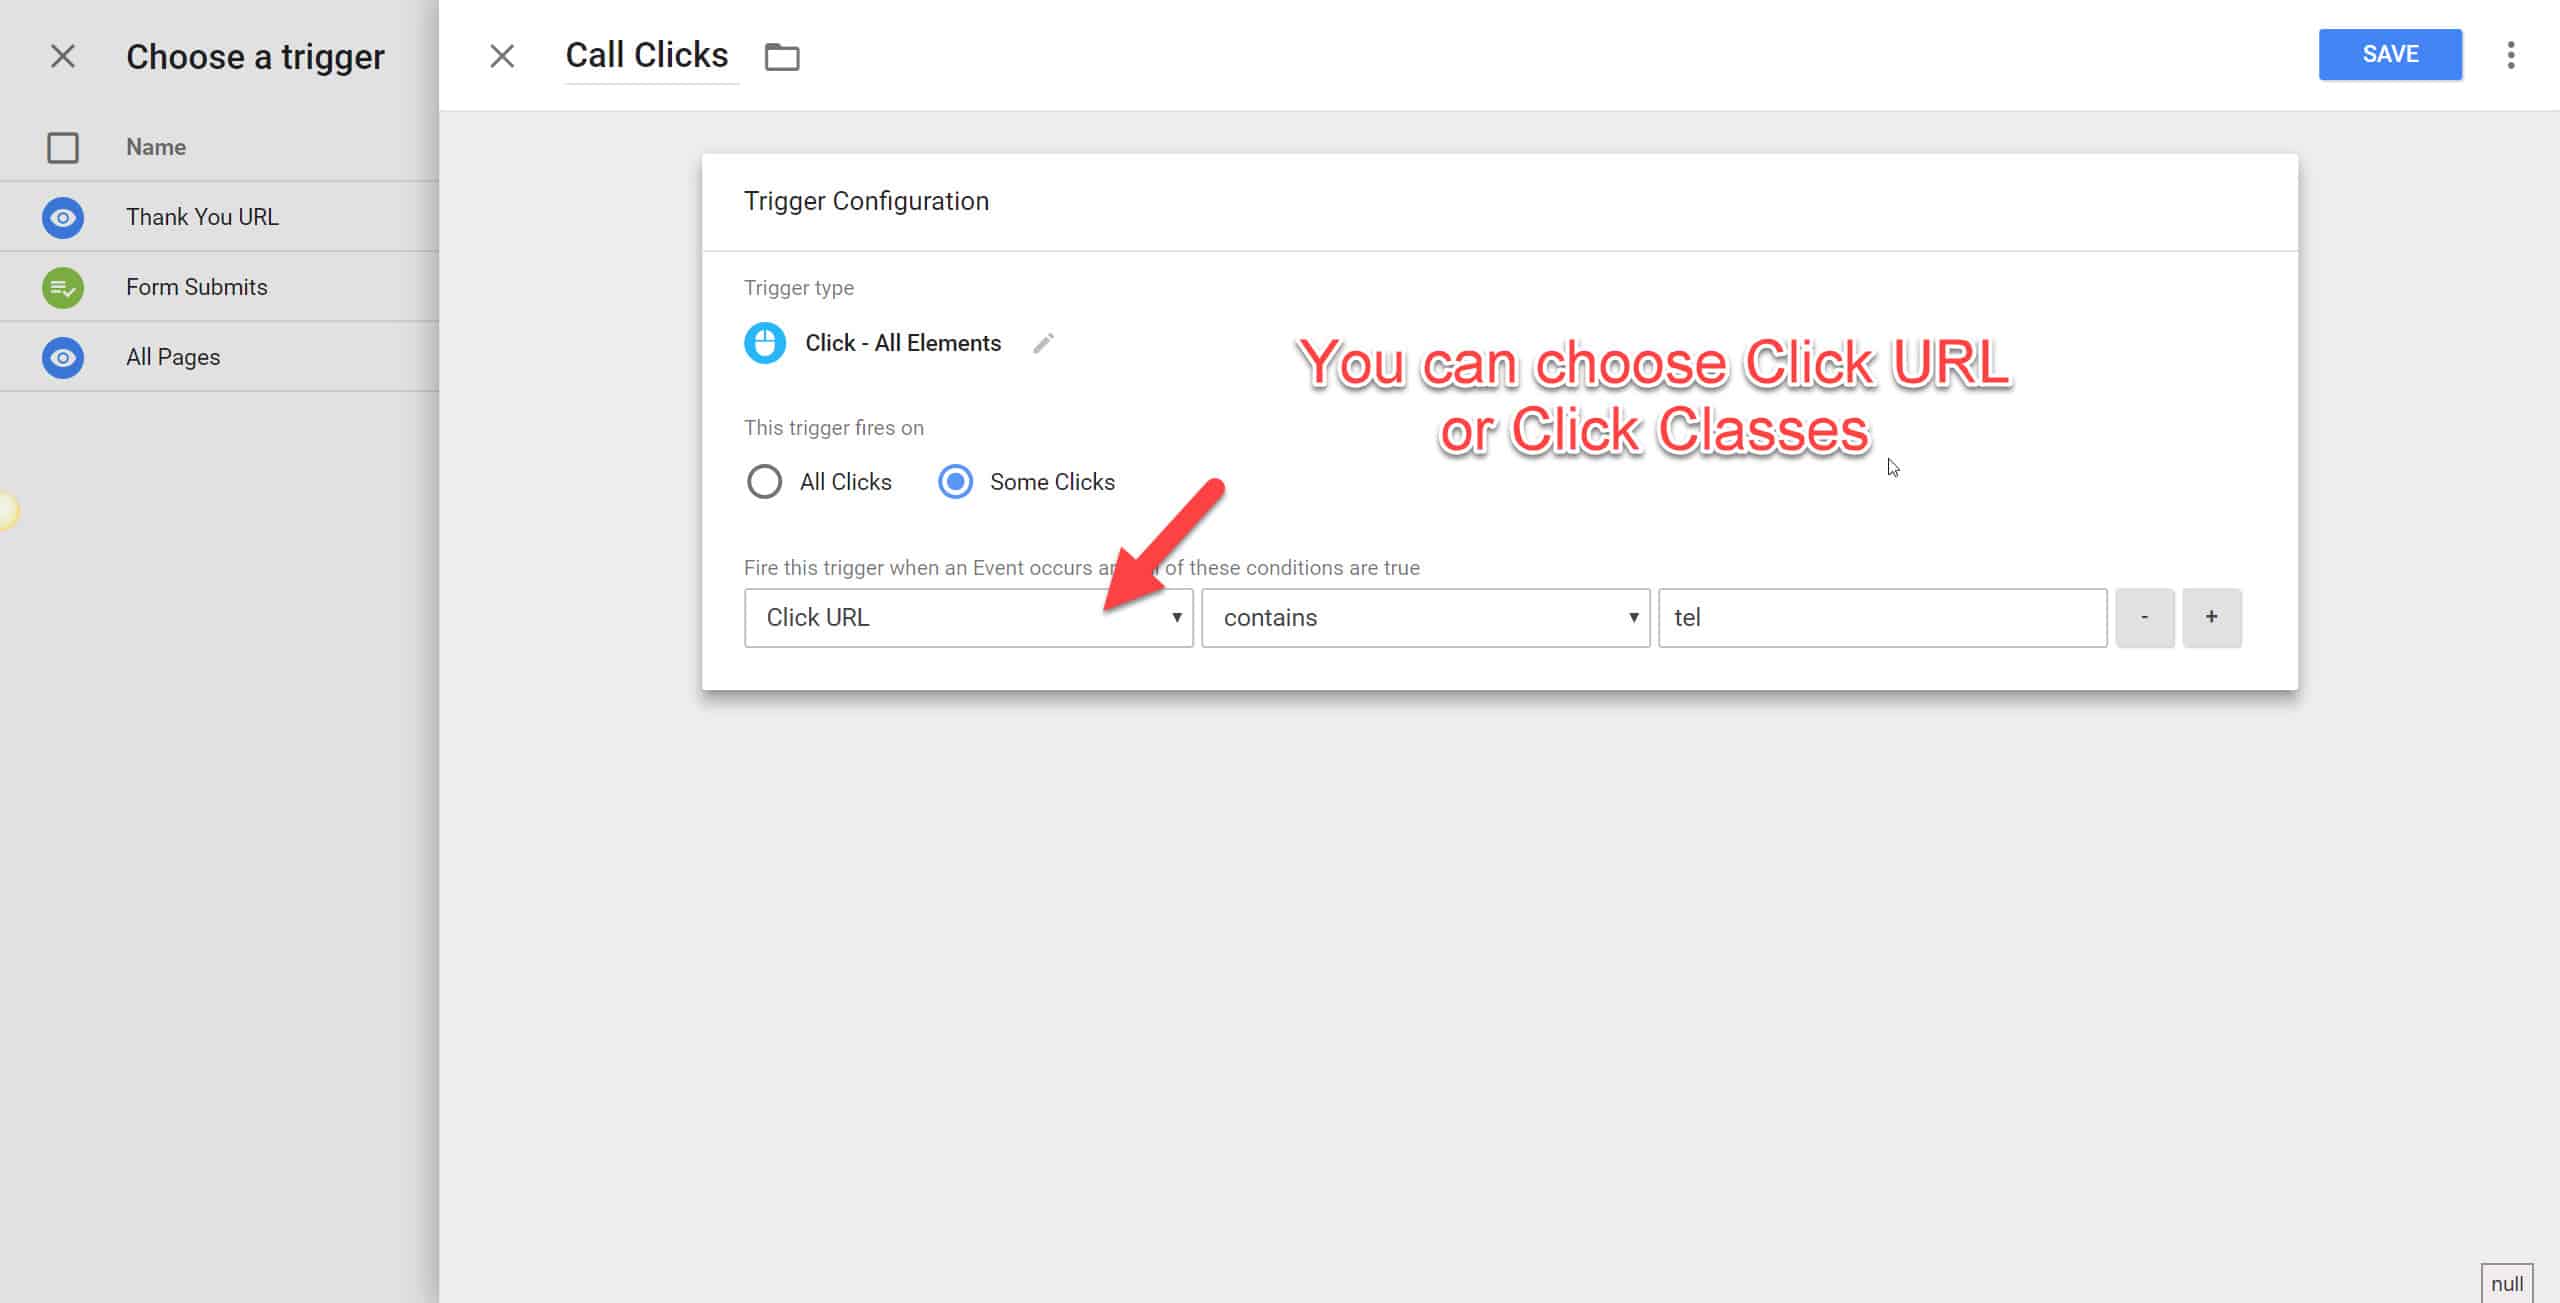
Select Some Clicks for the “This trigger fires on: option”. Select the Click URL option or the Click Class option. Input tel on the right column.
This will create make all elements (or links) that contain the tel markup to become a trigger for our Google Analytics Event.
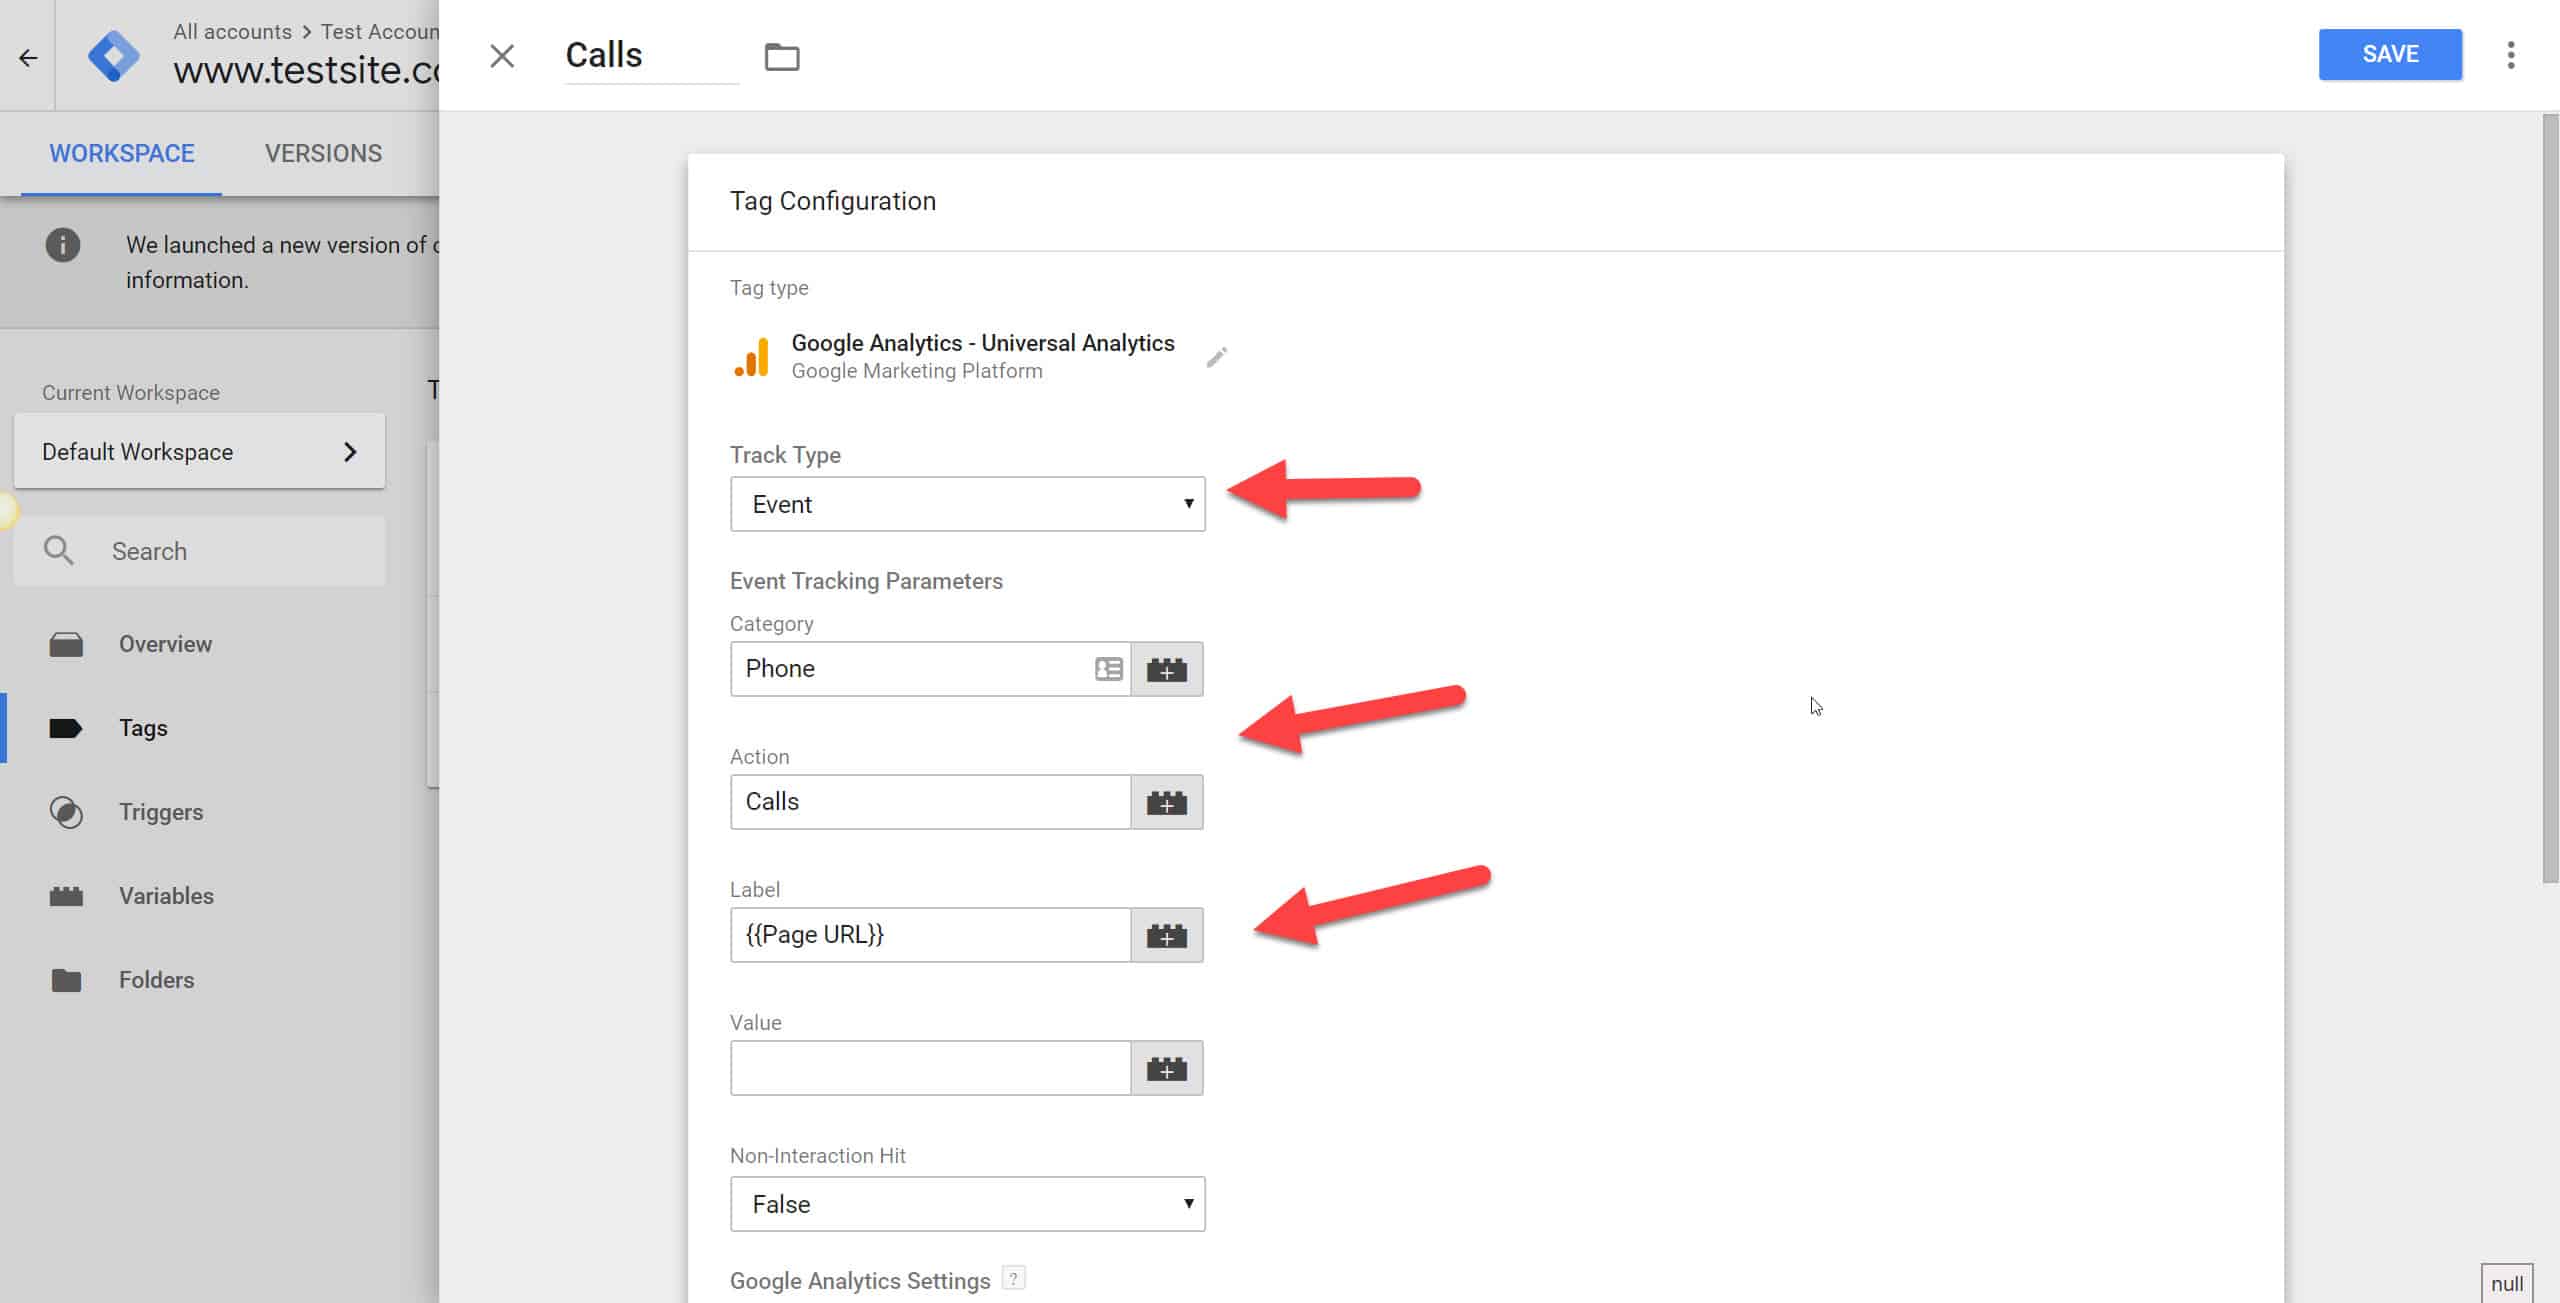
Setting up the GA Event in GTM is identical to our previous step.
There. That’s all to it.
If you would read aloud how the trigger+tag would flow, it will be something like this.
If user clicks on the phone number, then, fire a GA event that has these labels.
We then set this as a goal in Google Analytics. Do this the same way you set up the Goal Tracking with the Form Submit in the previous section.
Just this time, input the Category = Phone and Action = Calls instead, since this is what we have defined.
Note: This is not the ideal method to do call tracking for these two reasons.
- We don’t know if the user actually calls through. When clicking the numbers on the mobile, it will prompt a “call this number” option on the phone. The user will then have to click again to call. All this method does though, is to track the first step, not the second. Again, a click in this case doesn’t necessarily result in an actual call.
- Even when it does result in a call, we are unable to track how long the call went or if the call was a qualified lead. There is therefore no way to determine the quality of the calls.
If possible, implement a call tracking solution as soon as you can. That will help with proper tracking and analytics of which marketing channels work, and which ones don’t. I’ve seen Callrail recommended the most, amongst Call Fire and Analytics Call Tracking. An up and coming call tracker Jensen looks promising too (does much more than just call tracking), so you might want to check that out.
Events Tracking – How to Track Emails
This method is no different from the method above. What we need to do is to define our emails that appear on the site as a link, with the mailto markup. Let’s use my site as an example: info@adscelerate.com. Now, info@adscelerate.com becomes a clickable link with the mark up “mailto”.
When a user clicks on the email, the default mailing software on the users computer will appear.
Try it!
We’ll run into the same problems with the call-tracking method we described above – there is no way of knowing if the user actually emails us.
Why do we still track it then?
Because, people still do click and email, and as a whole, more data is always better than no data.
Events Tracking – How to Track Downloads
If you have PDFs, Brochures and Informational content that users can download, I would consider tracking this metric.
It counts as a micro-conversion and in the grand scheme of things, it can tell us whether our users are engaged or not.
Let’s go back to the screenshots setups and define our Trigger, and Tags.
First, we need to create a user-defined variable.
Go to the Variables tab and Create a New User-Defined Variable, and choose the Custom Javascript Option
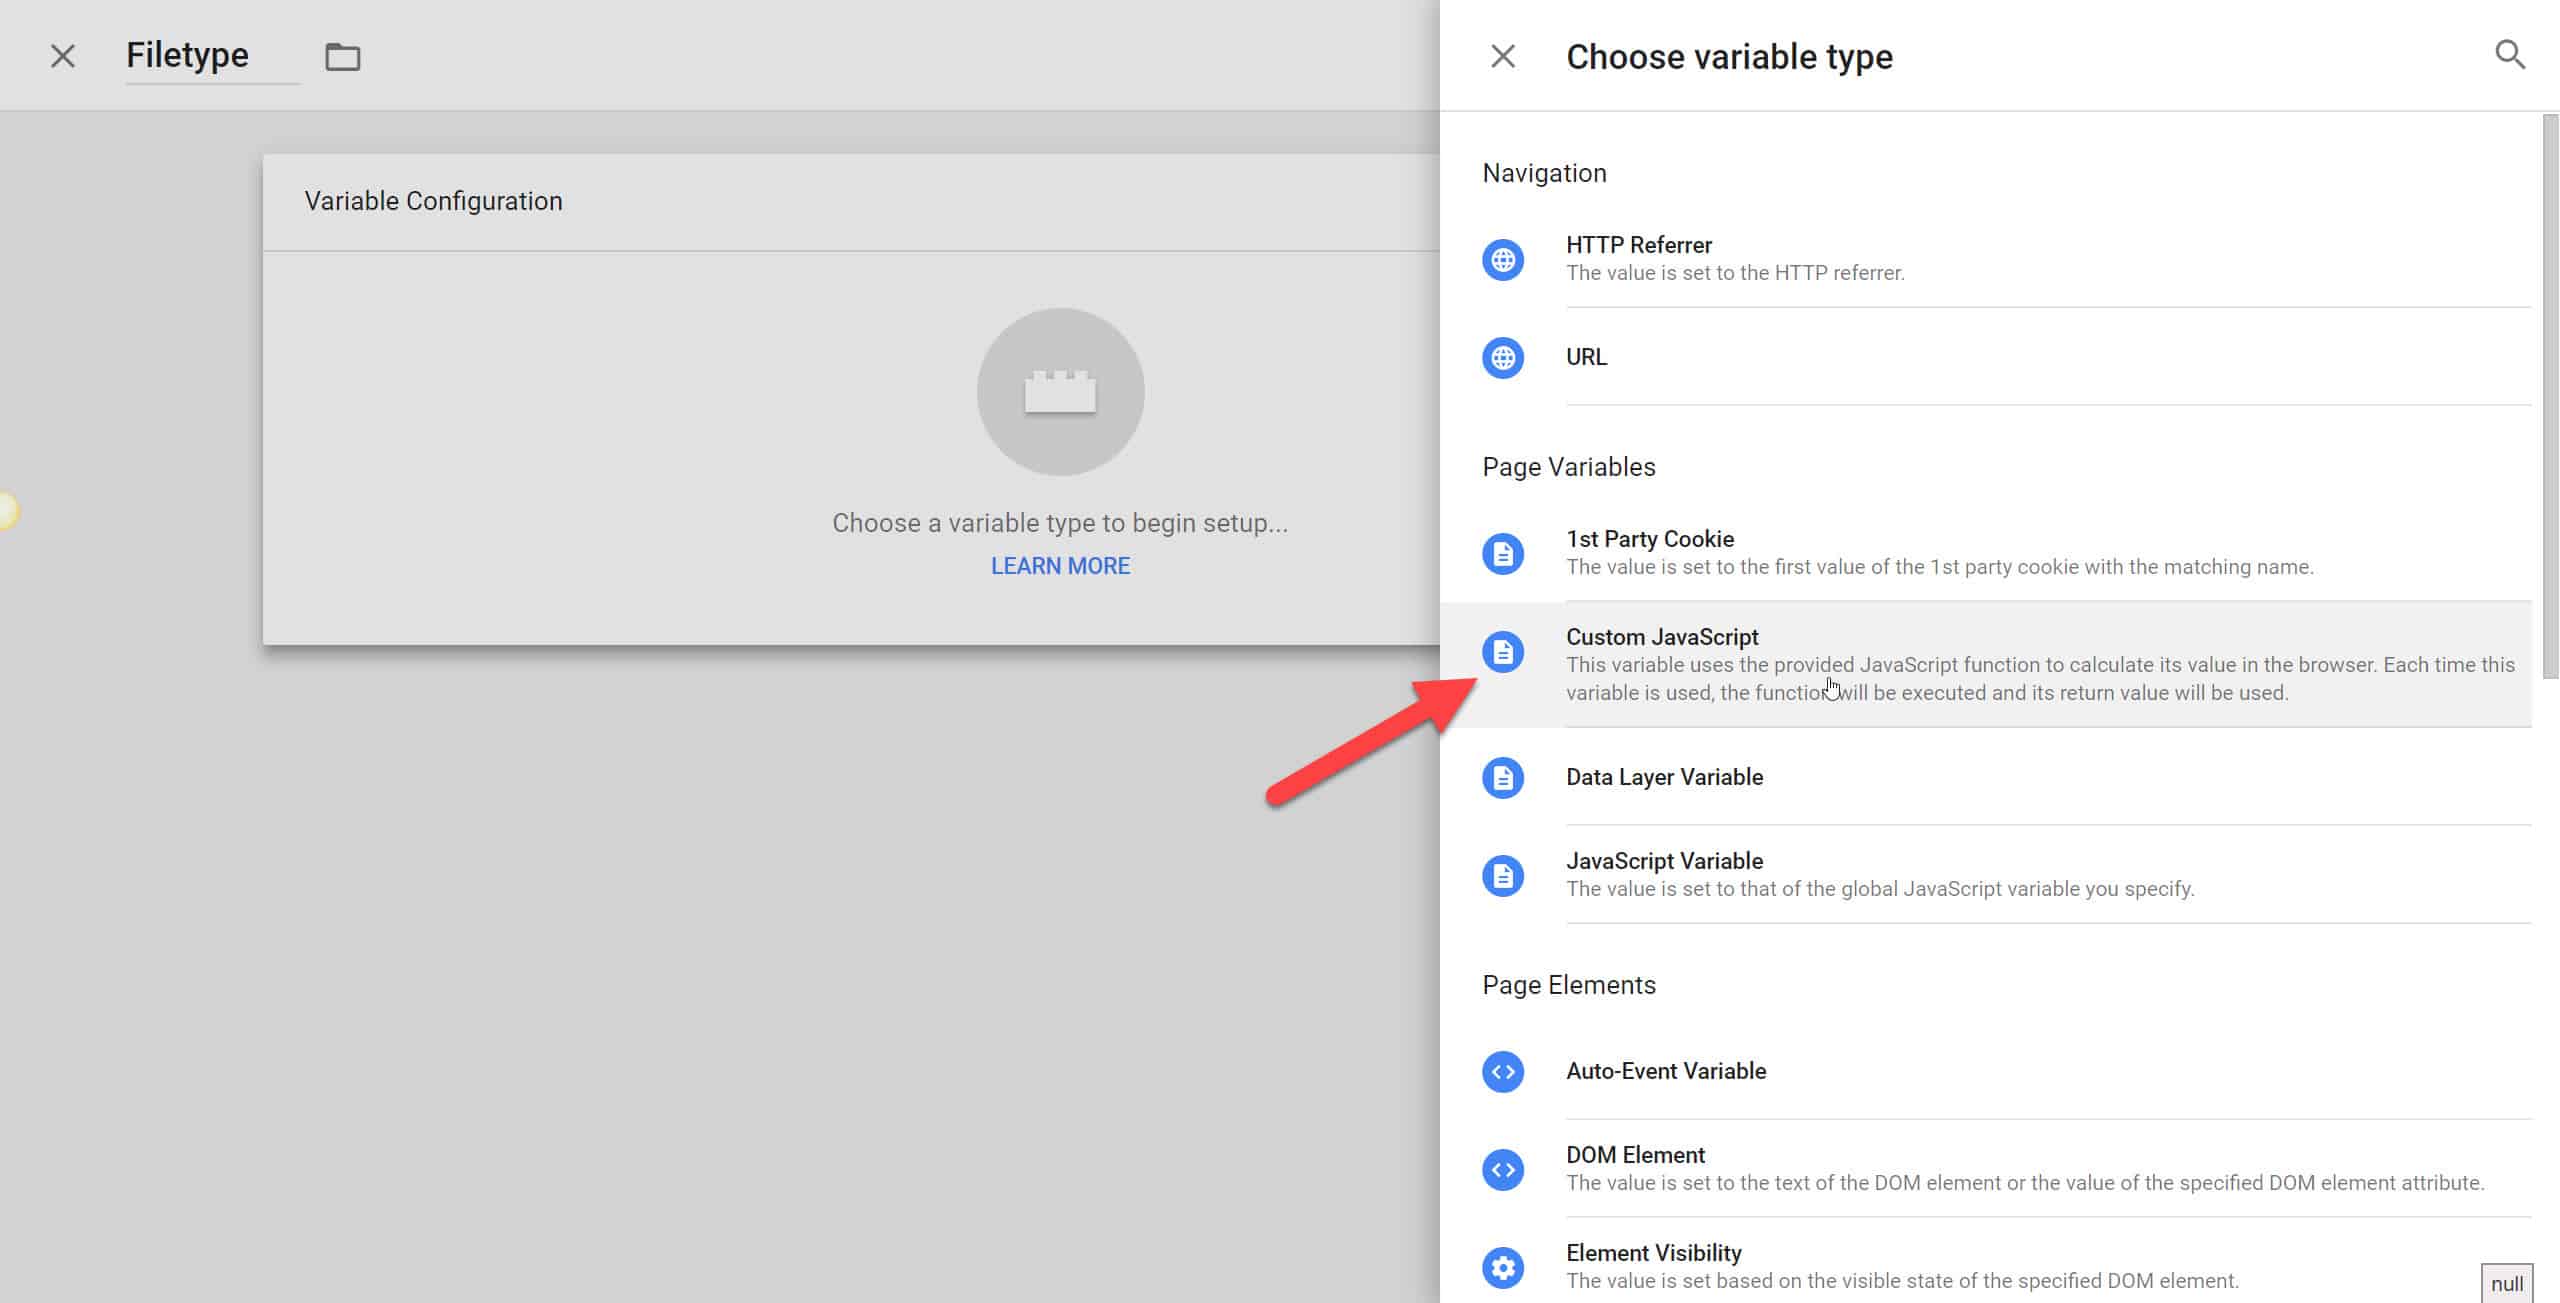
Input this Script:
function() {
  var ext = {{Click Element}}.pathname.split(".");
  return ext.length>1?ext.pop():'html';
}
and hit Save.
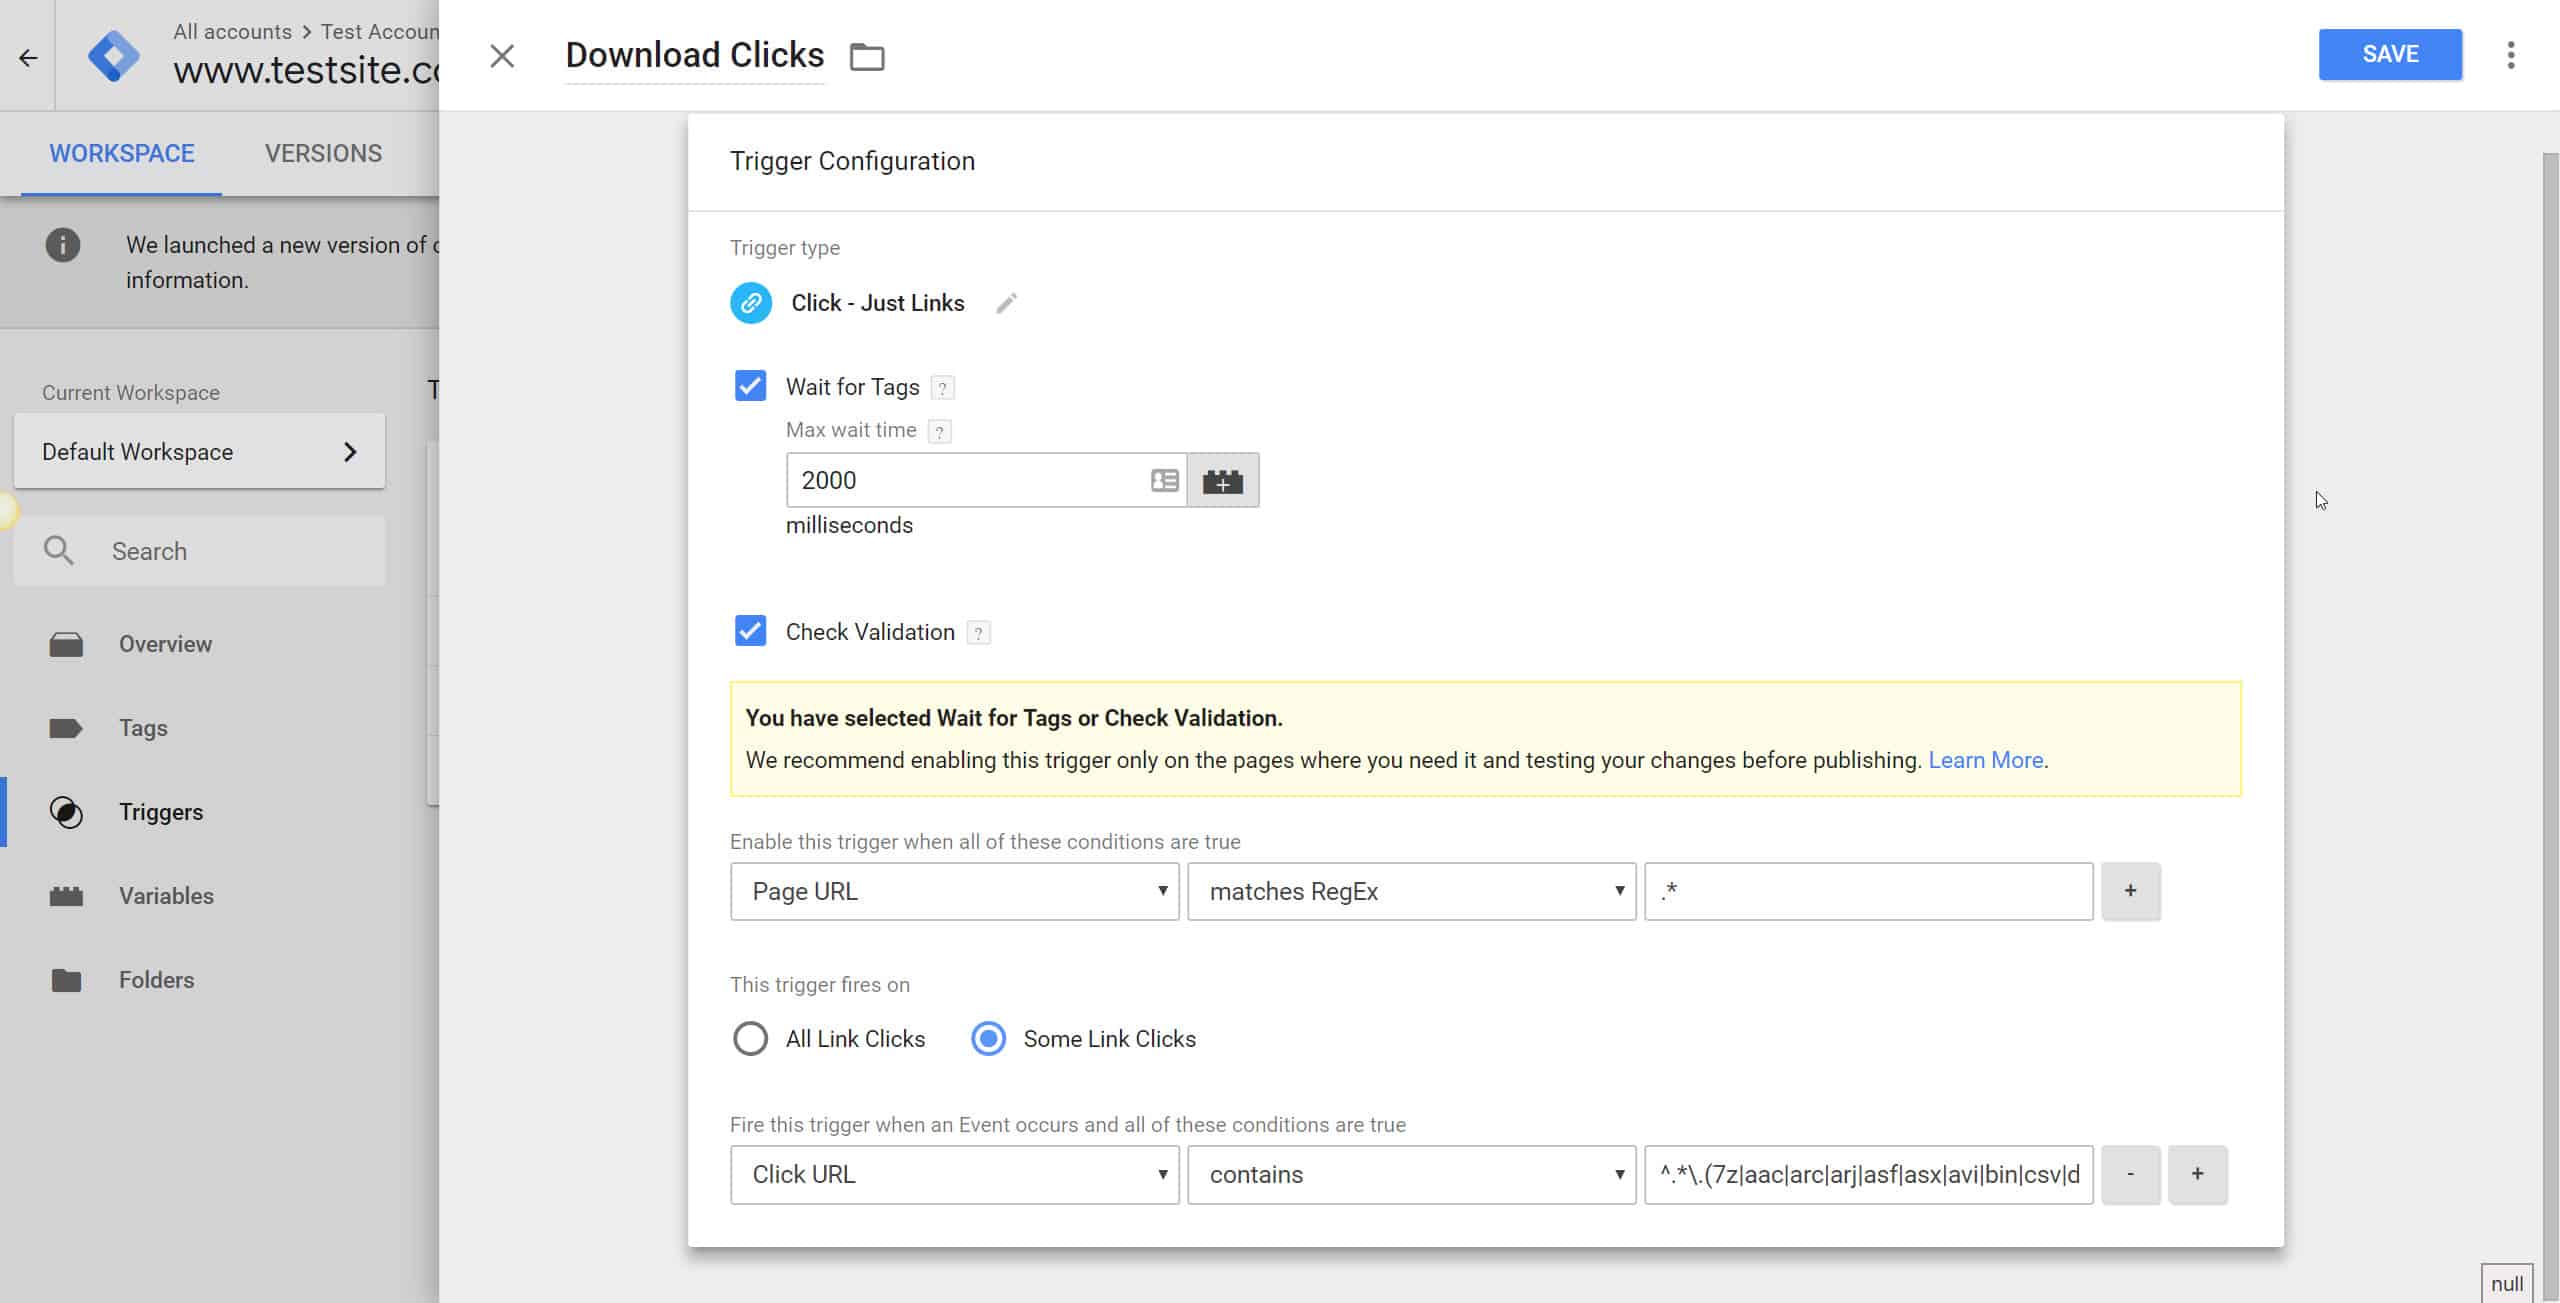
Next, let’s create our trigger. Choose “Just Links”, and input the settings as such.
- We will want to click on “Check Validation”, and the options should be Page URL, matches RegEx, and the right column input “.*” , without the “”.
- Next, we want to only fire the trigger on “Some Link Clicks”, so go ahead and choose that option. We’ll then pick “Click URL”, matches RegEx.
- In the right most box, input this string:
“^.*\.(7z|aac|arc|arj|asf|asx|avi|bin|csv|doc|exe|flv|gif|gz|gzip|hqx|jar|jpe?g|js|mp(2|3|4|e?g)|mov(ie)?|msi|msp|pdf|phps|png|ppt|qtm?|ra(m|r)?|sea|sit|tar|tgz|torrent|txt|wav|wma|wmv|wpd|xls|xml|z|zip)$”, again without the quotes.
Creating the GTM Tag (GA Event).
Go ahead and add a new Google Analytics – Universal Analytics Tag and choose the Event type.
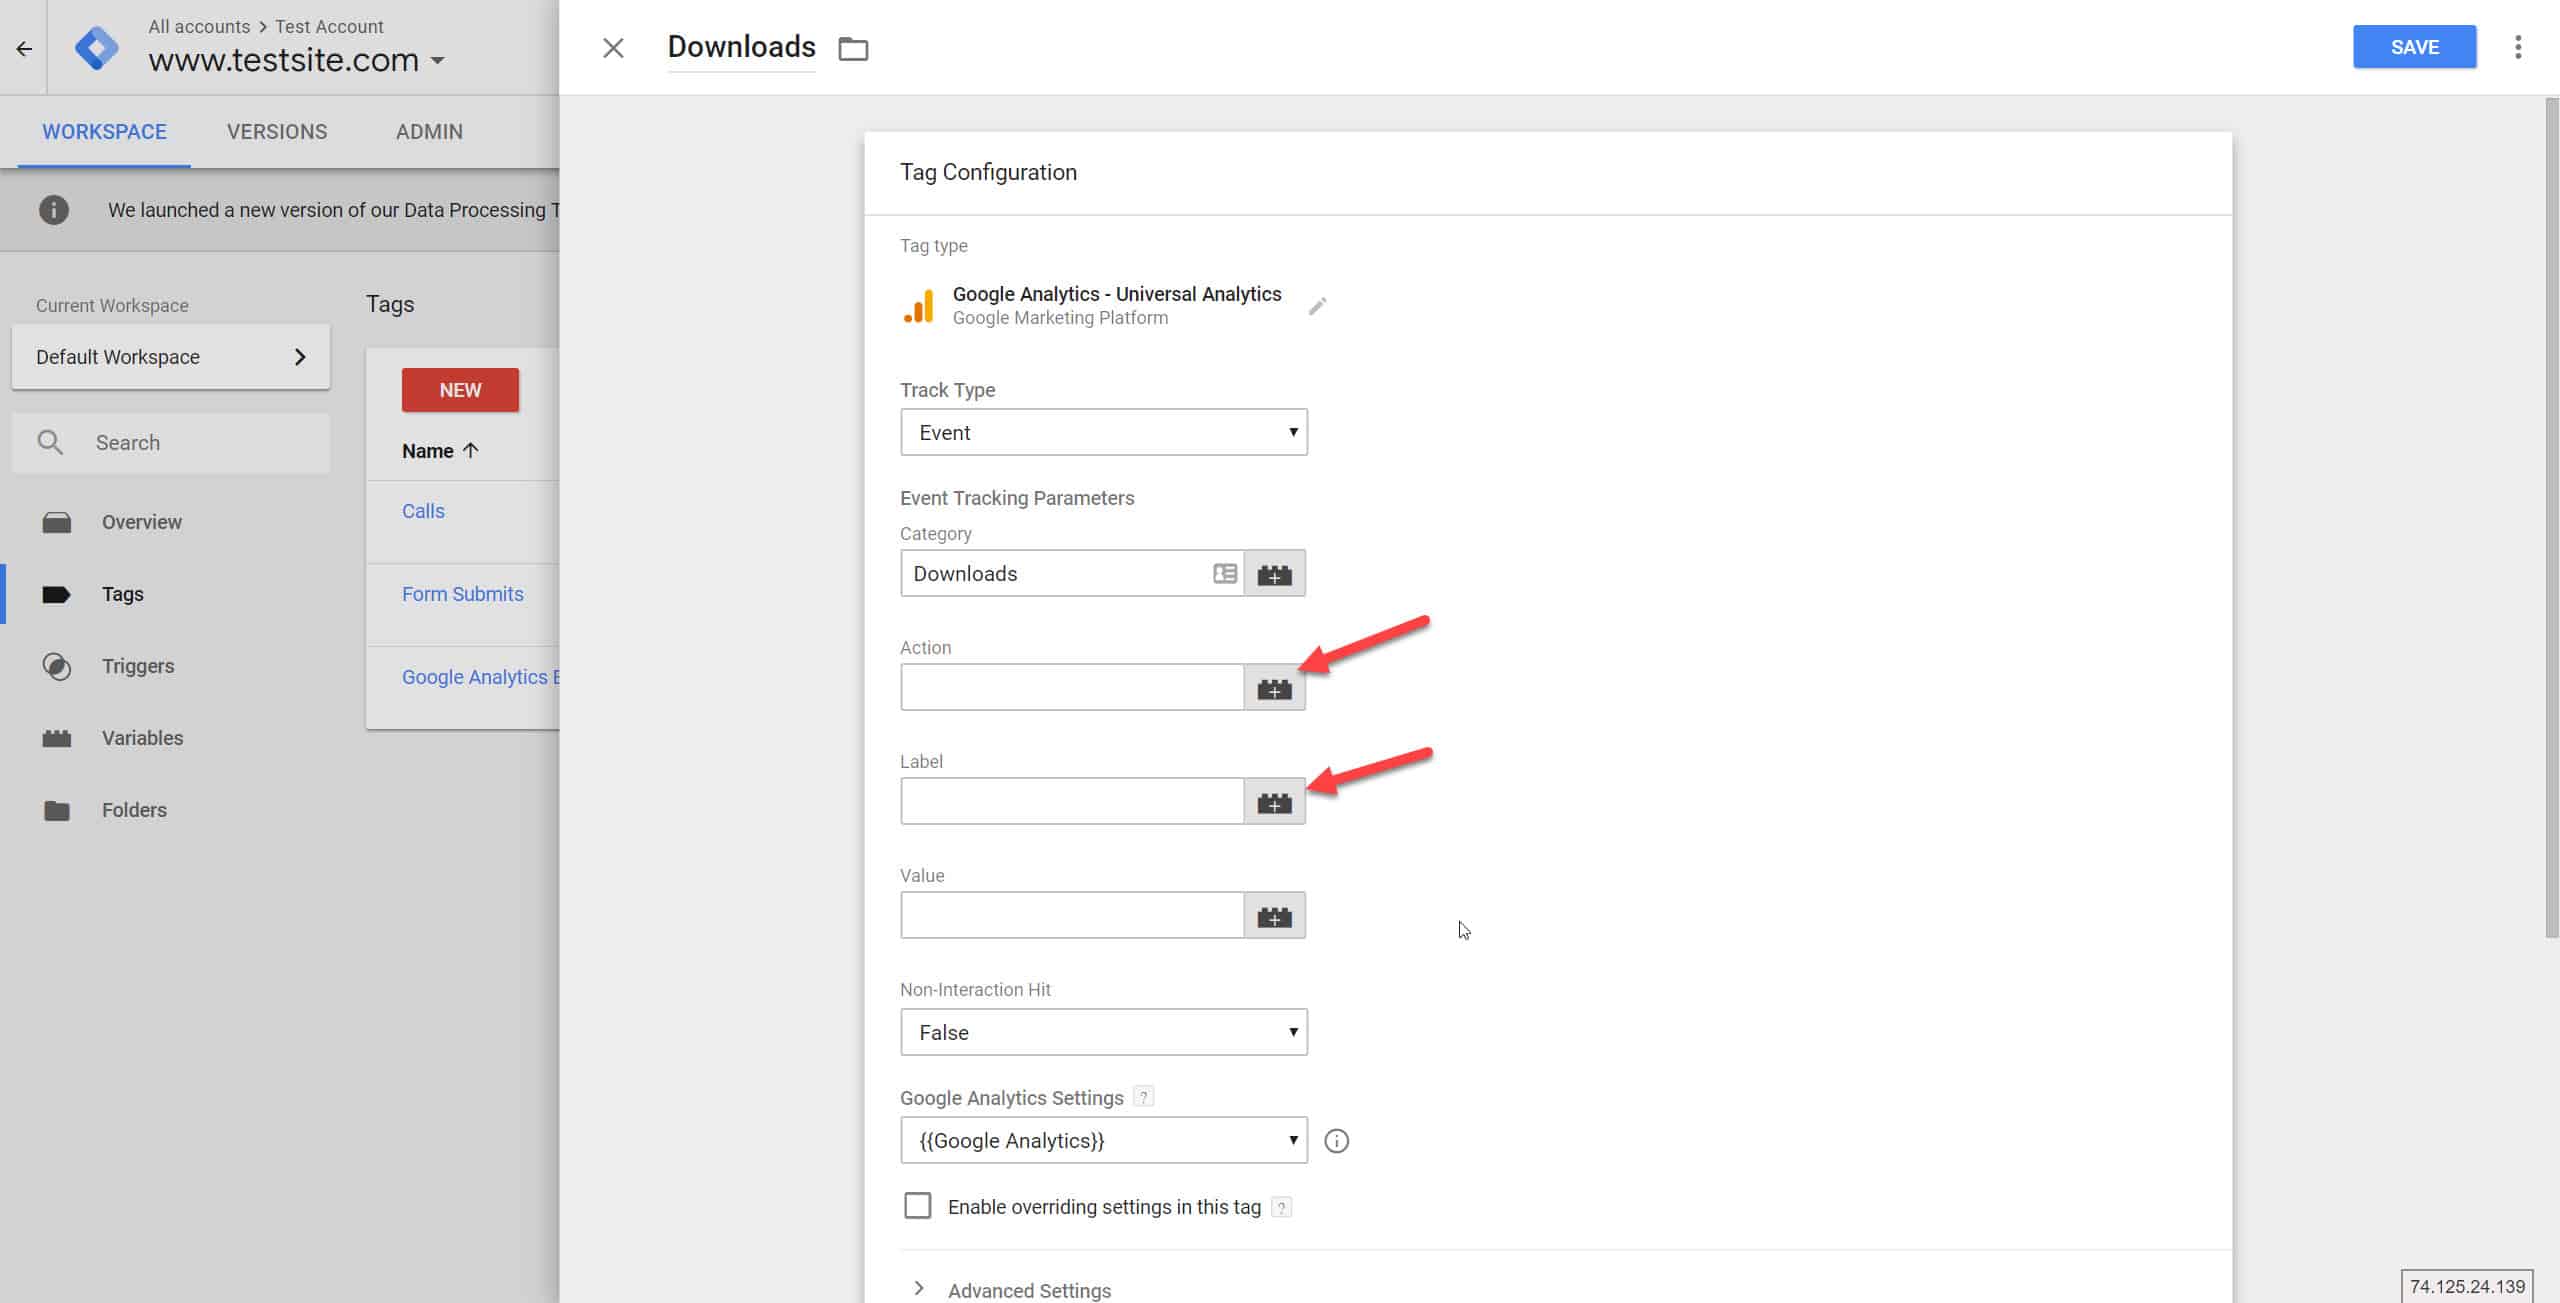
Let’s input the Filetype variable that we created earlier by clicking on the + button. Then, choose the Filetype variable by clicking on it.
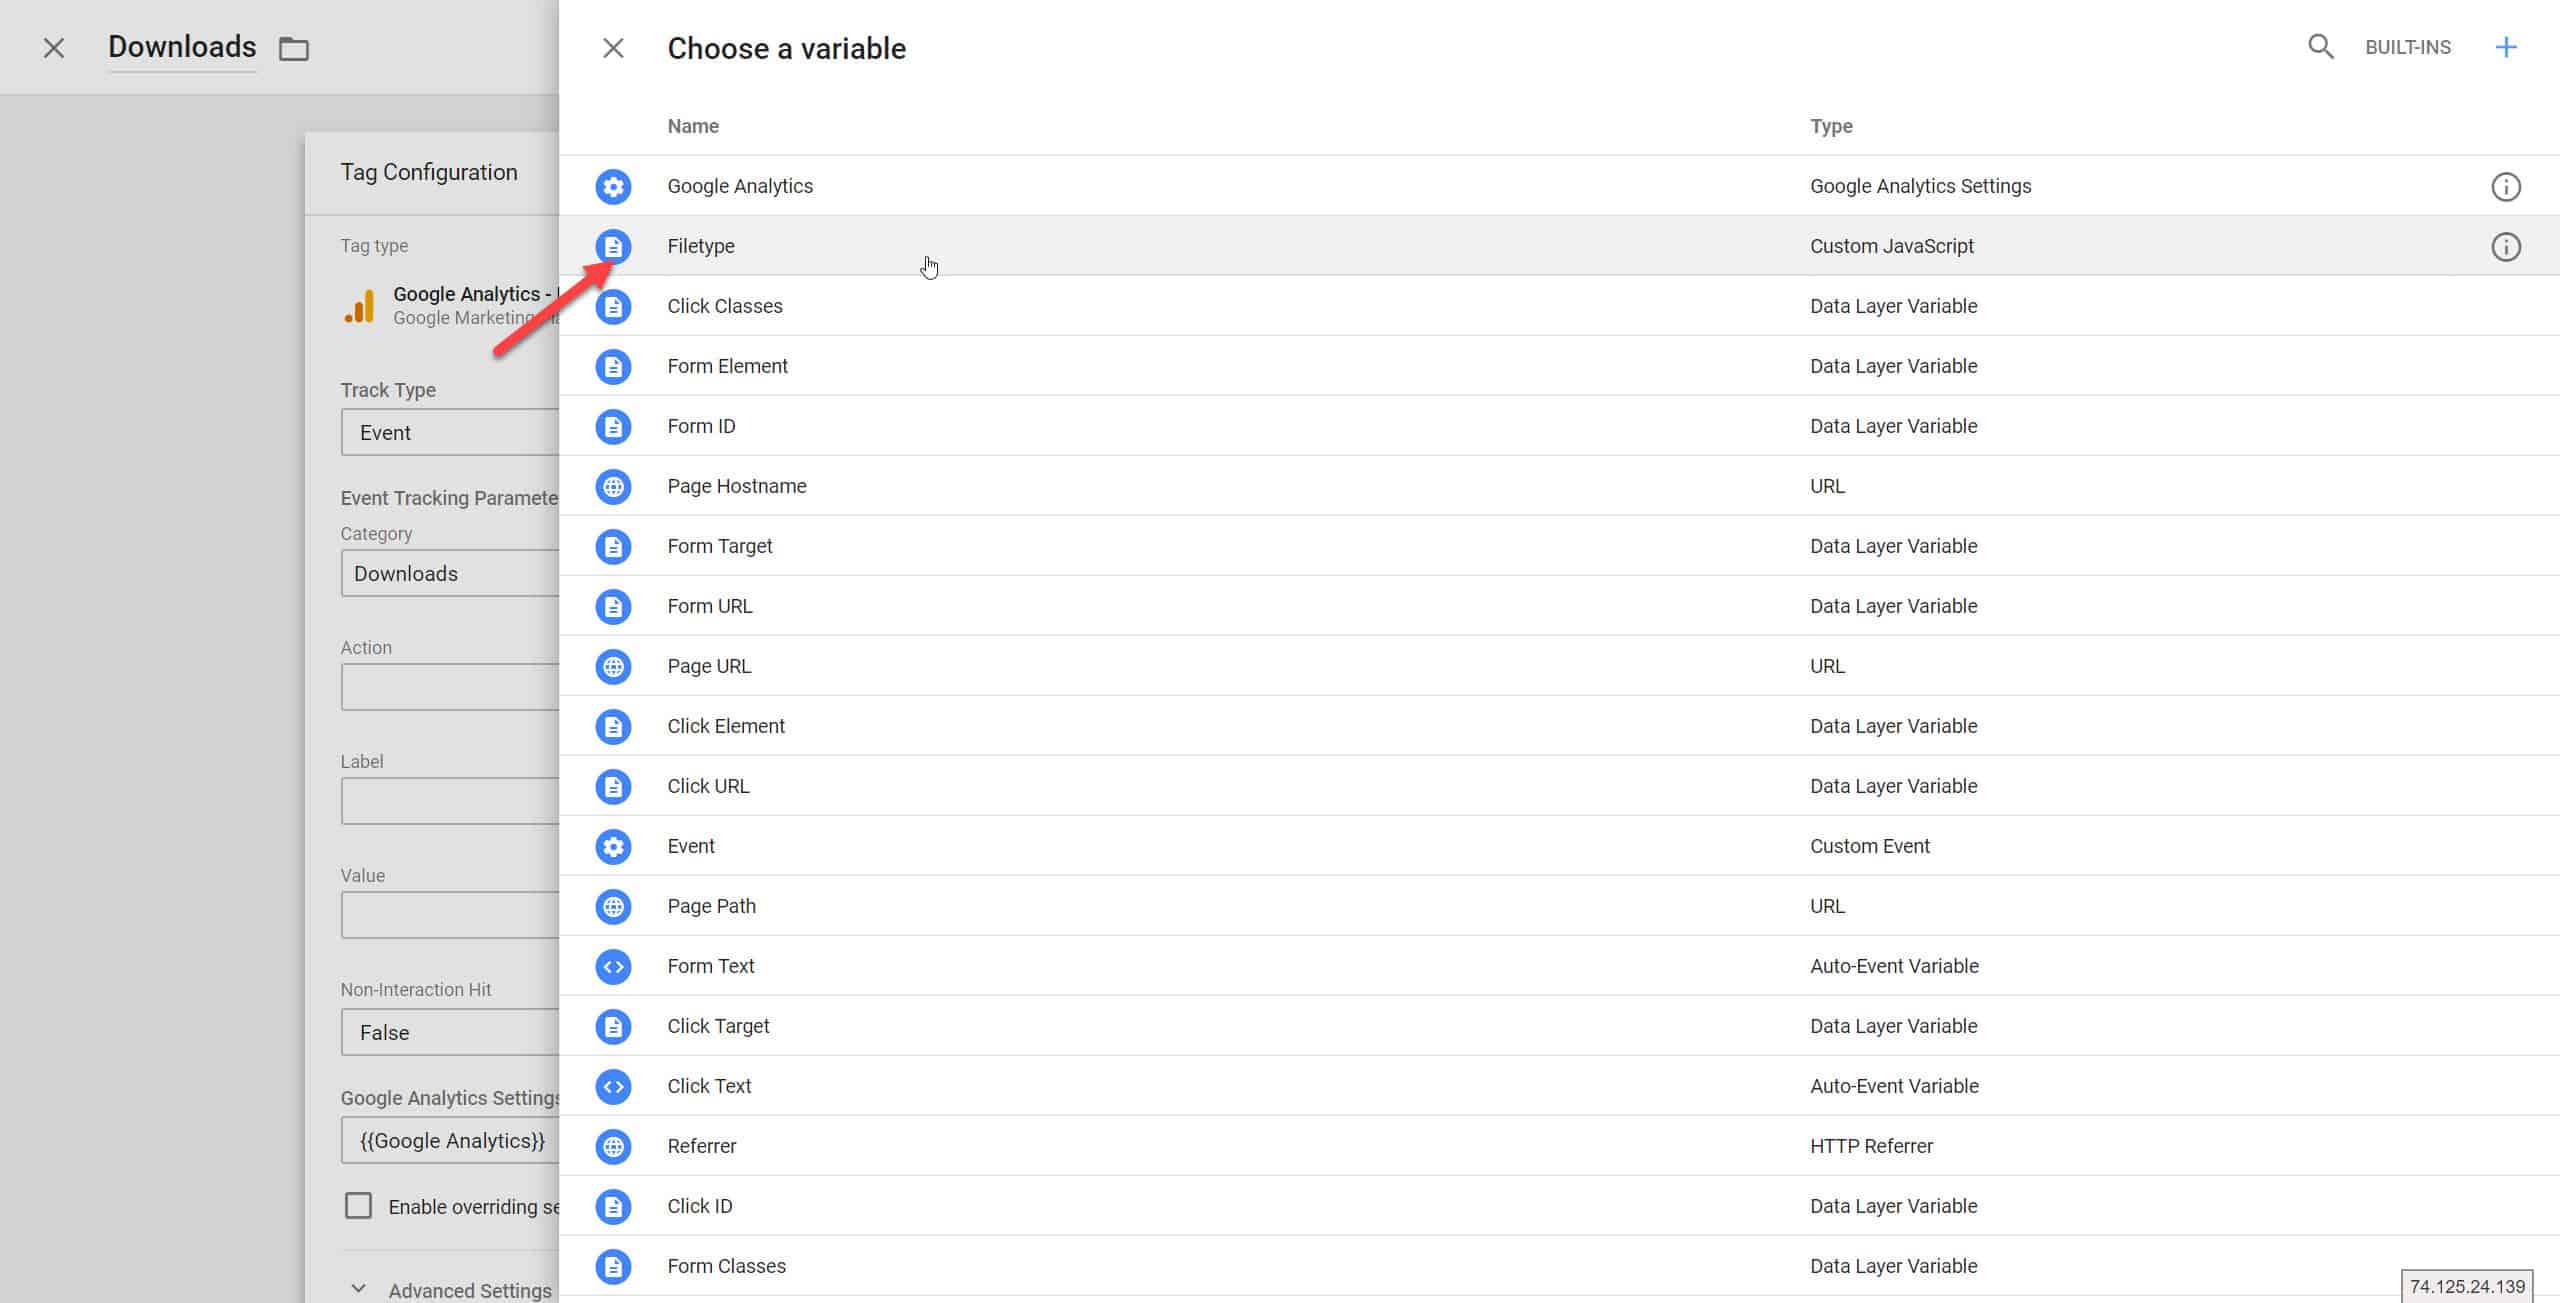
Do the same for the Event Label, choosing {{Click URL}}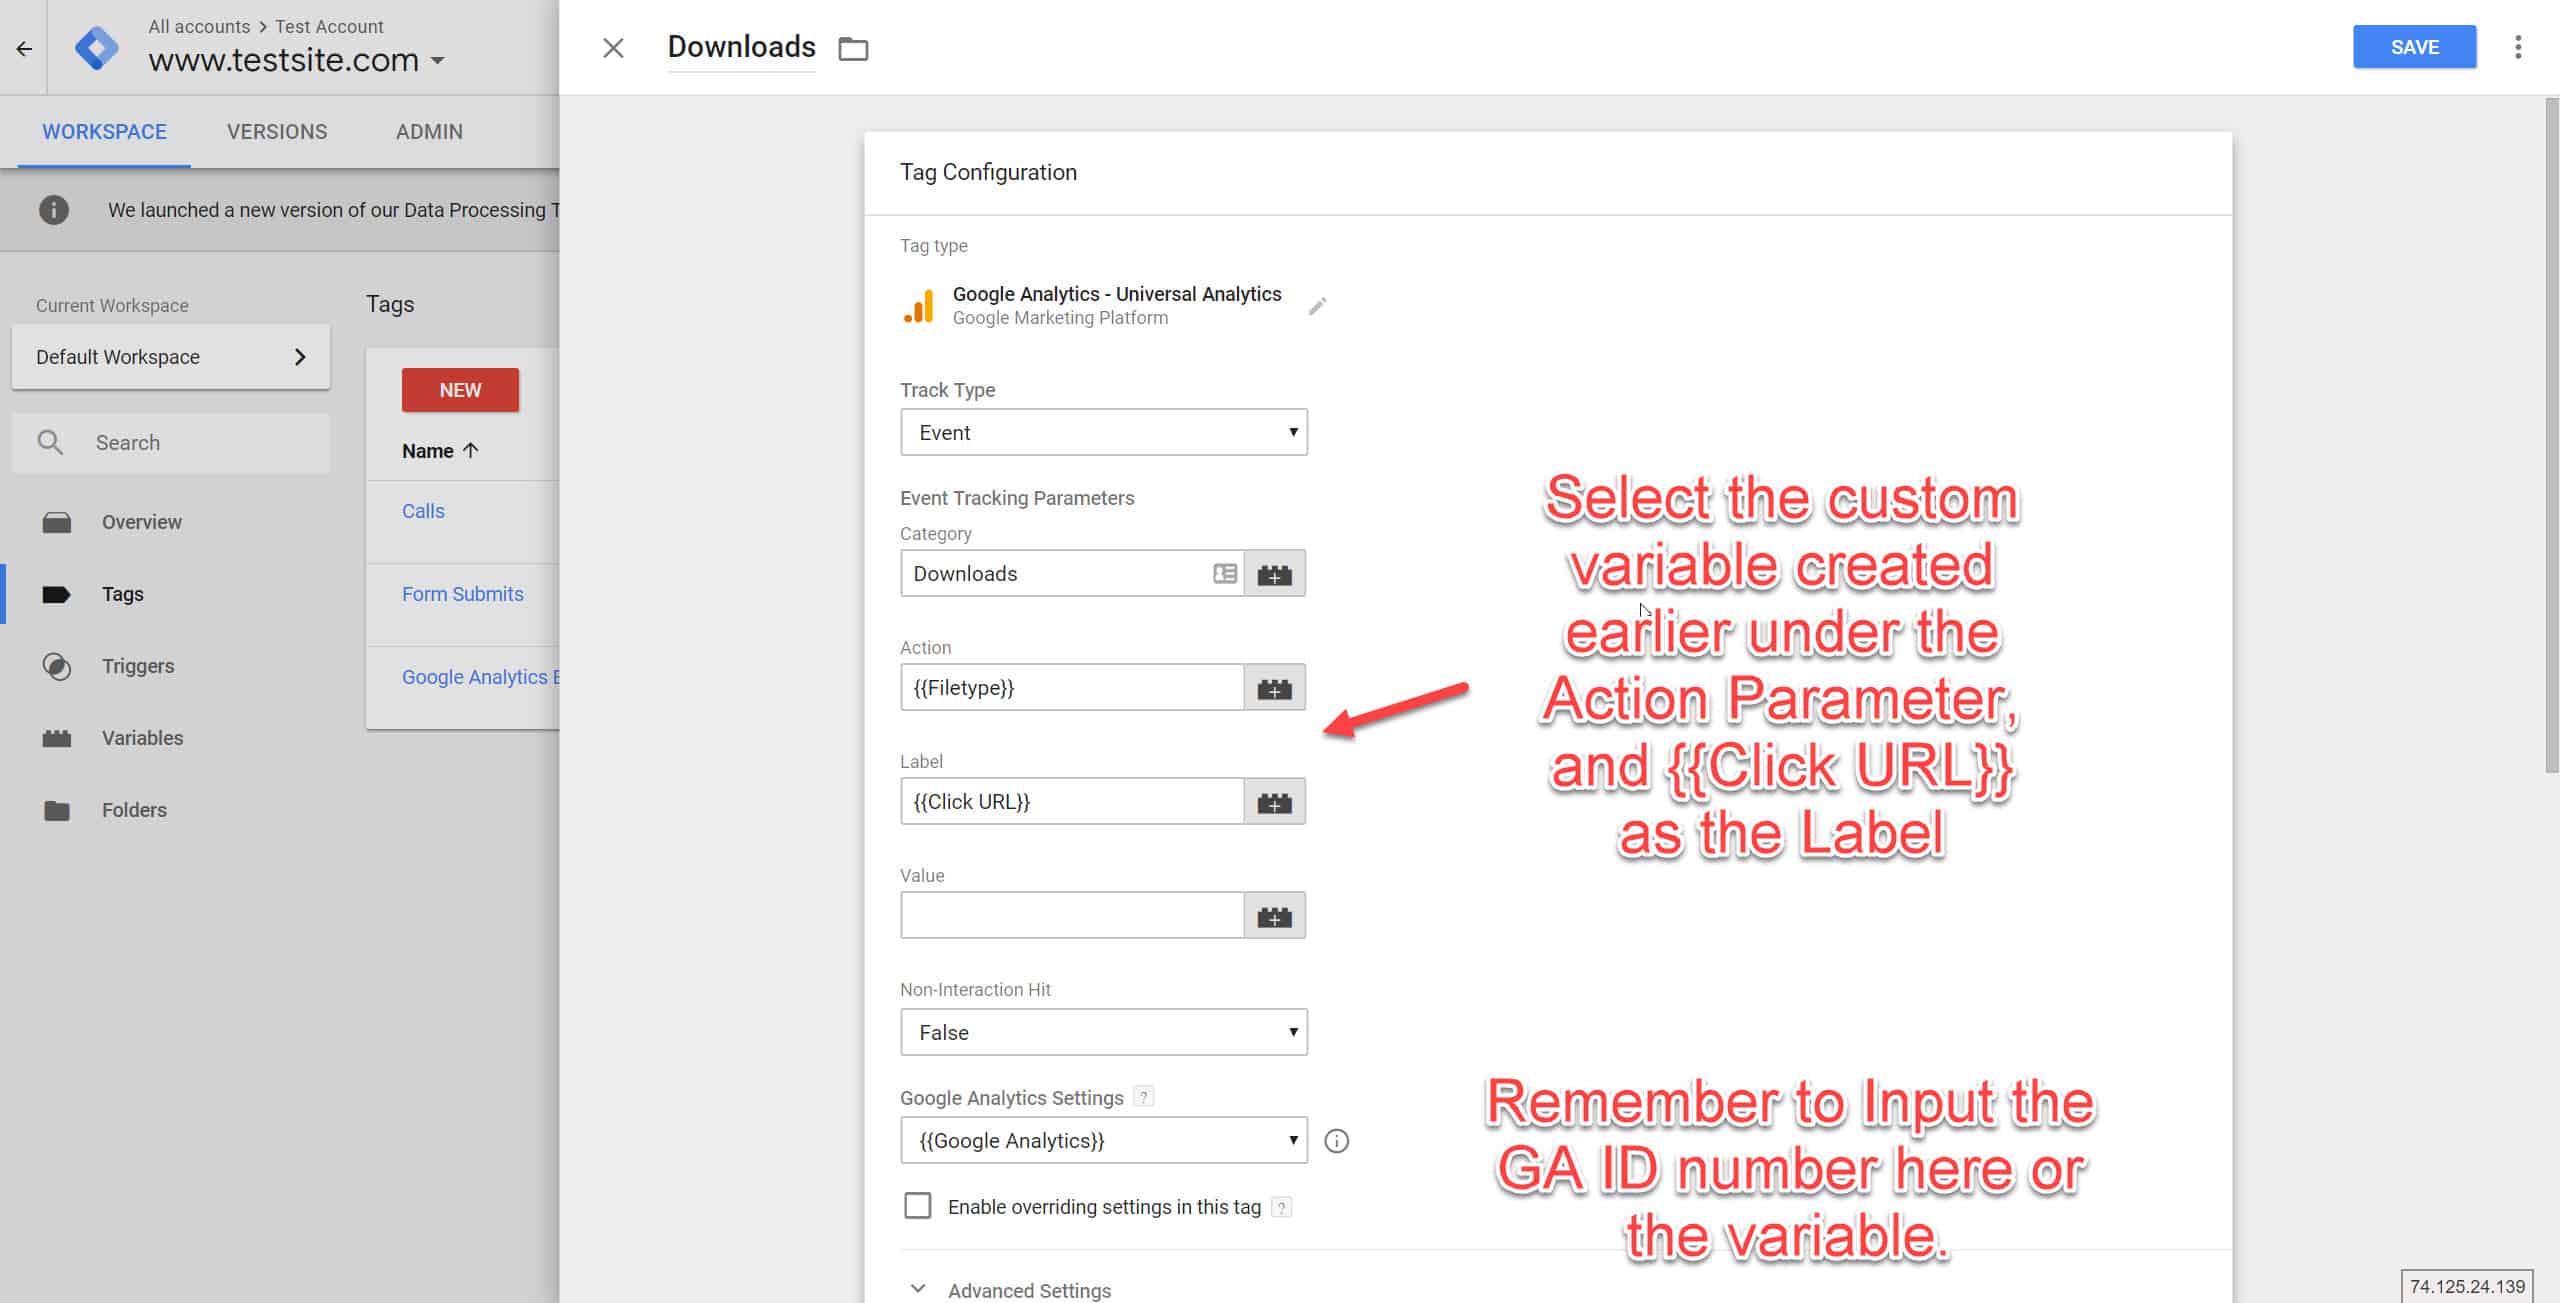
All we need to do now then, is to pair our newly created GA Event Tag with our Download Trigger that we created earlier.
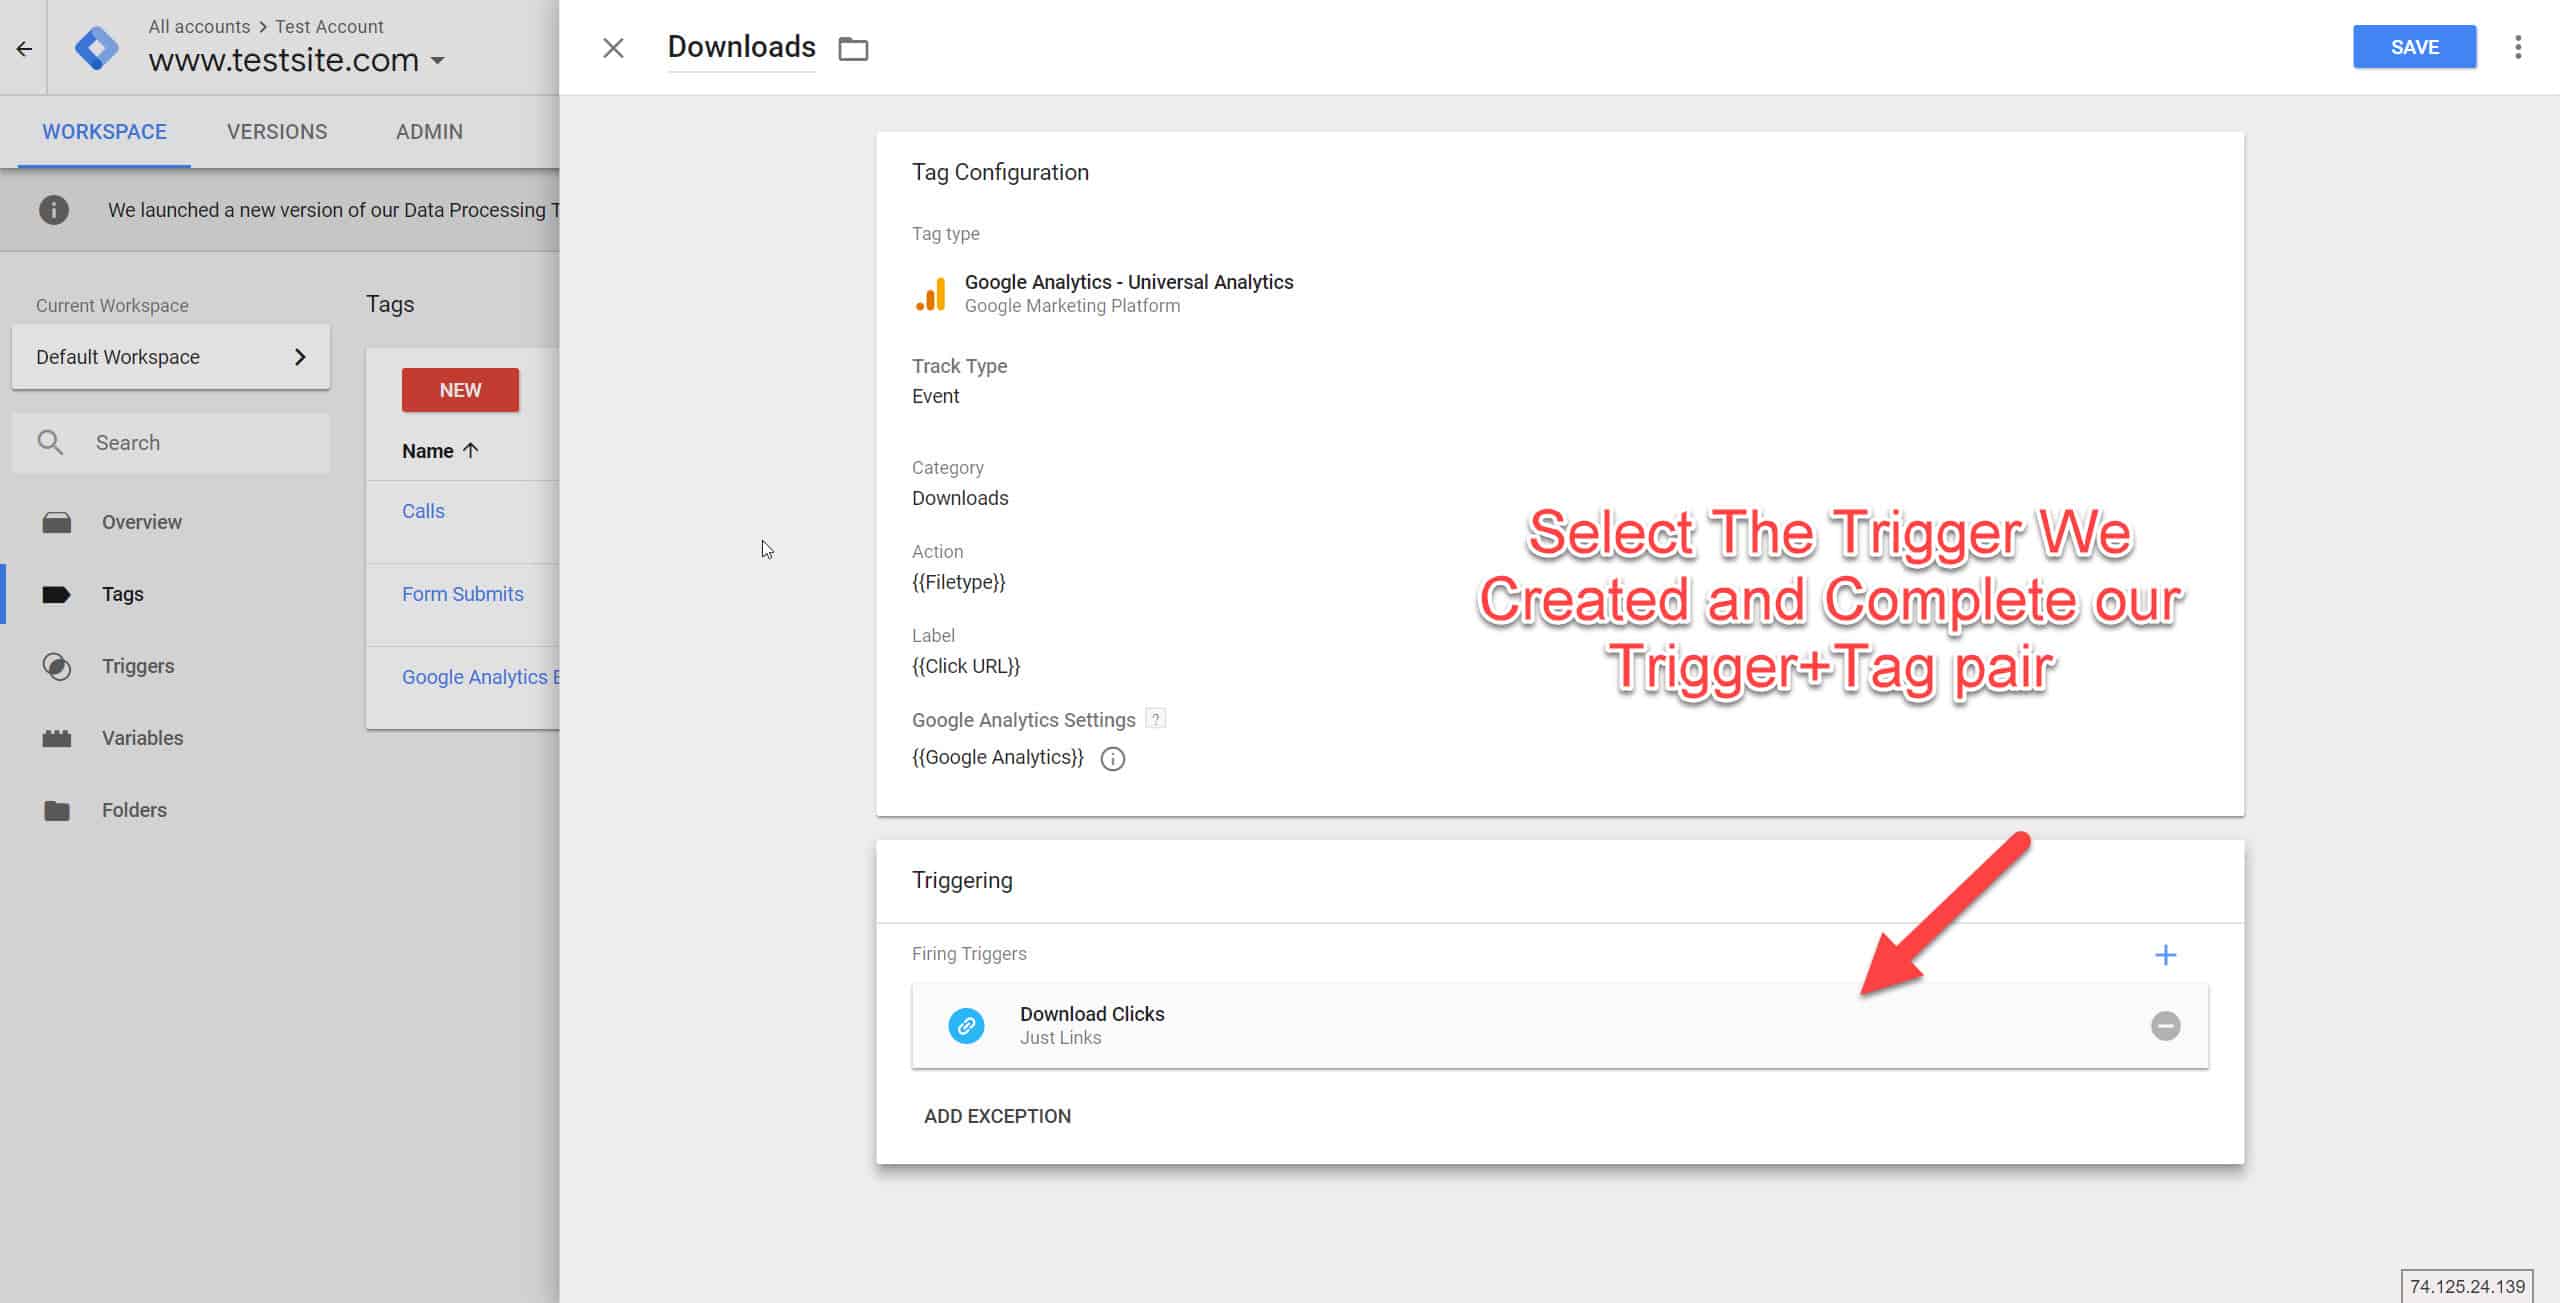
Save & Publish.
That’s it! Download Events will now be showing up in Google Analytics.
With this information inside of Google Analytics, you can have more actionable data that can tell you if your site is providing your searchers (read: potential customers) information that is relevant and accessible.
If you want to create a Goal using this Event, you can follow the same steps as I’ve covered above.
Events Tracking – How to Track Youtube Video Plays
At the time of writing, Google Tag Manager came up with a native way of tracking Youtube Video Plays. (YAY!) It was previously a little more complicated and we needed to implement scripts, courtesy of LunaMetrics and Simoahava.
This means it’s a little easier to implement video tracking now!
We want to track videos for the obvious reasons:
Are users actually interacting with the videos you embed on your website? If not, should you move them elsewhere on the site, or remove them all together?
The question we all ask ourselves when we do anything on our website: does this help, or harm?
We can do so by tracking.
Let’s set up the triggers and tags.
We want to know when YouTube Videos are being played, so that becomes our trigger.
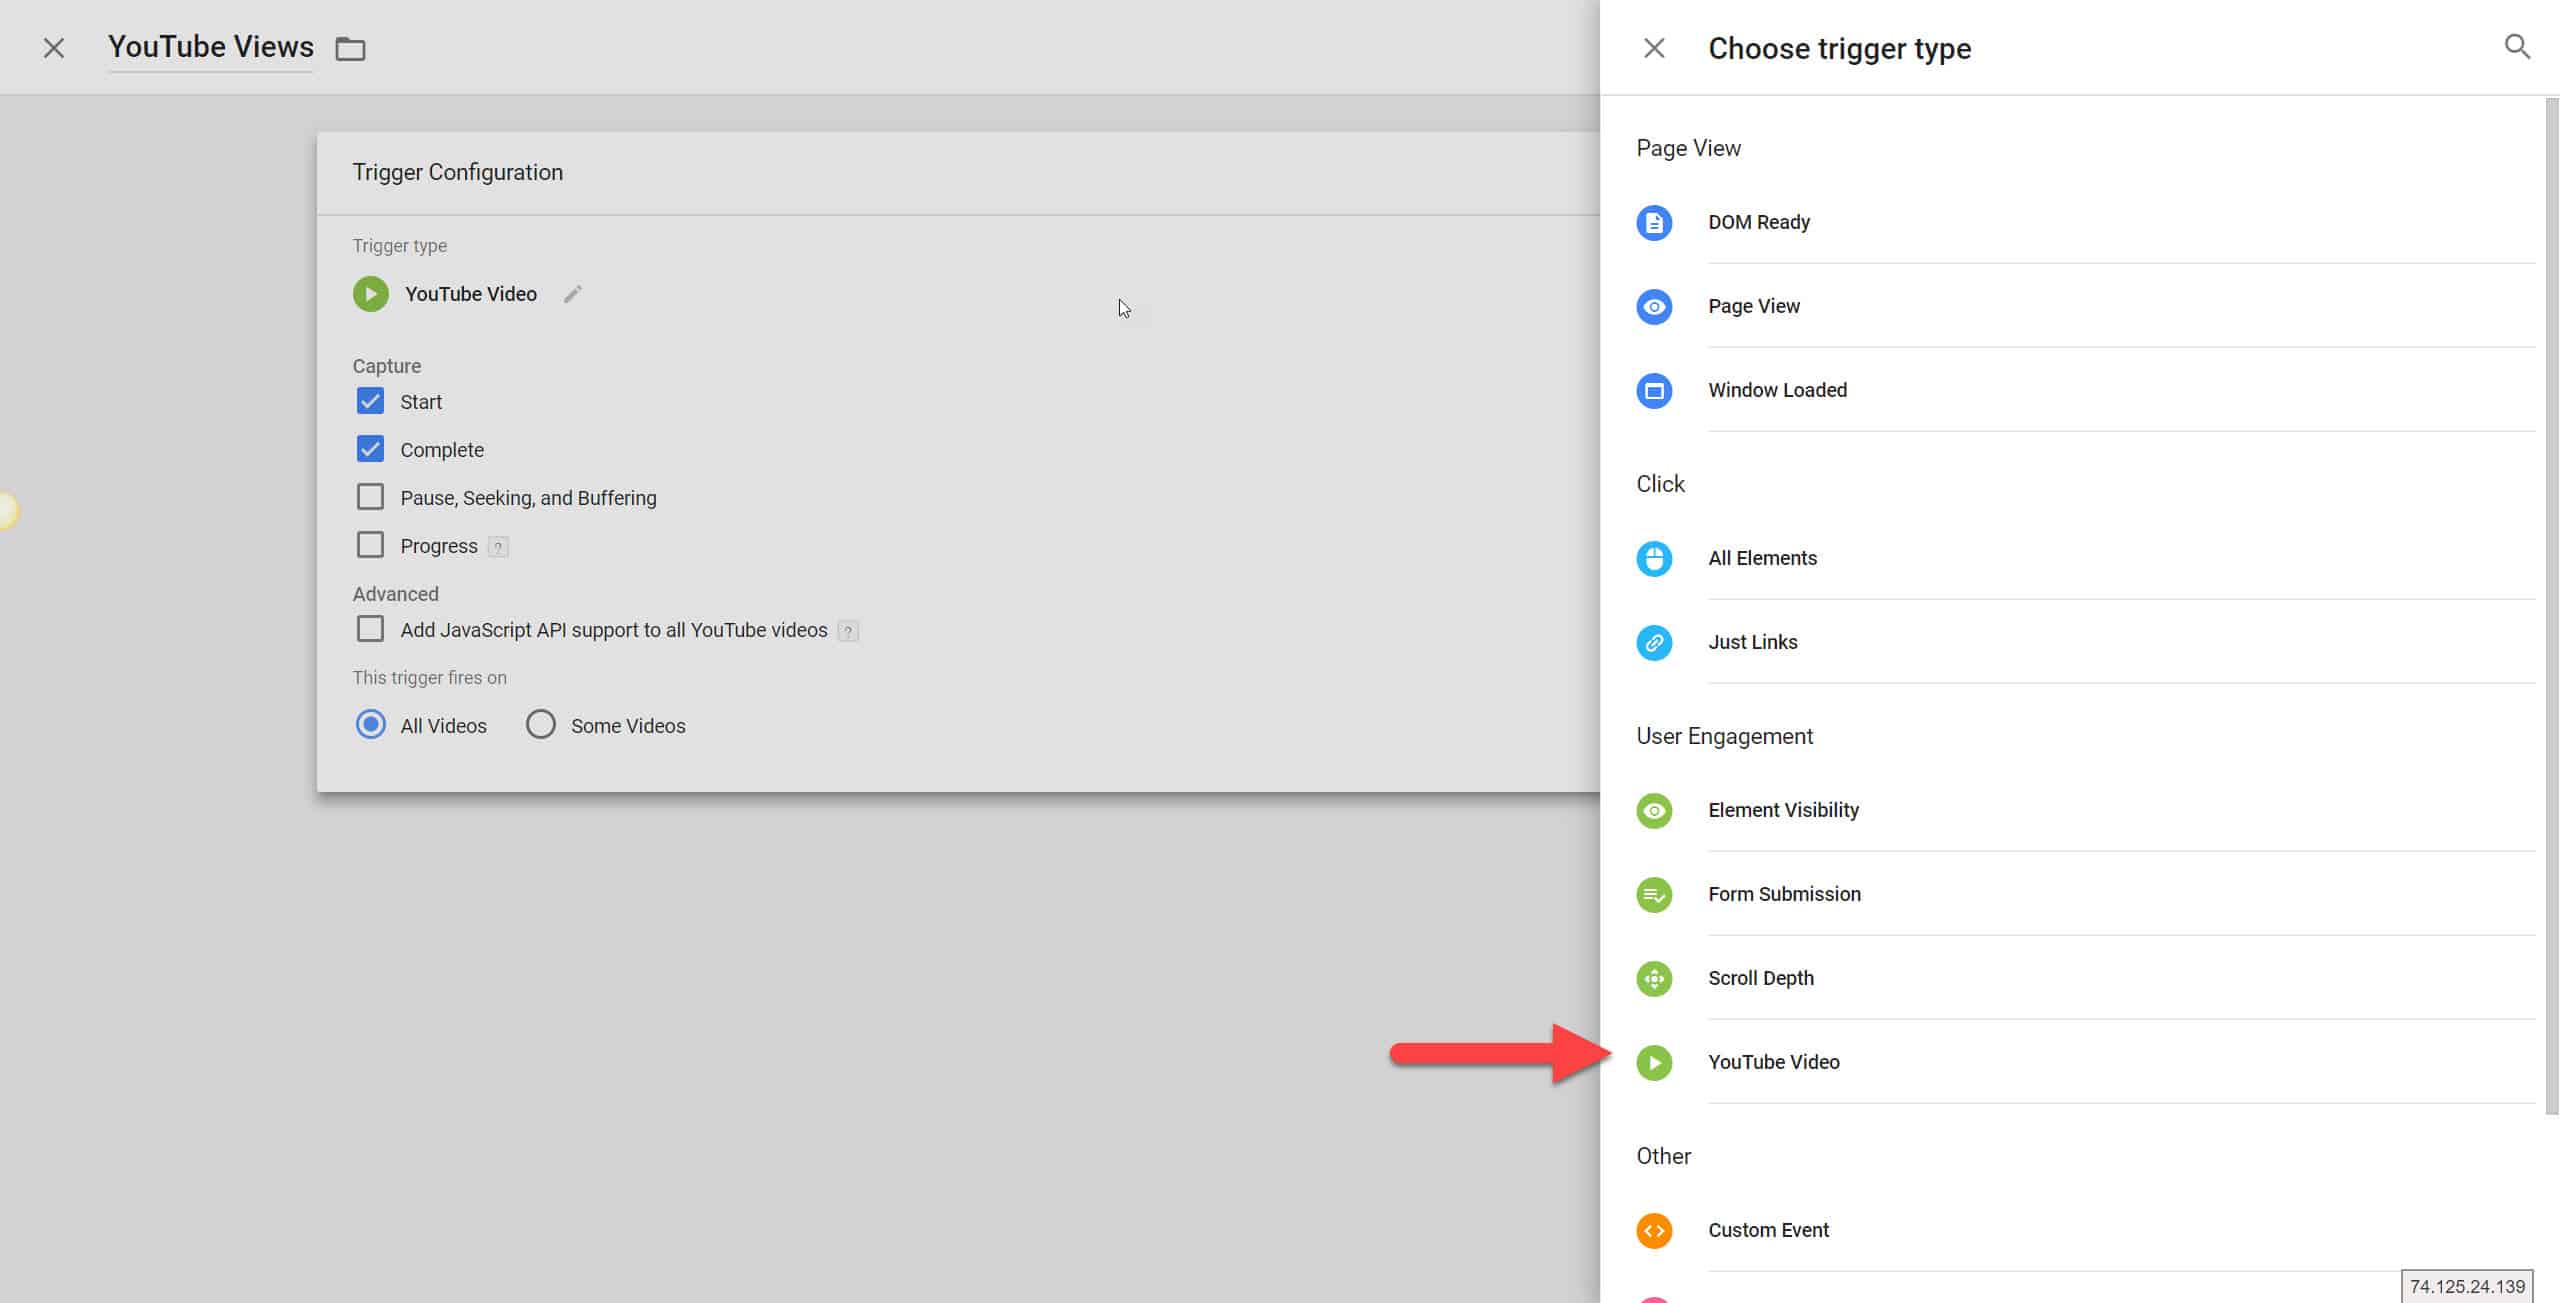
We can choose the YouTube Video Trigger here:
Next up, we want to create our Google Analytics Events Tag to pair it up with the Trigger.
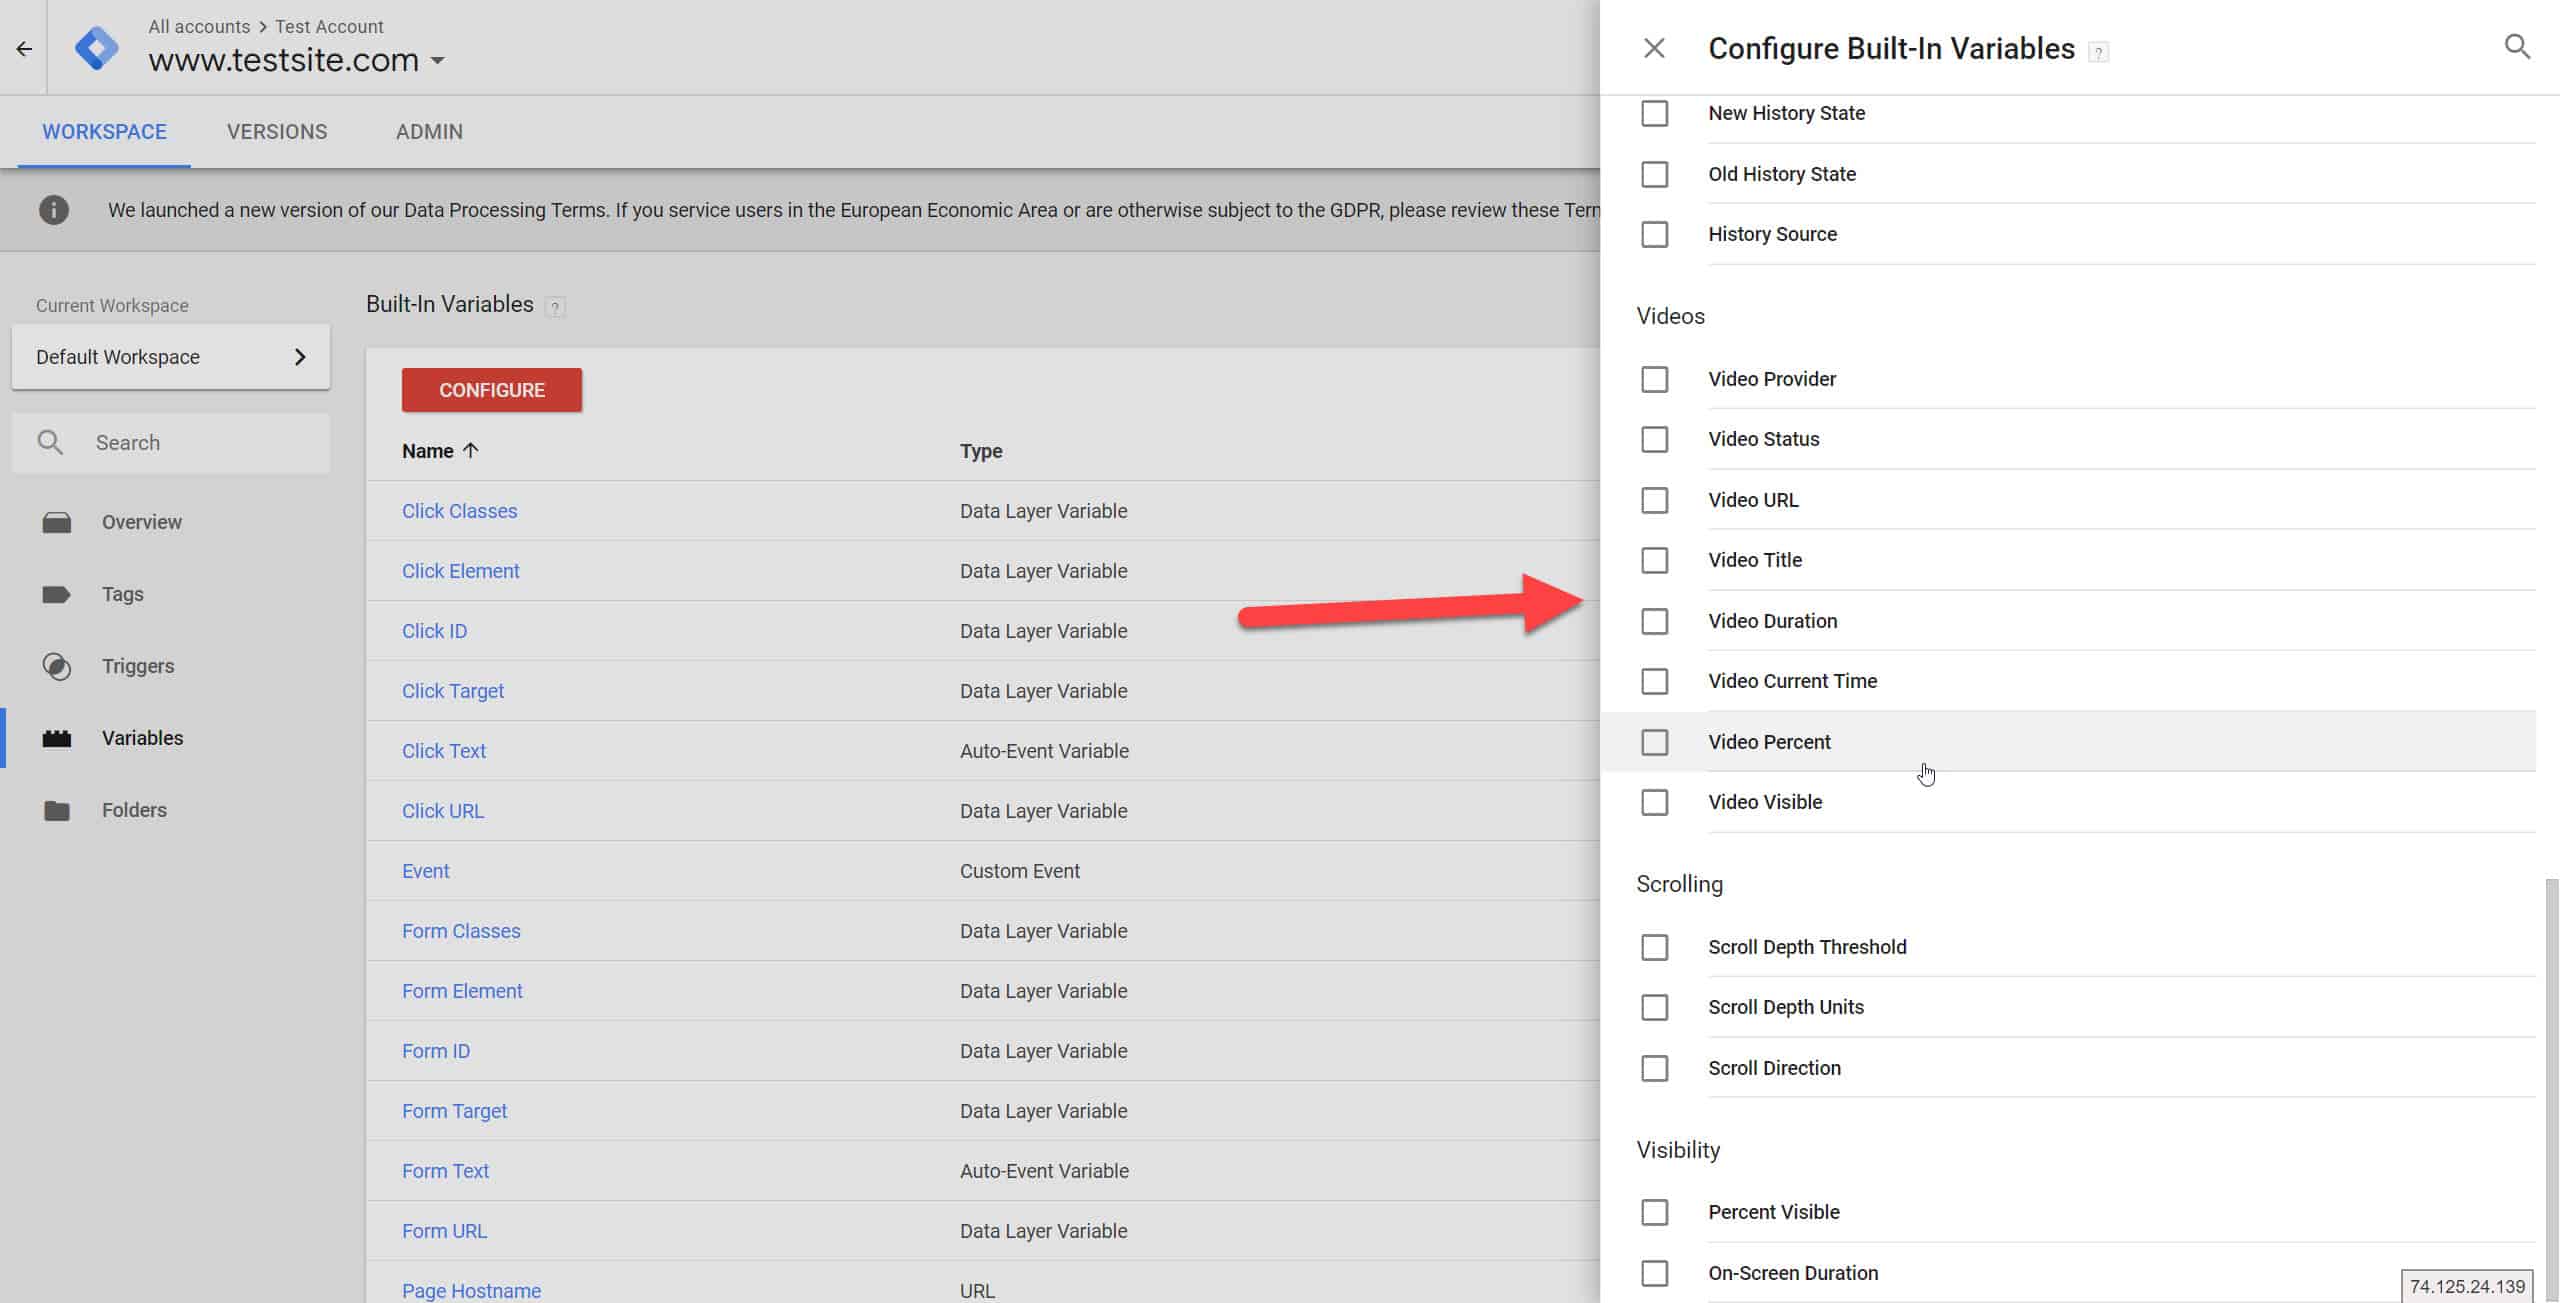
Before we do so though, let’s enable the YouTube variables so that we can use them.
Tick the ones that you want to use. Note: If you want to track Video Duration, Video View Percentage etc, you can do that. If these are relevant to you, you can use them as in your trigger earlier just by clicking on them. Notice I only captured Start and Complete. You could capture pause, seeking, buffering, progress as well if you want to.
Let’s go create our Google Analytics Event Tag again.
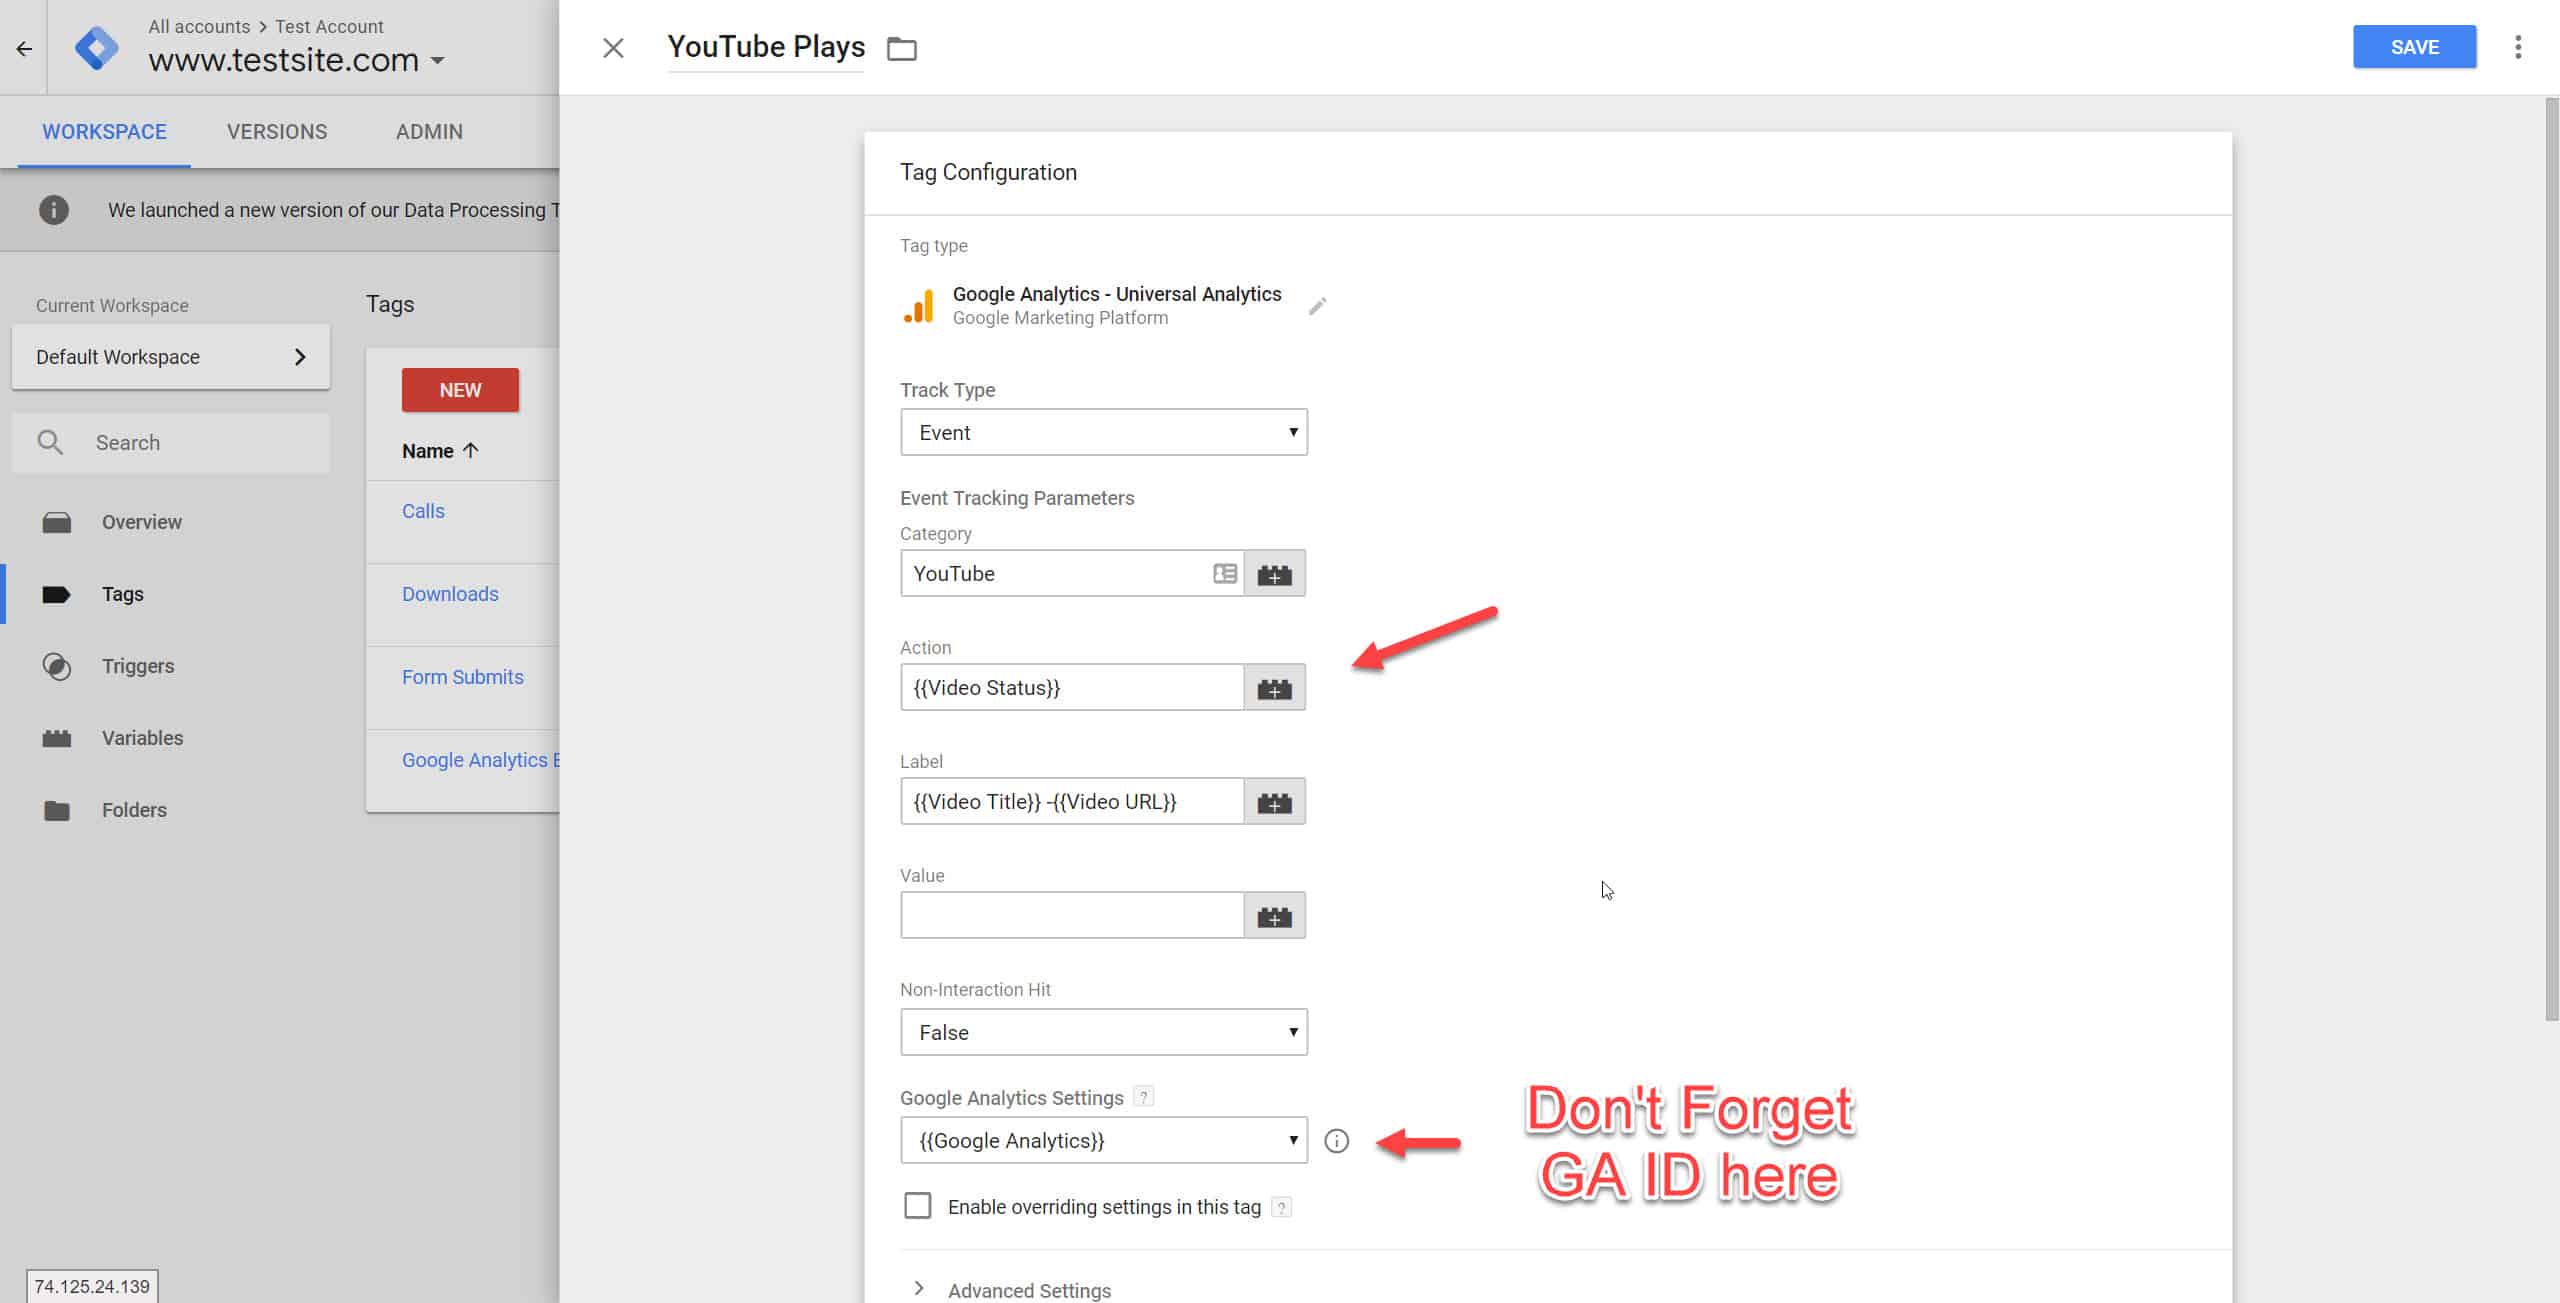
I name the category “YouTube”, while I use the variables that we enabled for the Action and Label. This way, we are able to get more information.
{{Video Status}} in this case, outputs “start”, and “complete”. If we have selected our trigger that to capture pause, seeking, buffering, these will show up as well. However, let’s just keep it simple this time.
In the Event Label, {{Video Title}} and {{Video URL}} will output the name of the YouTube Title together with the original Youtube link.
Pair it with the Trigger we created earlier, save, and publish.
We are now tracking YouTube plays as Events in Google Analytics. If you want to create Goals, the same rules and steps apply as what I’ve covered earlier.
Choose your Category as “YouTube”.
If you want to track any interaction with the YouTube videos, then just leave Action, Label and Values blank.
If you want to be be more specific, in this case, we can choose either “start” and “complete” in the Action Label, which means, if we want to count a YouTube video play as a conversion if the user watches the full video, then all we need to do is to input “complete” into the Action, and only YouTube Video Events with a complete watch will trigger the Goal Conversion.
Starting to get it now?
How to put Facebook Pixel in GTM
By now if you’ve followed the article, you would know how to put just about any script into Google Tag Manager by now. Before, Facebook Pixels need to be implemented via the HTML script Tag. Now, Facebook made a direct integration with Google Tag Manager.
Once you create a new Facebook Pixel, Facebook will ask how you would like to install the Facebook Pixel.
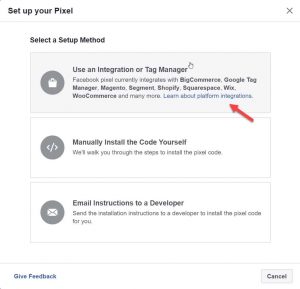
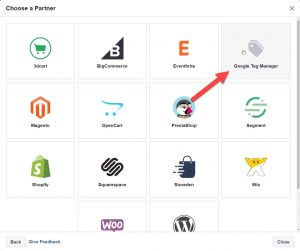
Pick the option which says Google Tag Manager.
You will be prompted to log in to your Google Account. Go ahead and log into the account that we created previously, and choose the right container. Follow the prompt and voila, you’ve integrated Facebook Pixels into your GTM set up. Bonus: all the Facebook Conversion Events are automatically tracked, so we don’t need any complicated set up at this point.
Yep. It’s that simple.
How to put custom scripts using GTM. (Almost Any Script)
Just in case you decided to skip all the way to the end, let’s go through how we can implement any custom script via Google Tag Manager.
(bear in mind though, Google Tag Manager loads scripts asynchronously, so if you scripts need to load synchronously early, it might not fit your needs.)
Mantra of the day: IF This, Then That (Triggers, and Tags.)
We put our custom scripts into the Tags via the custom html option.
Go ahead and drop the script in, and click save.
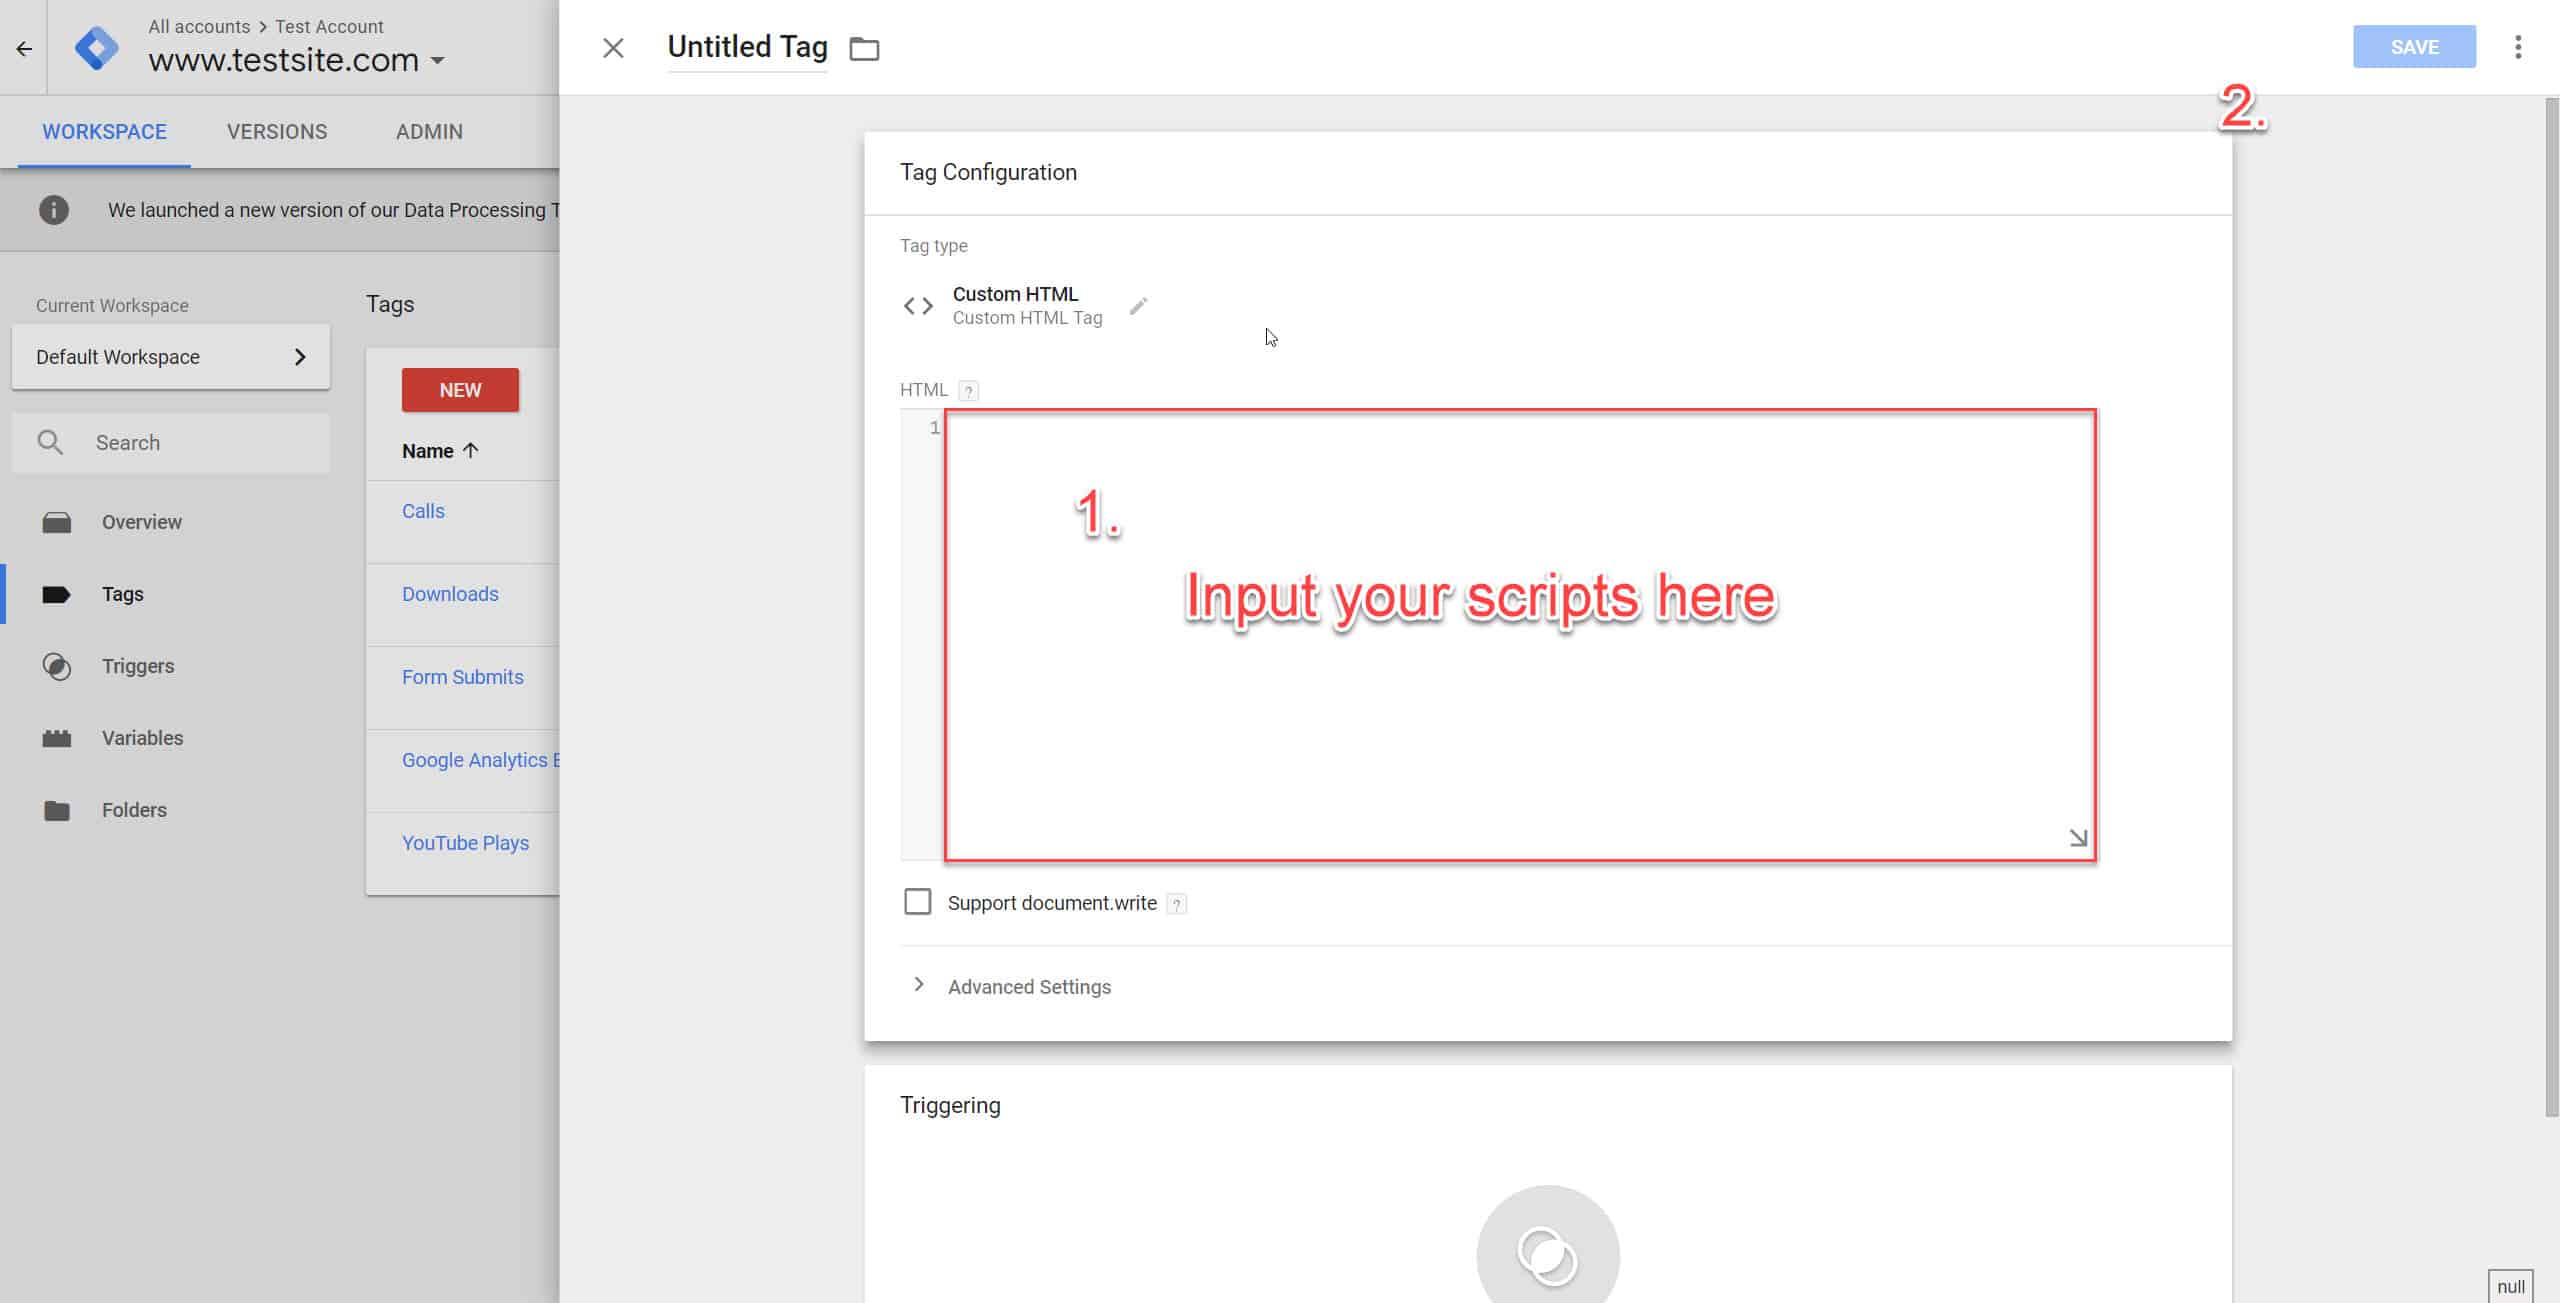
Pair it with an appropriate trigger. All Pages? Or Some Pages? If you need the screenshots on the steps on doing the triggers, refer to the section for inputting Adwords Conversion Script (it’s exactly the same!)
And that’s it.
The whole process was designed to be easy to implement and to follow along with increasing difficulty. Hope by this point, you will be equipped to take on any Google Tag Manager requirements that you have. There are far more complicated setups to do, such as enhanced e-commerce tracking via GTM. Perhaps another time if there are requests!
BONUS Section (Updated):
I mentioned that there are many things you could do once you got to this point – only limited by your imagination. There are few things however, that I would like to put in here.
- Improve your website’s load speed by delaying loading of heavy scripts (like chat widgets):
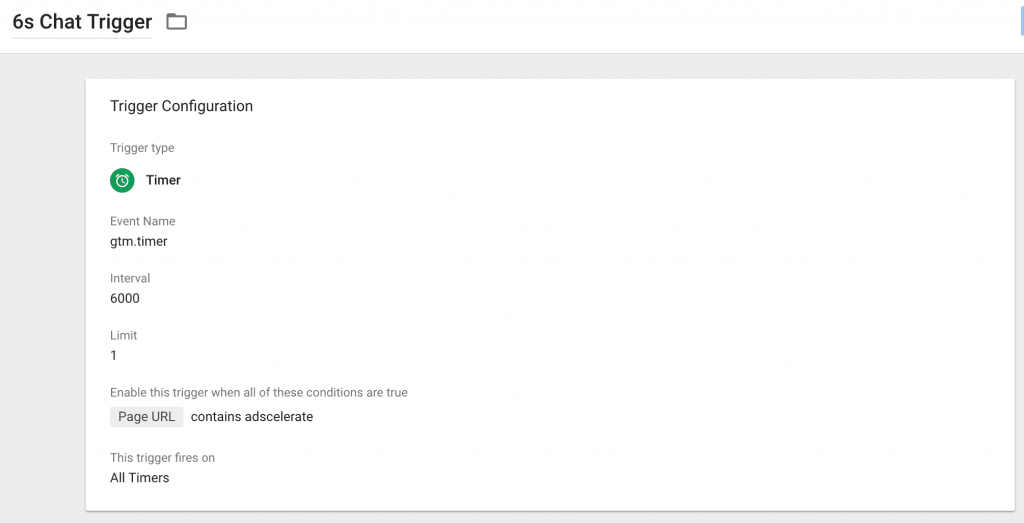
What this does, is that it delays the load of the script by 6 seconds. (It could be 10, 30 seconds, just change the setting as you deem fit.) My chat script increases the fully loaded time from 3 seconds to 14 seconds by the way, so chats are HEAVY performance hitters. If you are looking to optimize your website’s speed, you might want to try this. Credits: Brendan Tully
- Only pixel people that matter, so you only do retargeting that matters:
Same as the above, the original post from Justin brook that gave Brendan the idea to lazy load performance impacting scripts. You can delay your script by time (as above) by 10, 15, 30seconds – your choice.
You could also delay firing by scroll depth. Meaning, you could fire a pixel only if people scroll past a certain point of your content, eg, 50% of the page. That way, when you do retargeting on this pixel audience, you are spending ads money to only people that matters. Saving you money right there.
Missed anything or if you have questions, hit the comments below.
Still find it too overwhelming and need help integrating Google Tag Manager on your site? Drop us a message!
Do remember to share this post if it found that it helps you!